The New Complaints Process A Damage Claim, Start to Finish
Complaints now carry one line saying what has to happen next, and the app blocks a close that would leave a hole in the record. Here is a mirror-housing claim from first report to paid and closed, plus how to build your own intake forms.
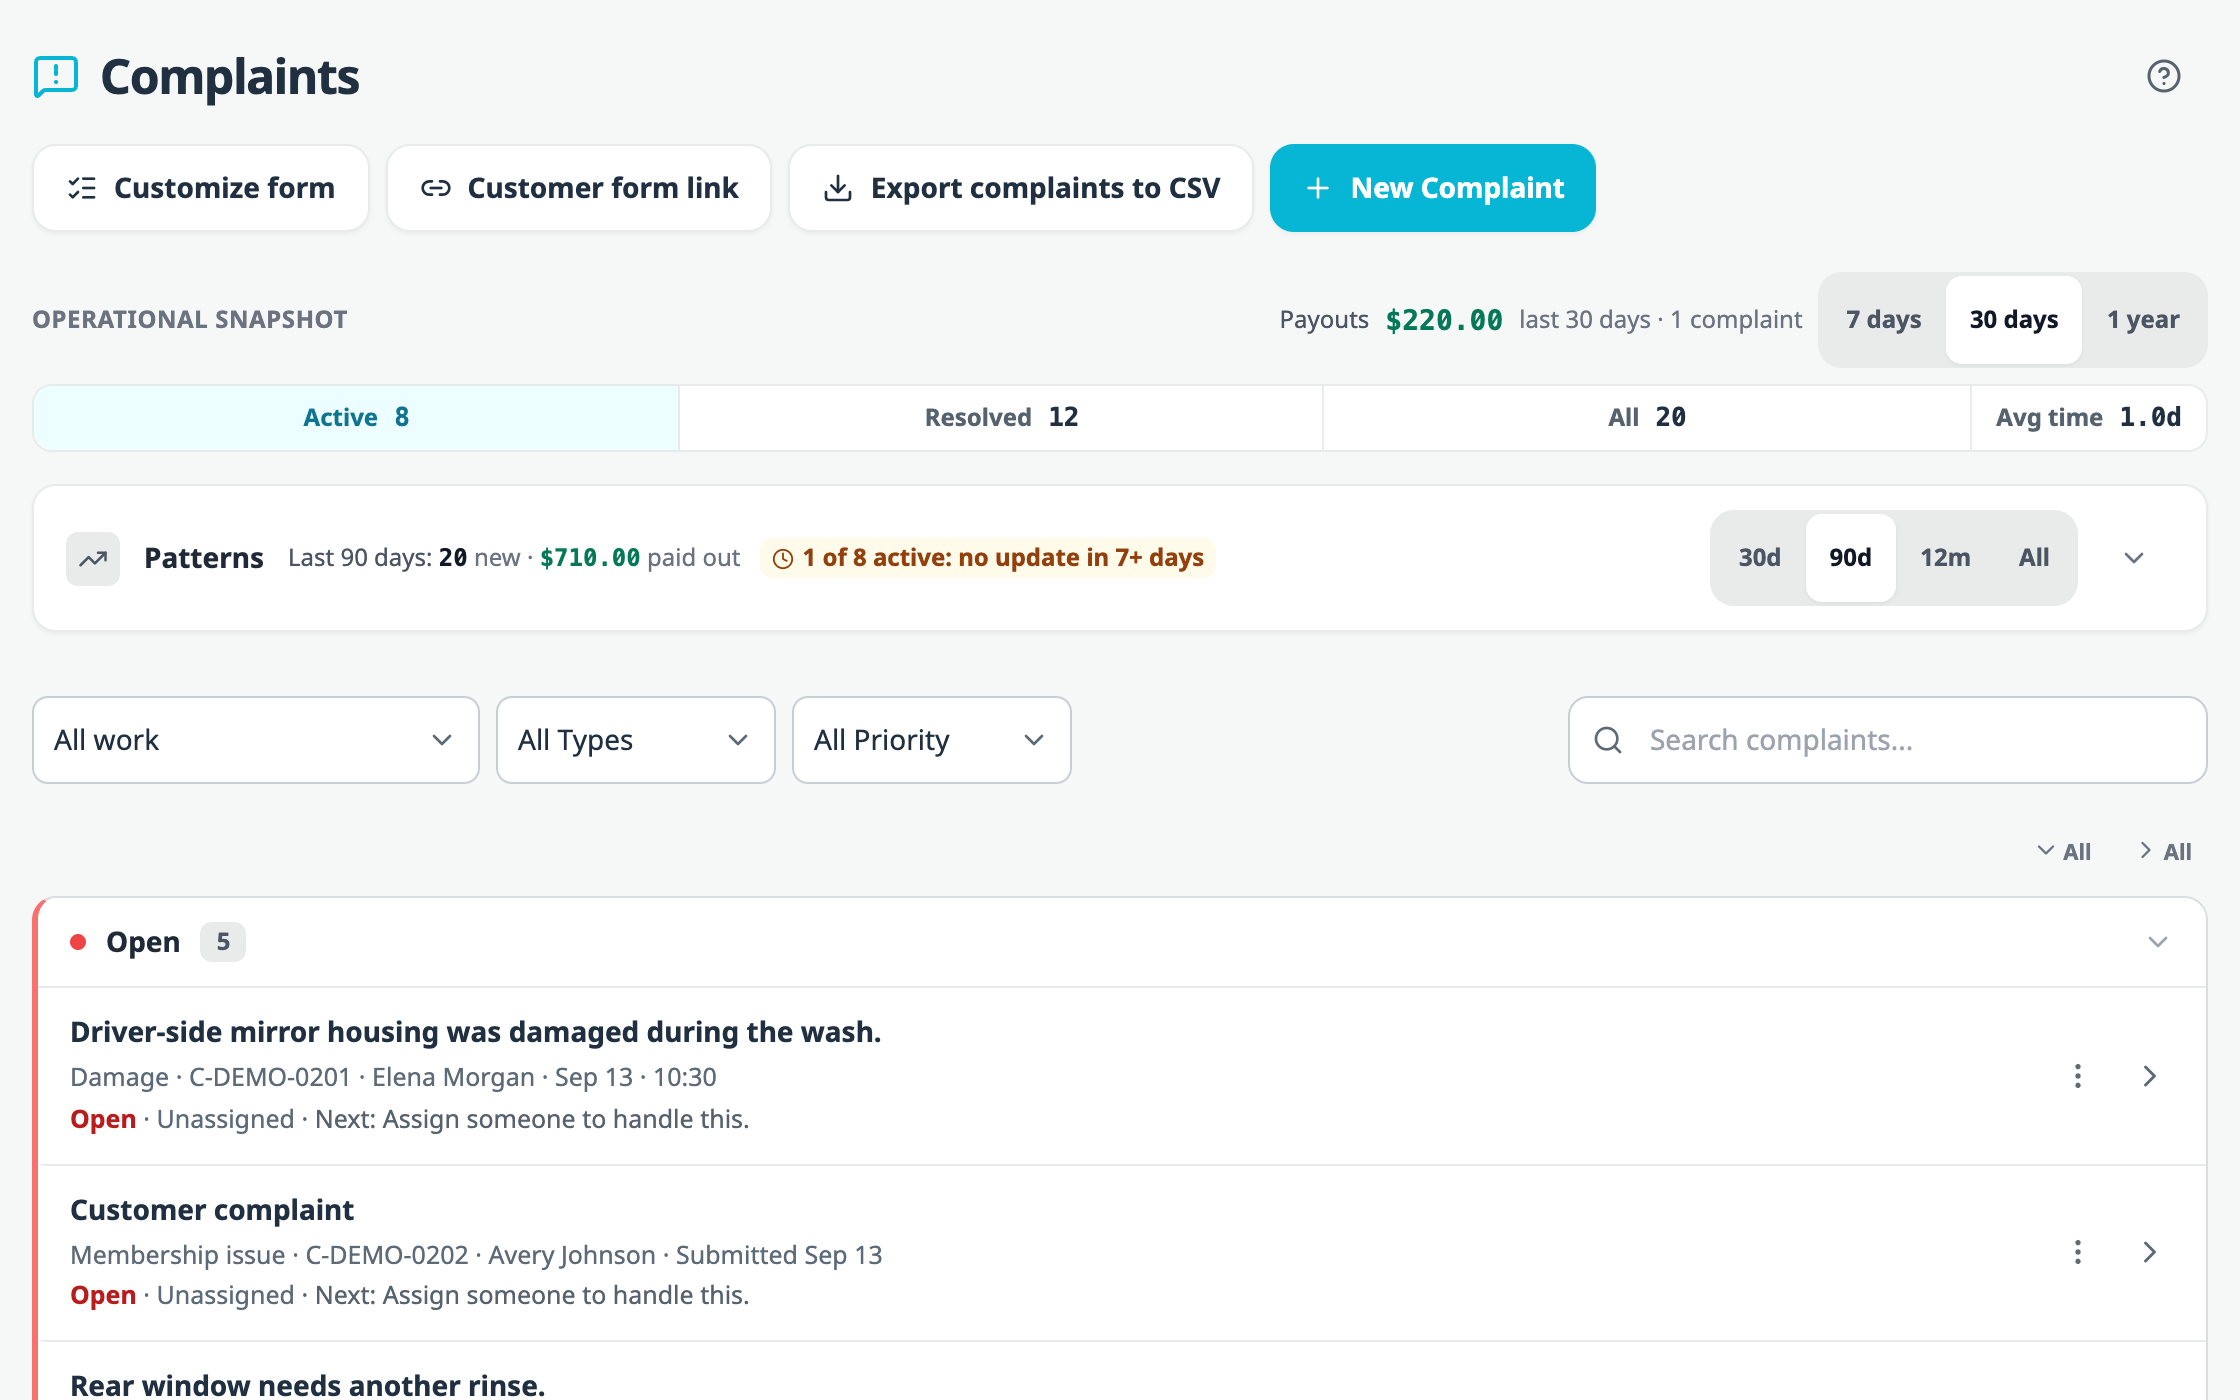
Three Weeks Later, Nobody Knows
A customer comes back with a cracked mirror housing. Somebody writes it down. Three weeks later she calls to ask where her money is, and whoever picks up the phone cannot say whether anyone pulled the footage, who decided the wash was at fault, or whether a check went out.
Writing the complaint down was never the part that failed. What failed was the stretch between the attendant who took the report, the manager who reviewed the camera, and whoever finally paid.
We rebuilt Complaints around that stretch. Every case now carries one line at the top naming what has to happen next, and the app will not let you close a case that still has a hole in it.
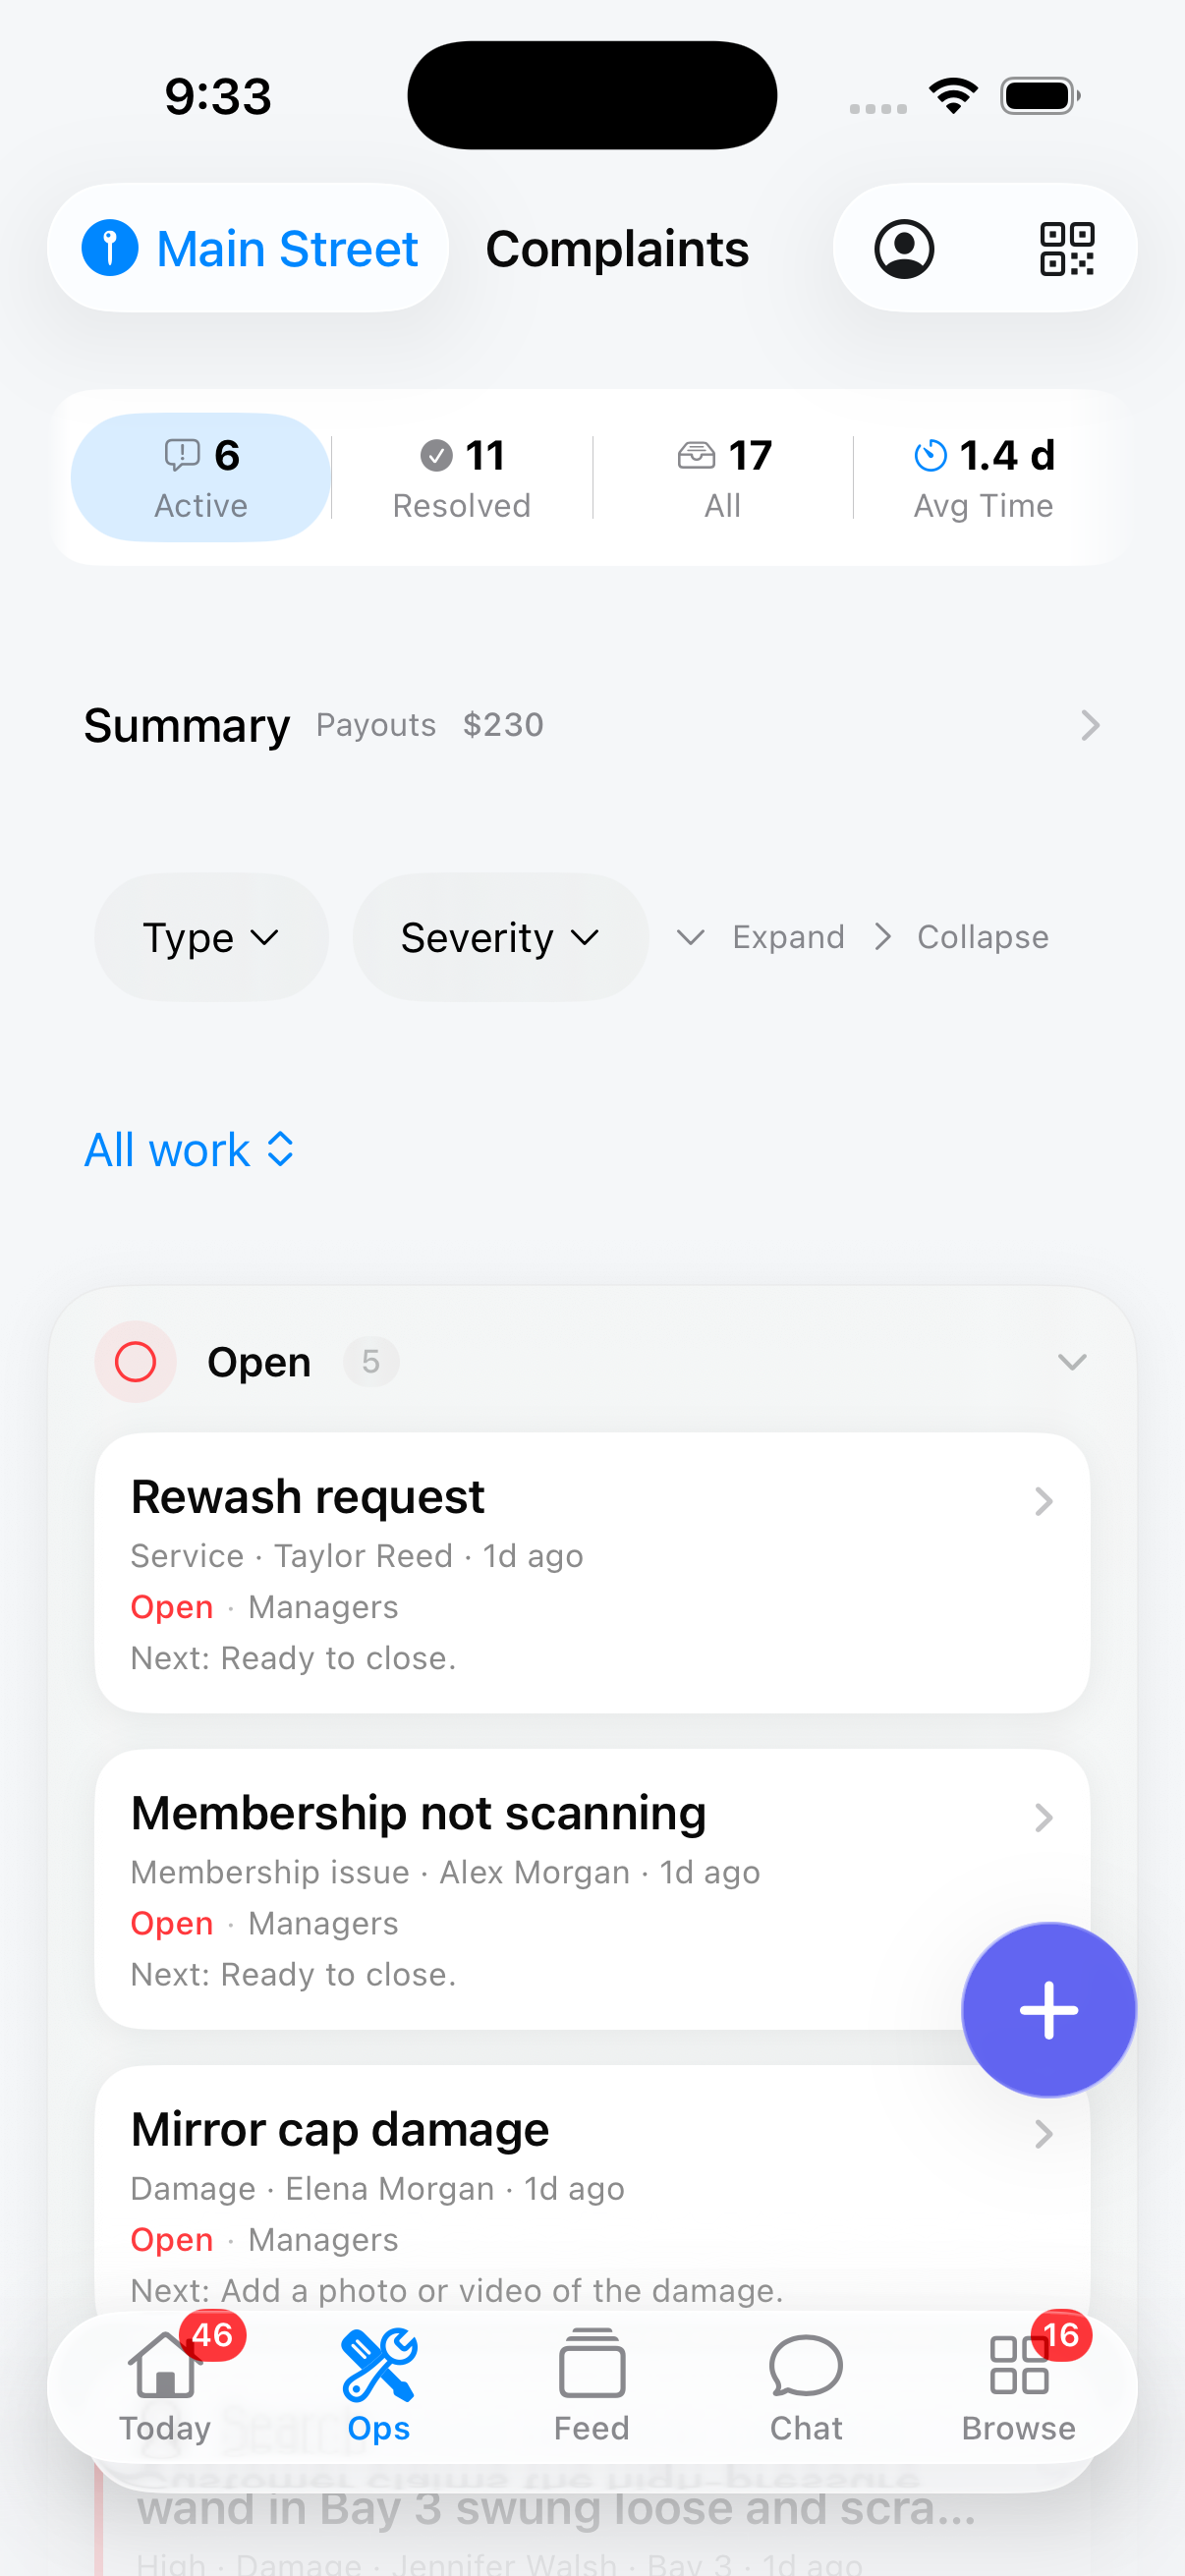
In the picture above, every row ends with a sentence: Next: Assign someone to handle this. Next: Ready to close. Nobody types those. They are worked out from the state of the case each time the screen draws, so there is no status field sitting there going stale while the case moves on underneath it.
What Changed
The third one is enforced on the server, where it always was. What is new is that the screen works out the same answer and shows it to you before you have typed an outcome, rather than after a save comes back rejected.
Logging the Complaint
Start by naming what happened. Nothing else is asked yet.
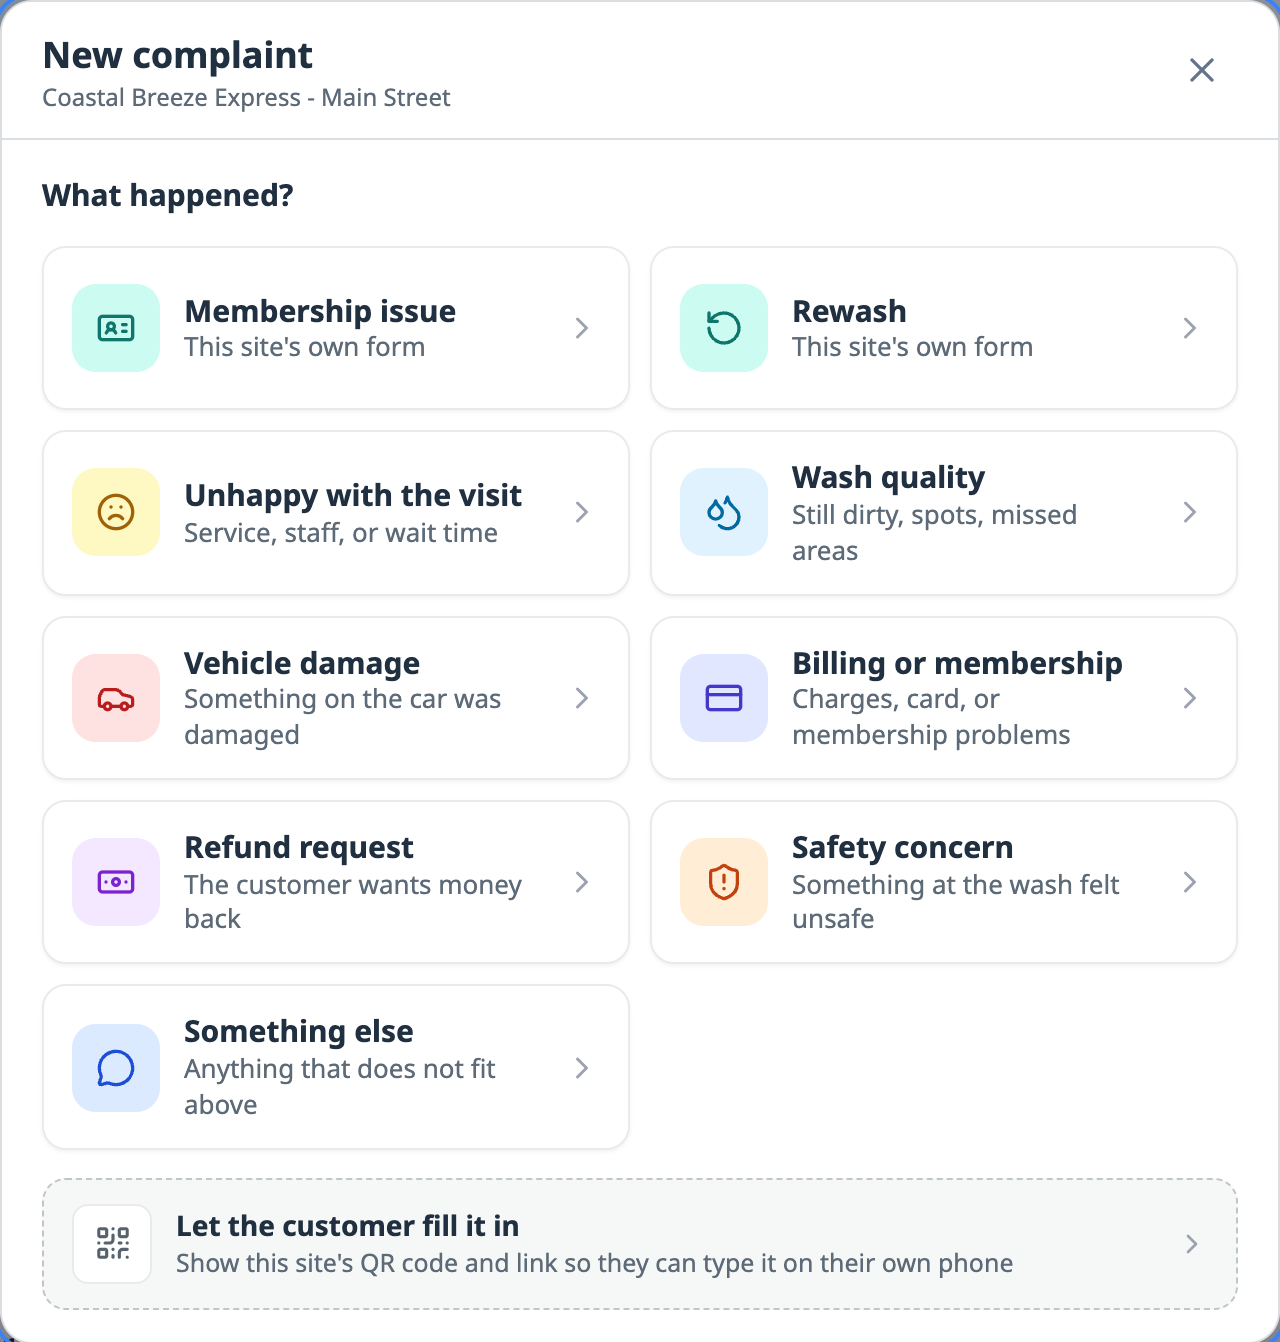
Membership issue and Rewash at the top of that list are forms this site built for itself. They sit with the built-in types rather than under a catch-all. The dashed panel at the bottom hands the job to the customer: show the QR code at the bay and she fills it in on her own phone, no app, no sign-in.
On a Phone, Damage Splits Into Three Steps
Damage asks for more than any other complaint type: what happened, when and where, the vehicle, the specific part, photos, and a customer. On an iPhone held in one hand in a wet bay that is a punishing scroll, so iOS breaks it into a short wizard.
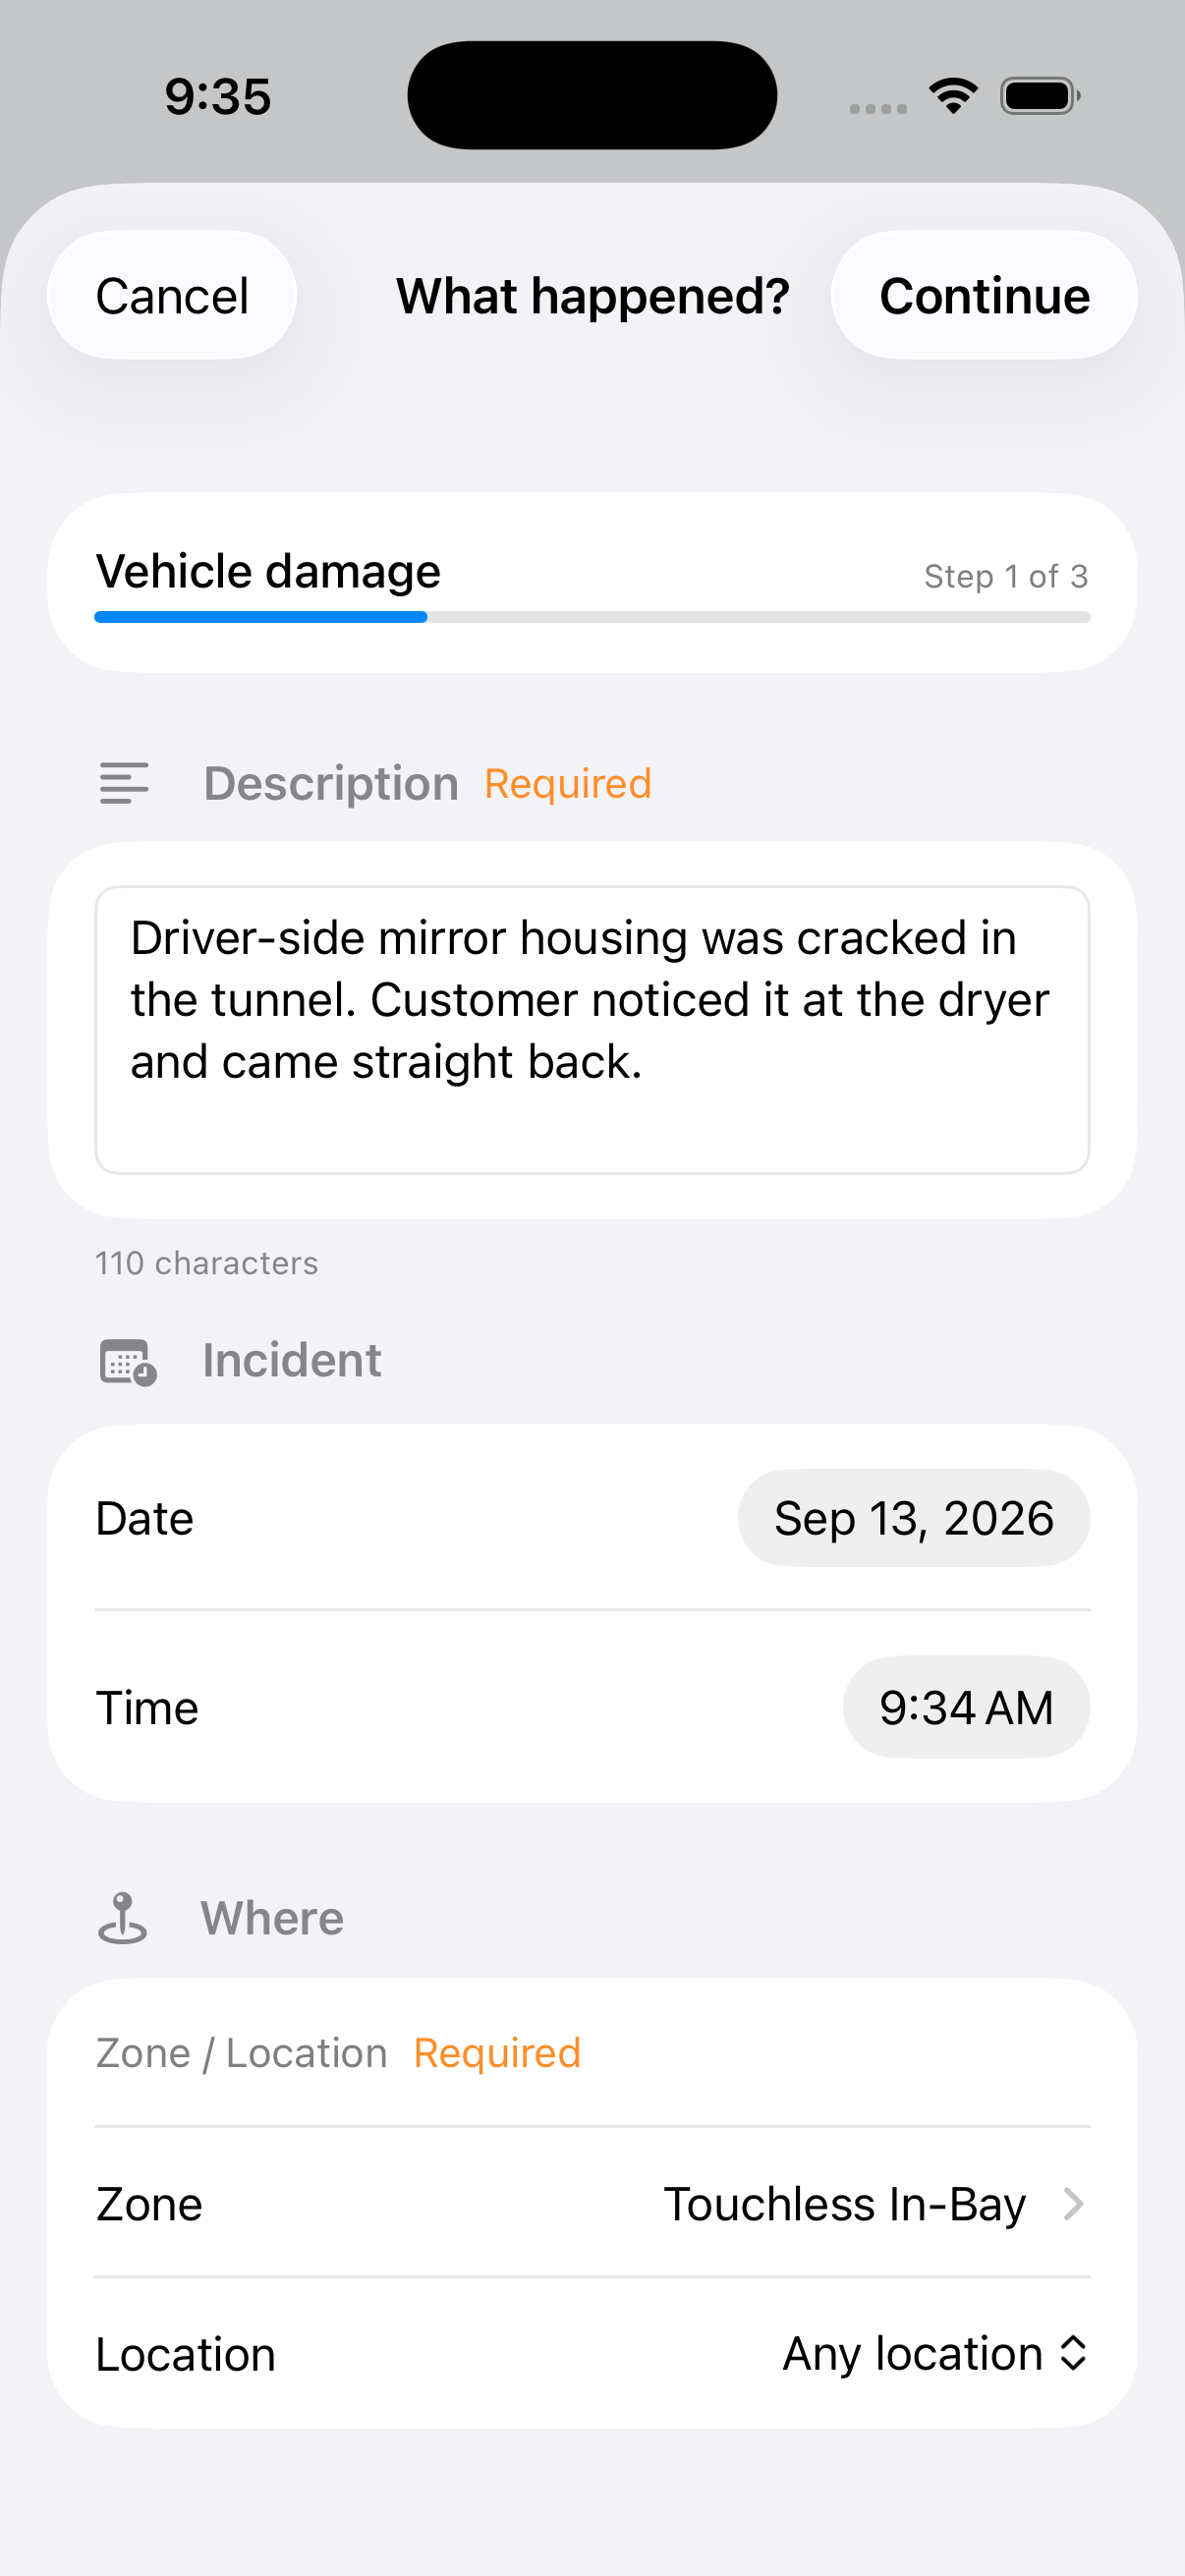
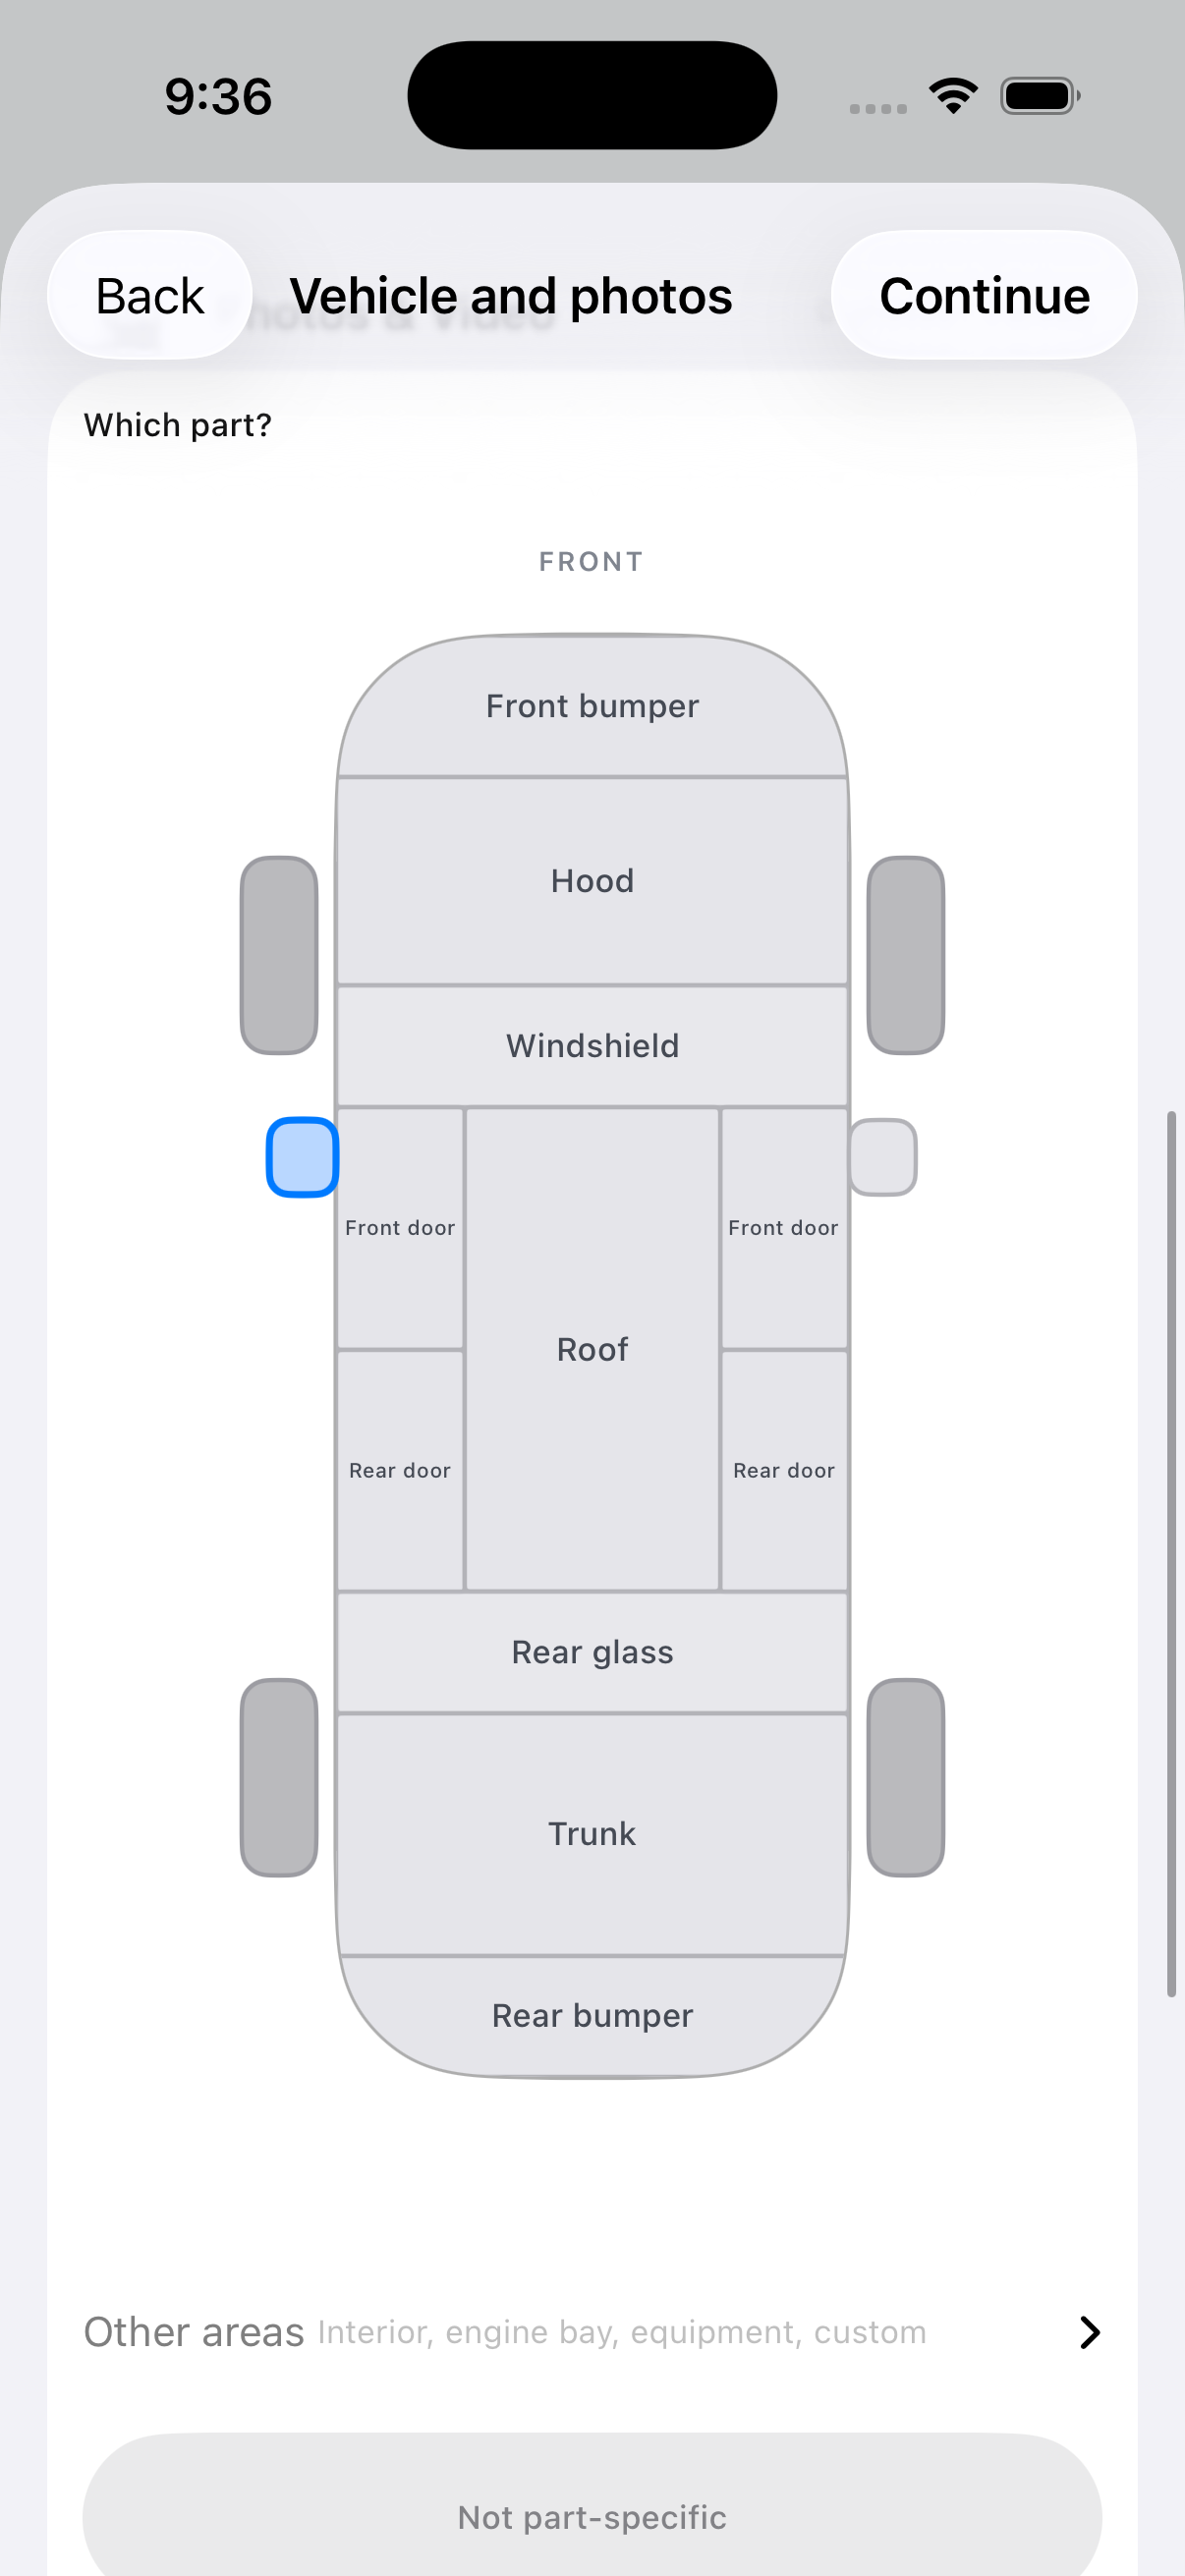
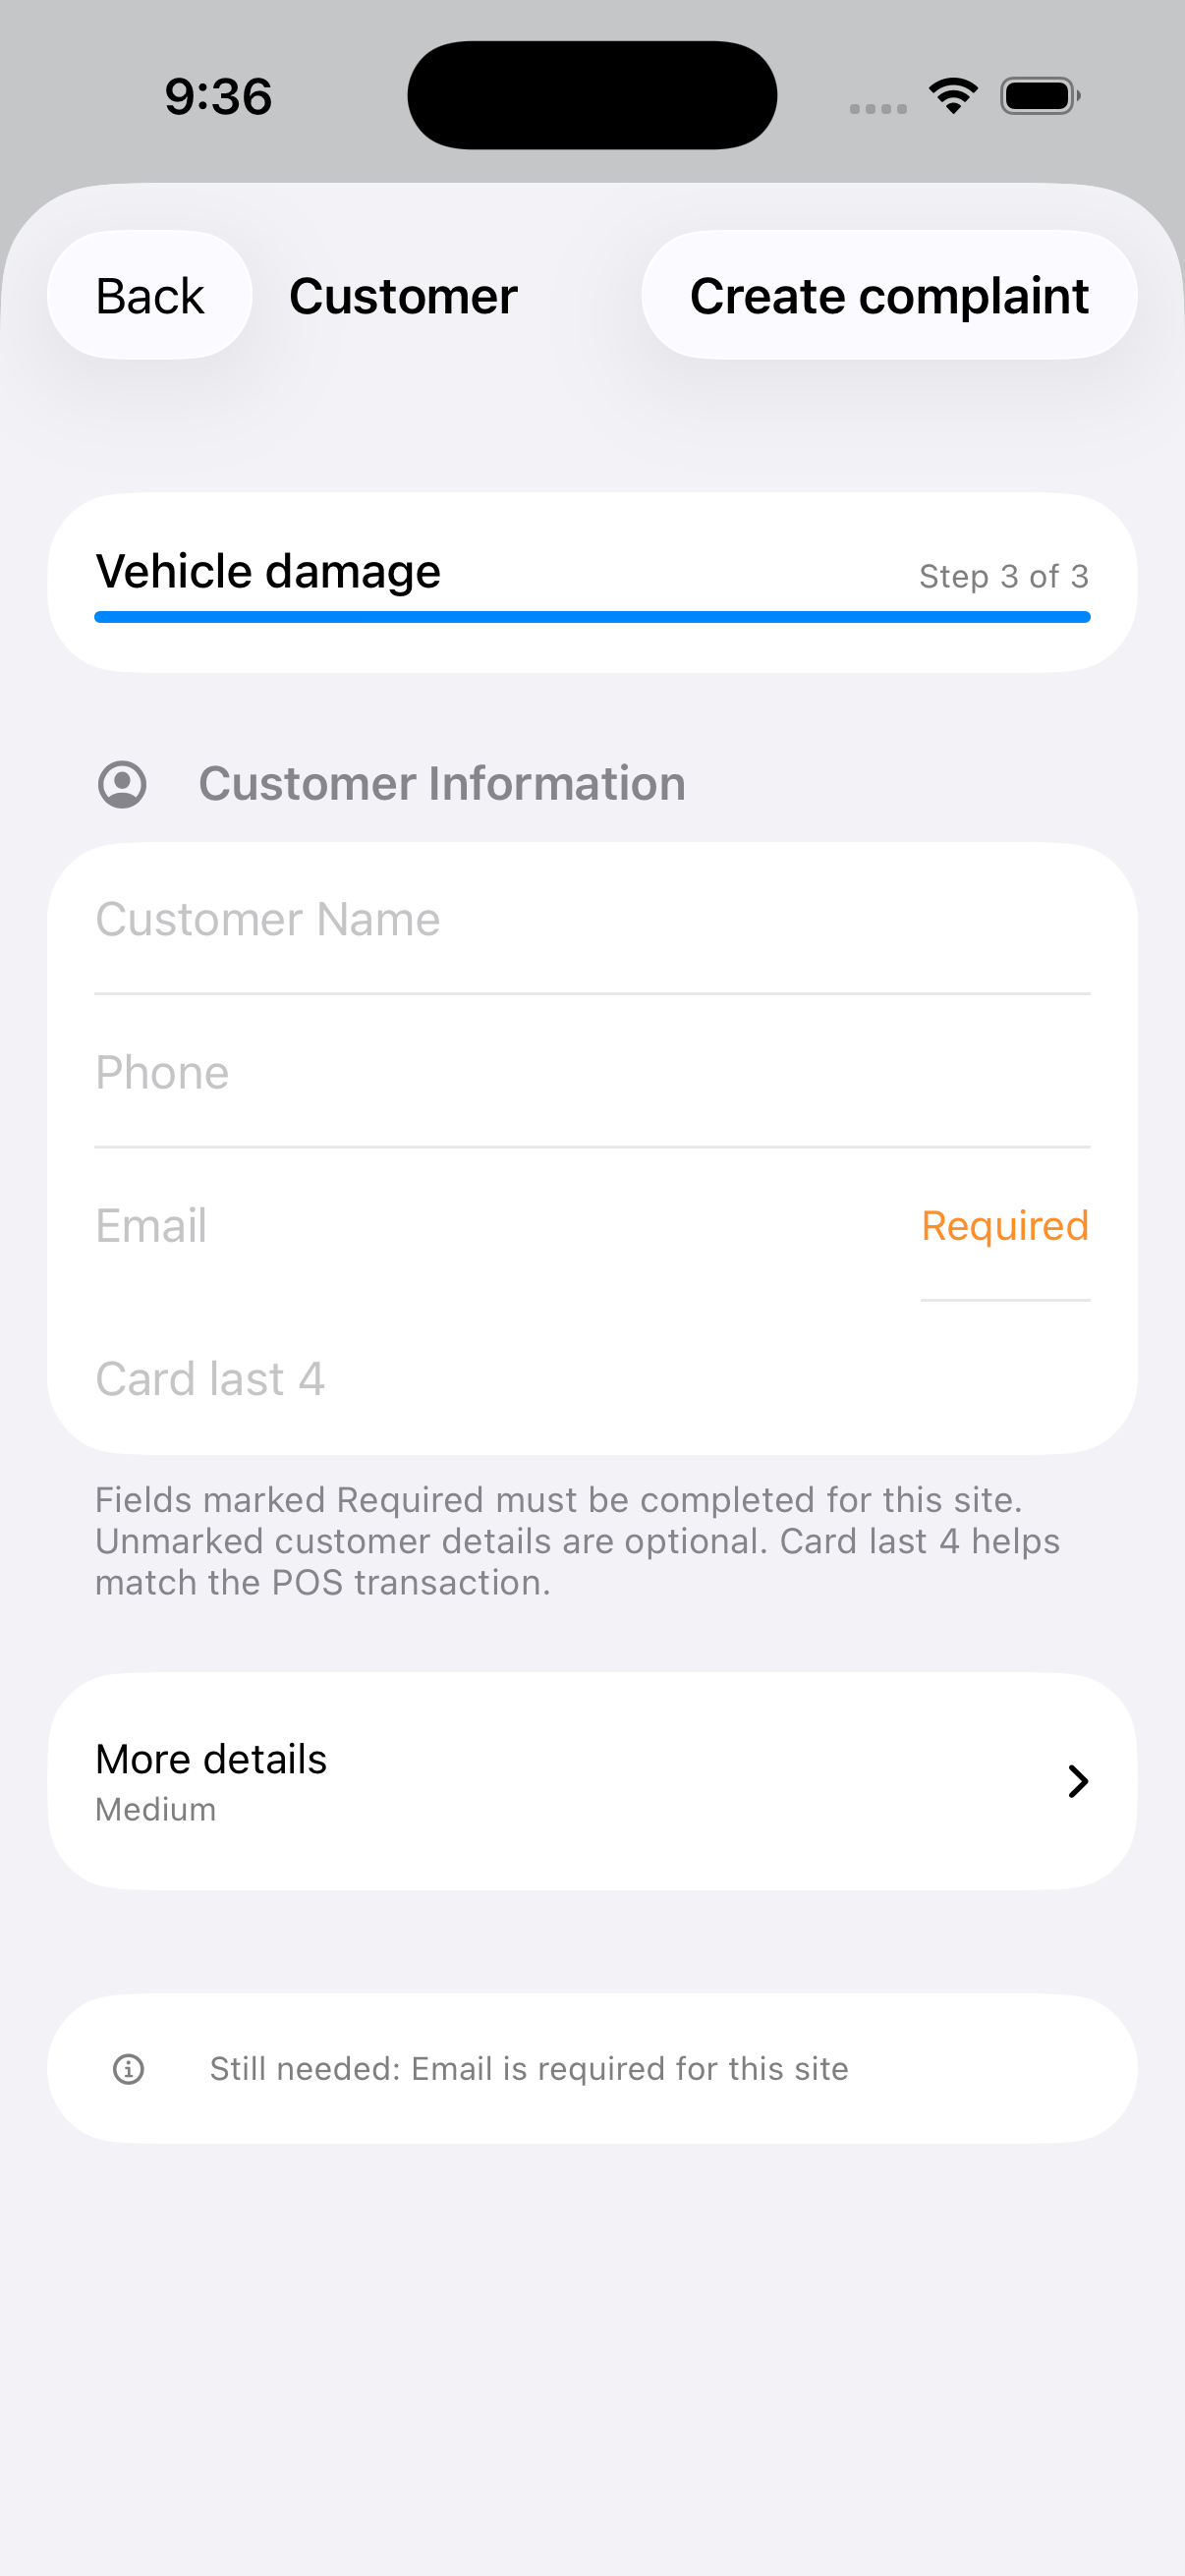
Continue never greys out. Tap it on an unfinished step and it lists what that step is missing and jumps to the first one, and the Still needed panel on step three keeps a running tally across the whole wizard. Because photos are filed against the part you tapped, they are still useful six weeks later when an adjuster wants to know which mirror.
A Damage Claim, Start to Finish
Elena Morgan reports that the driver-side mirror housing was damaged during the wash and says she will send a repair estimate. Here is the whole claim.
Step 1: Give It an Owner
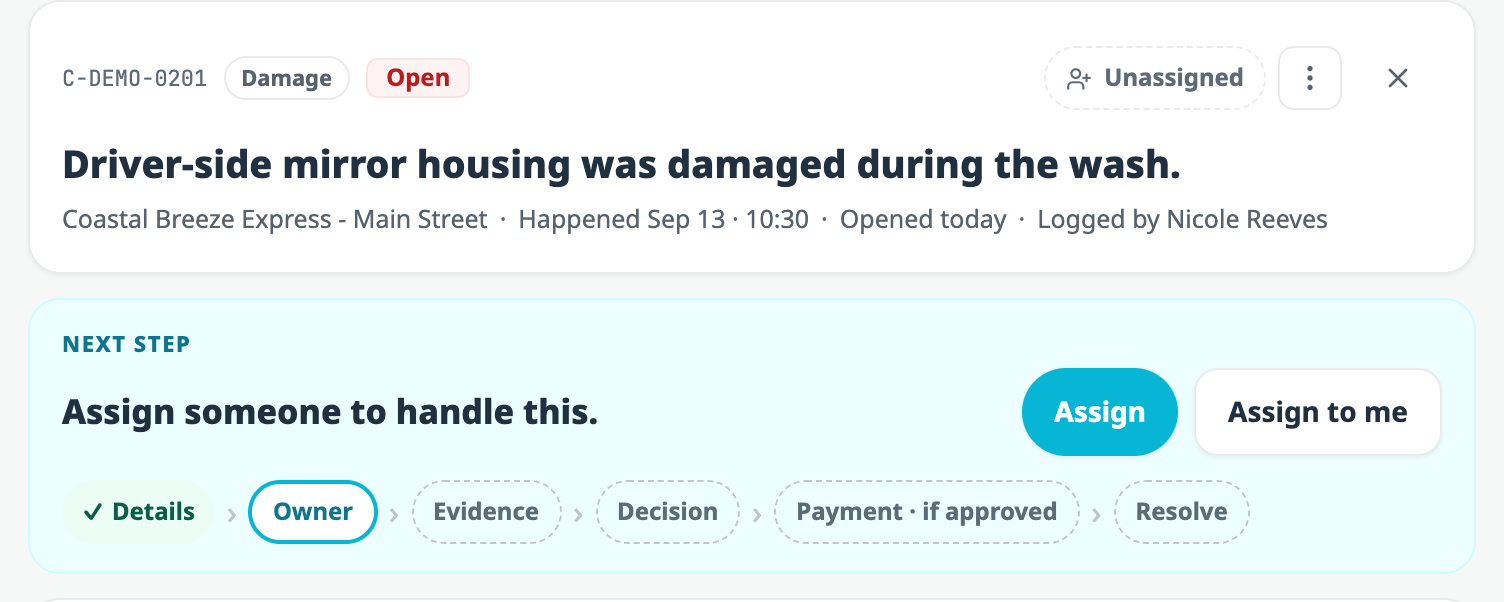
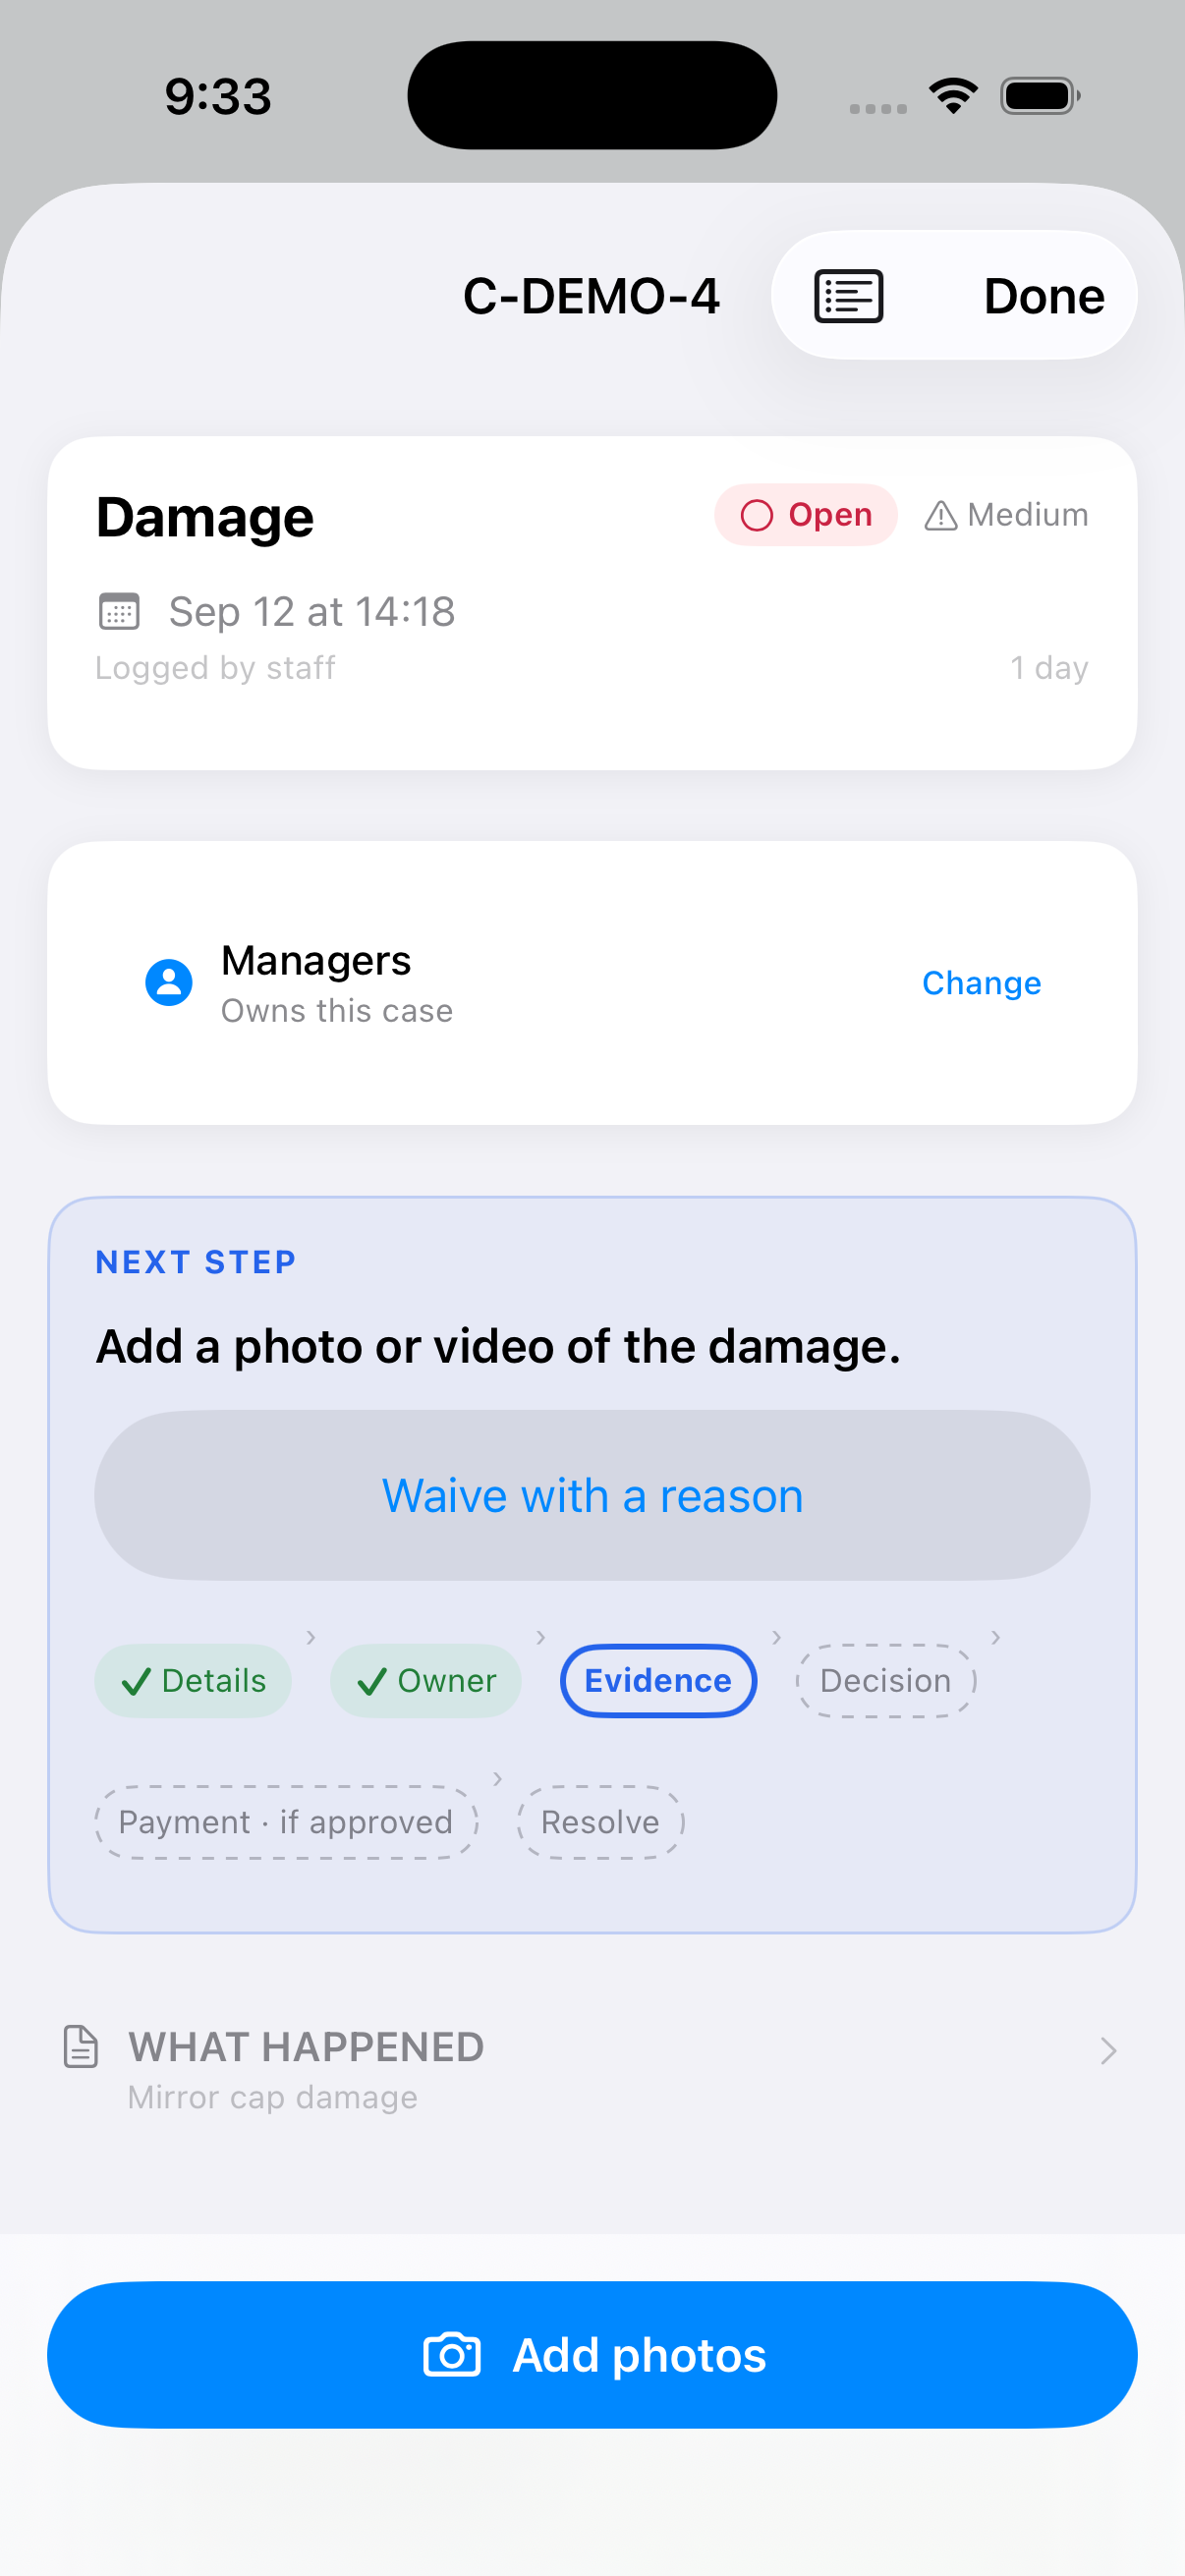
Details is ticked because the intake form collected it. The case wants an owner, so that is all it asks for. Payment reads if approved, since plenty of claims close without money changing hands.
Step 2: Gather the Proof
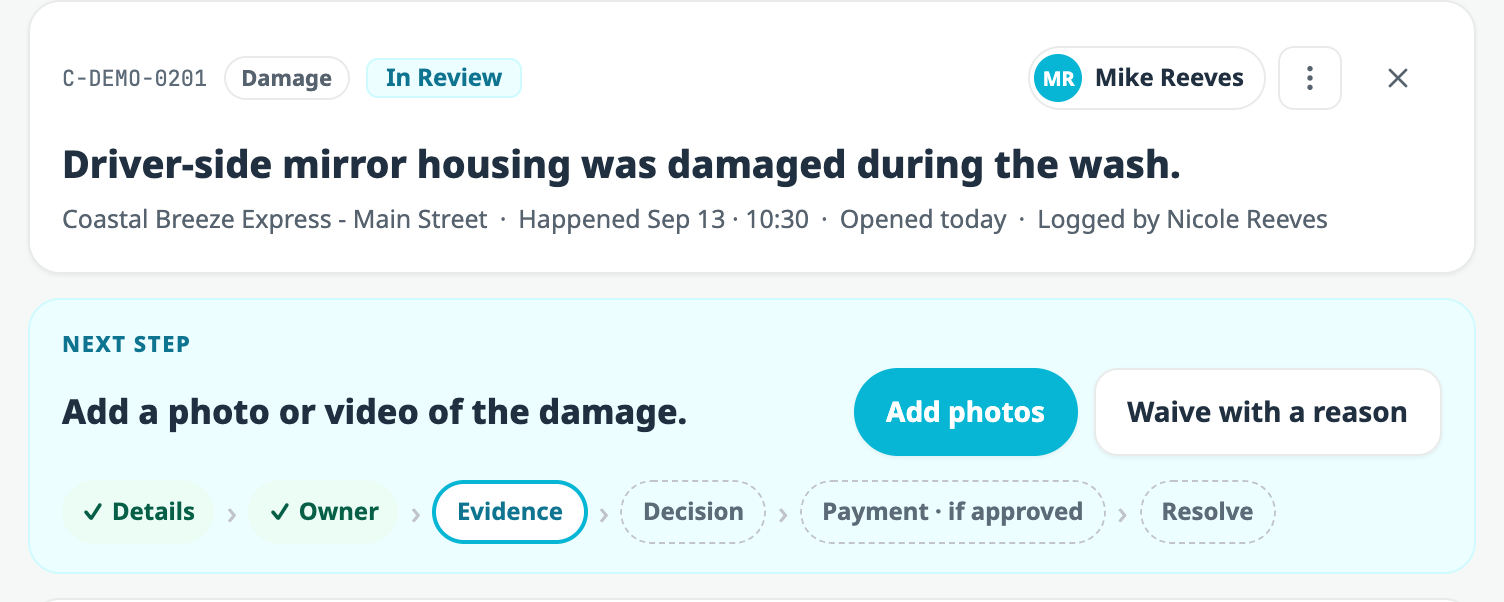
The evidence list reshapes itself as the claim develops. Damage photos are required unless you decide the wash was not responsible. A repair estimate becomes required once you approve money for a repair. A rental receipt becomes required only if rental money was actually paid out. That keeps the list short enough that people read it.
Step 3: Record the Decision and the Money
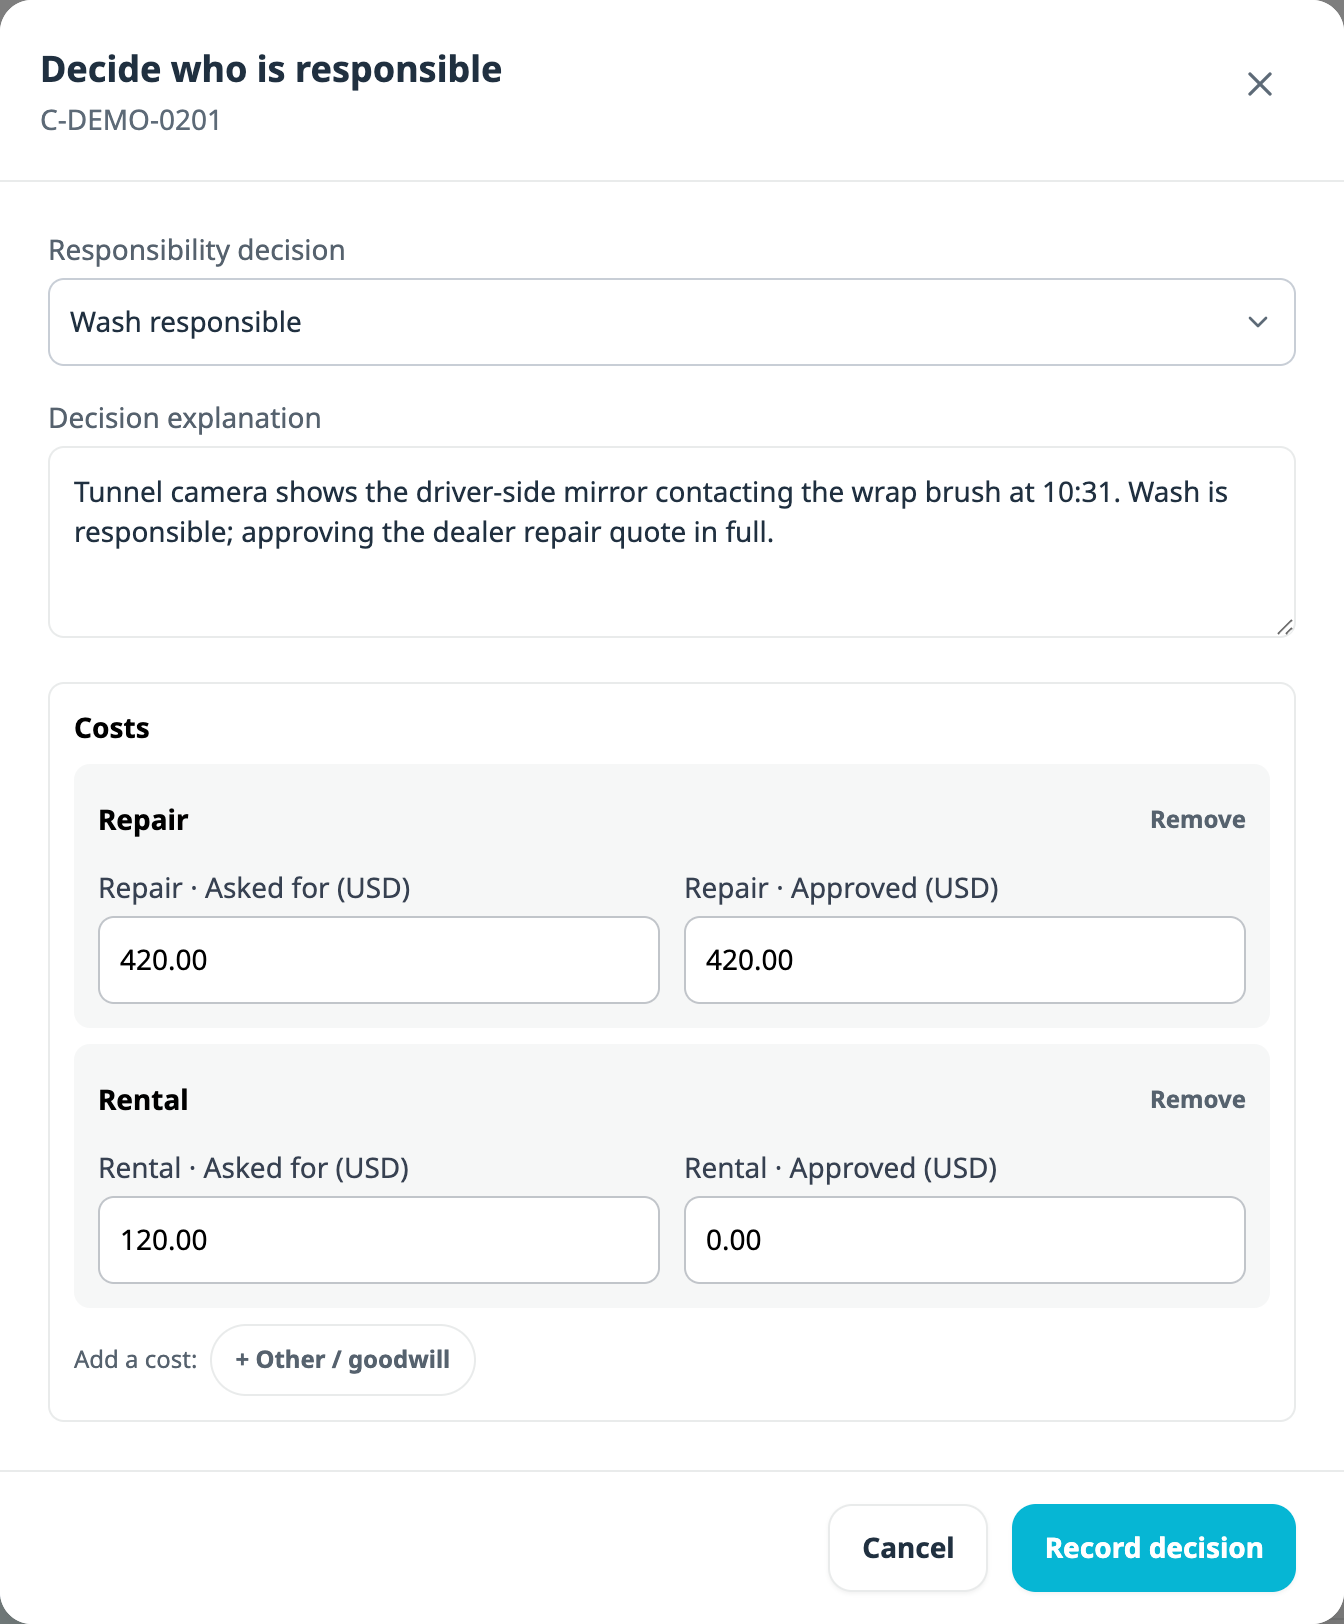
The responsibility dropdown starts empty and will not let you leave it that way. Its help text explains why: "Not assessed" is where a case starts, not an answer.
What the customer asked for and what you approved are stored as separate figures. A 3,500 dollar spoiler claim you settle at 420 dollars keeps both numbers, so a year of claims totals up two ways: what was demanded of you, and what it actually cost.
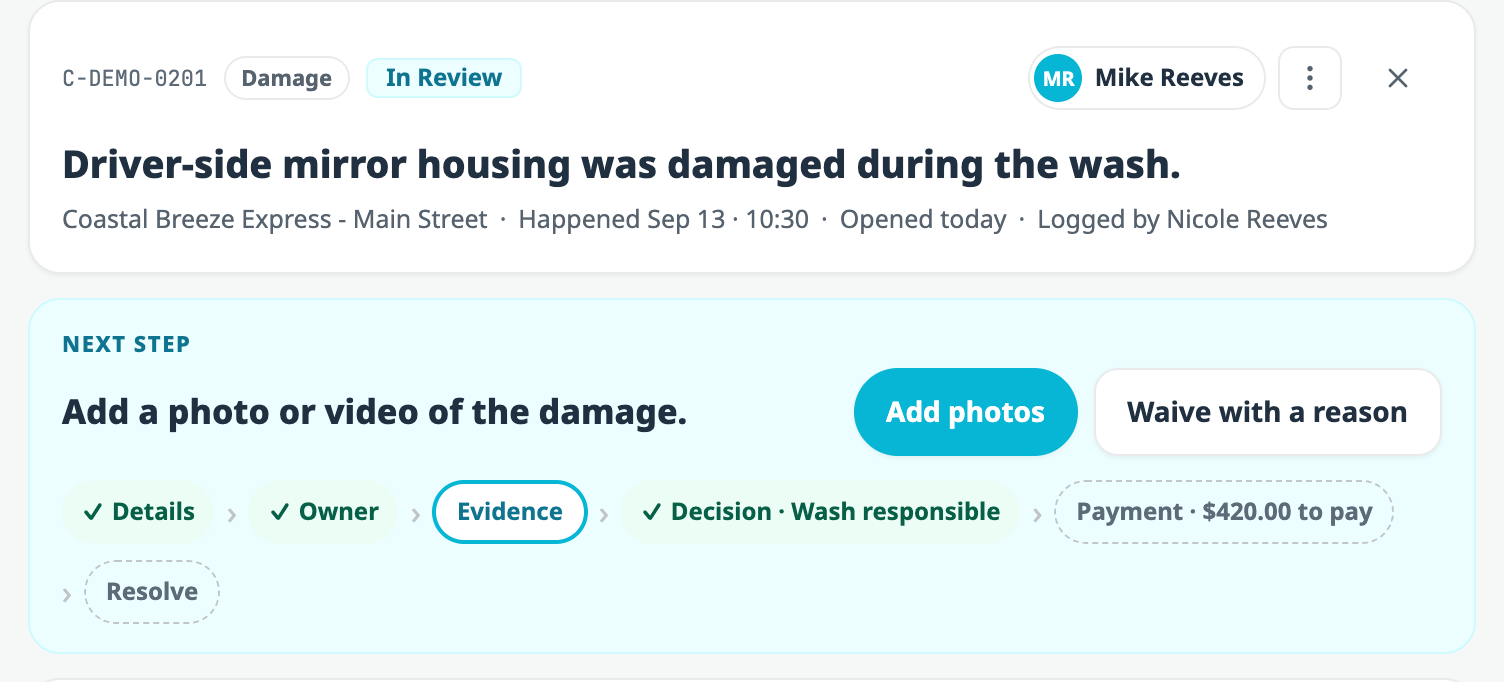
The path chips now carry the decision and the outstanding balance, while the next step still asks for the photo. The chips summarise the case; the step names one action. Keeping those separate is what stops the screen turning into a wall.
Step 4: Try to Close It Early
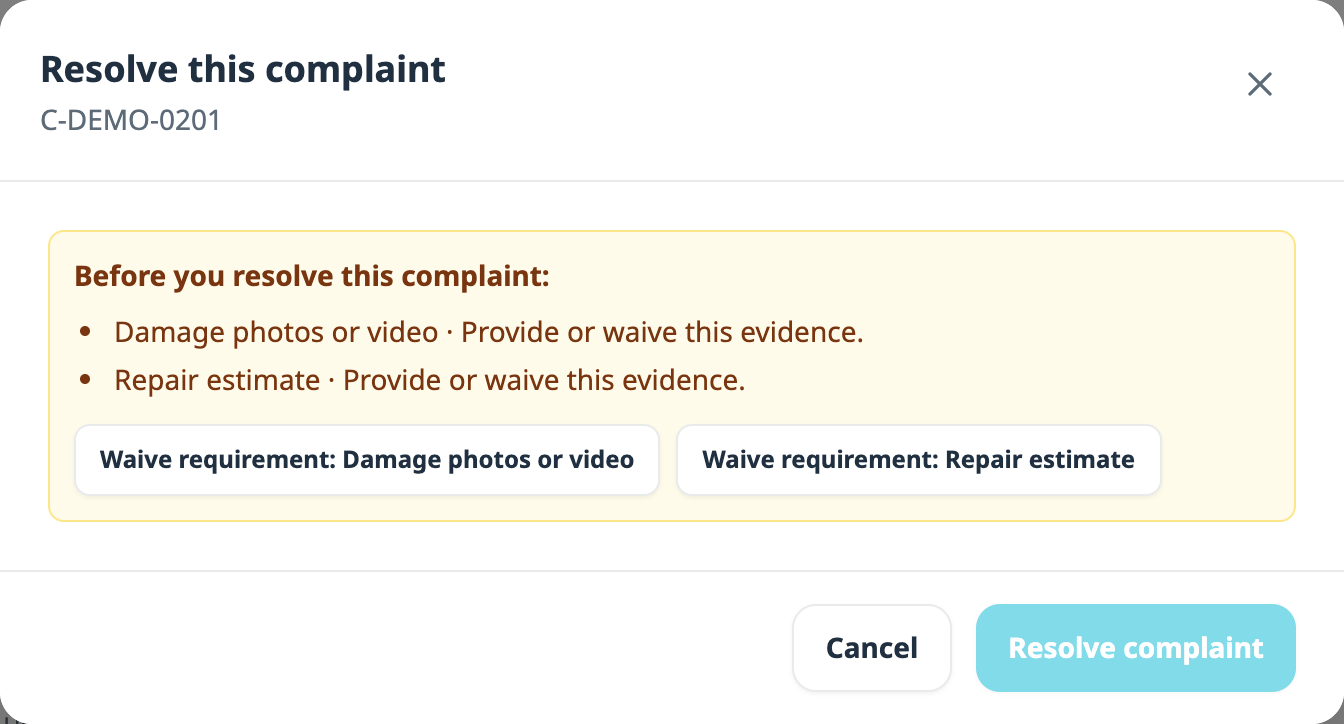
Repair estimate is on that list only because 420 dollars was approved for a repair a step earlier. No setting controls it. Approve repair money and the estimate becomes required; rule the wash not responsible and the photo requirement falls away.
When a customer simply never sends the photo, you are not stuck with an open case forever. Waive the requirement and record why.
Step 5: Pay What You Approved
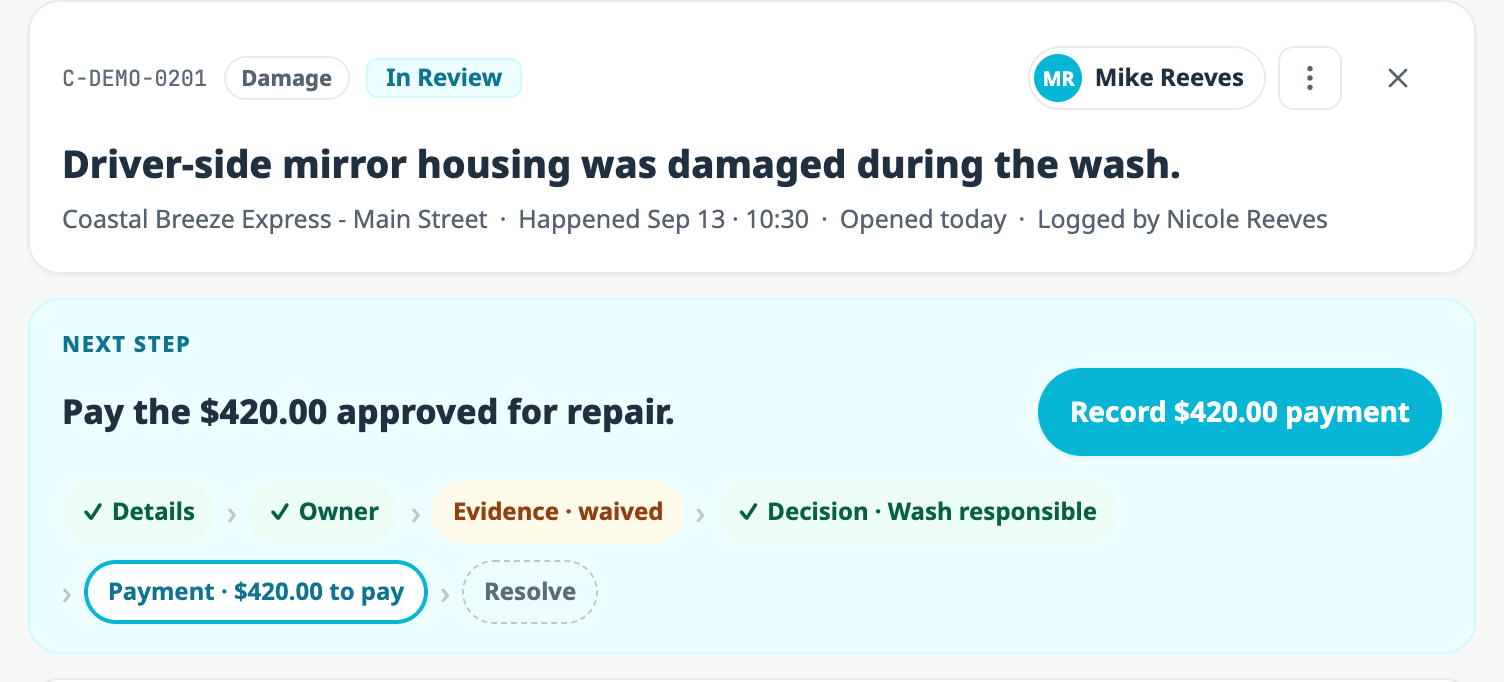
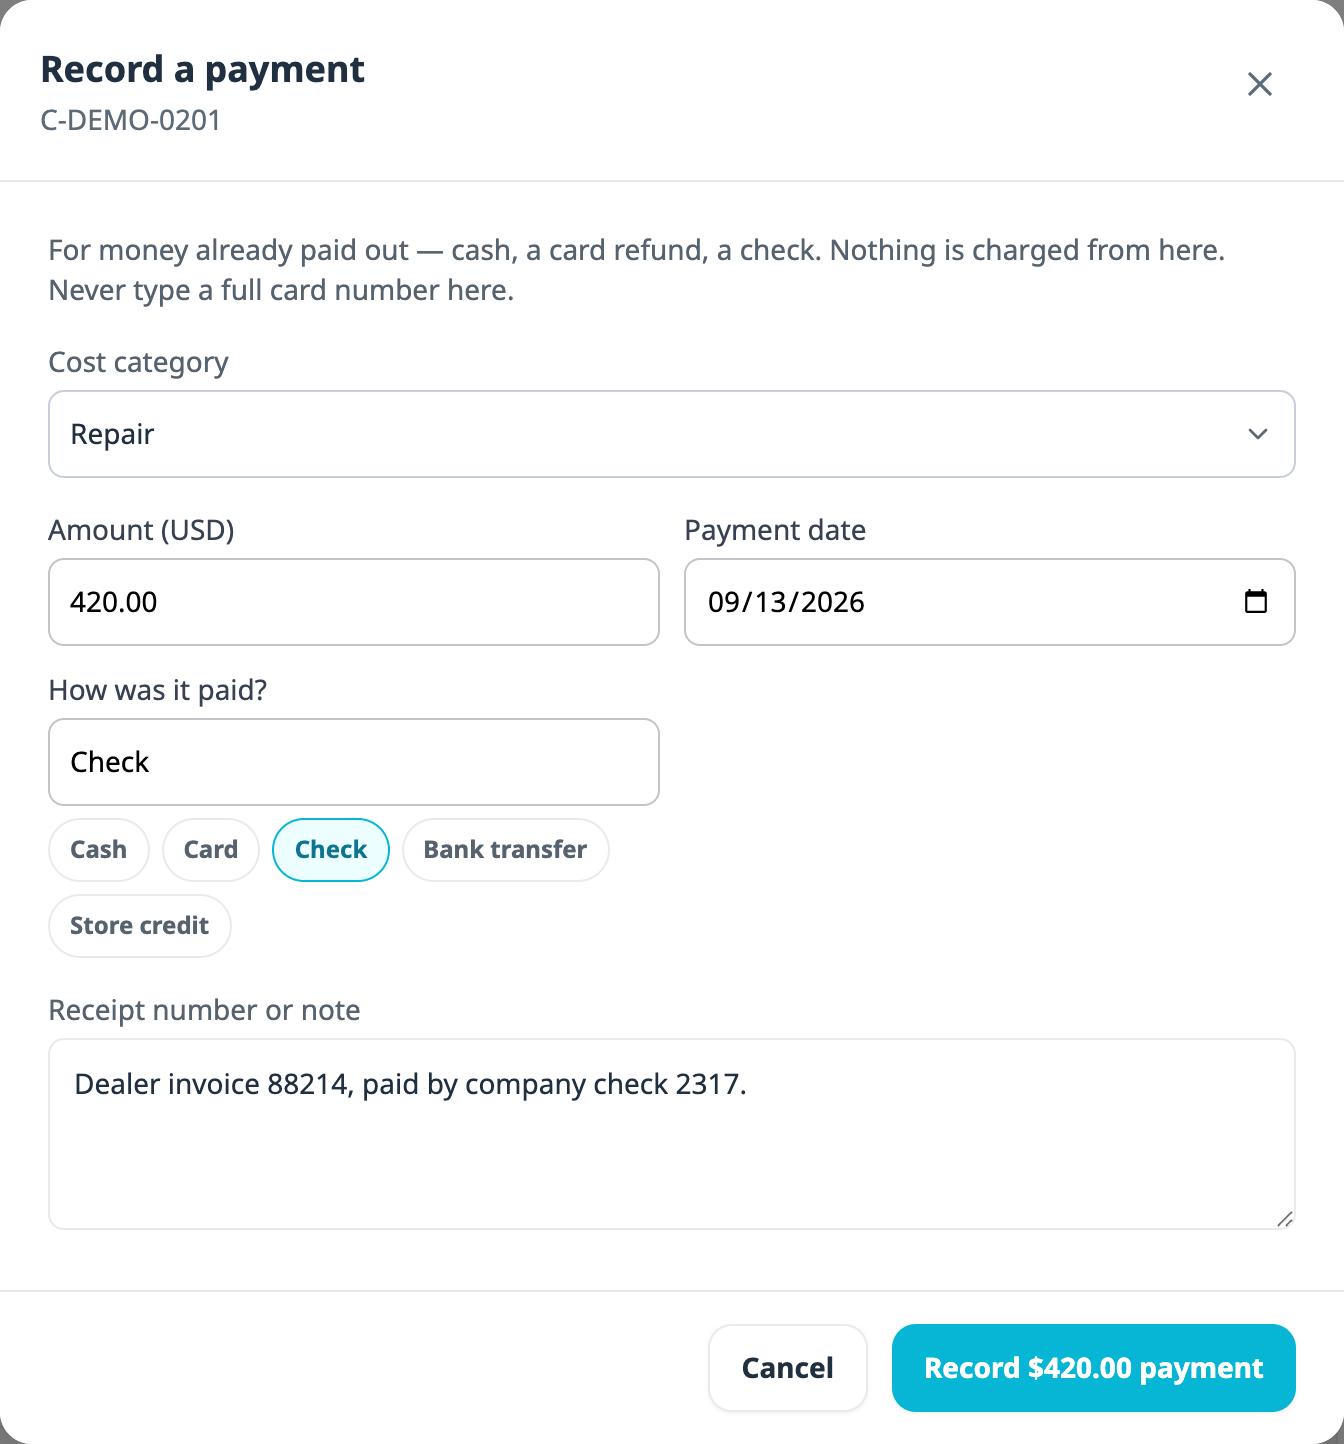
The dialog says so at the top: Nothing is charged from here. Never type a full card number here. You paid the money somewhere else, by check or card refund or cash, and this is the record of it. WashConsole staying out of the money movement is why the record can be blunt about what was actually paid.
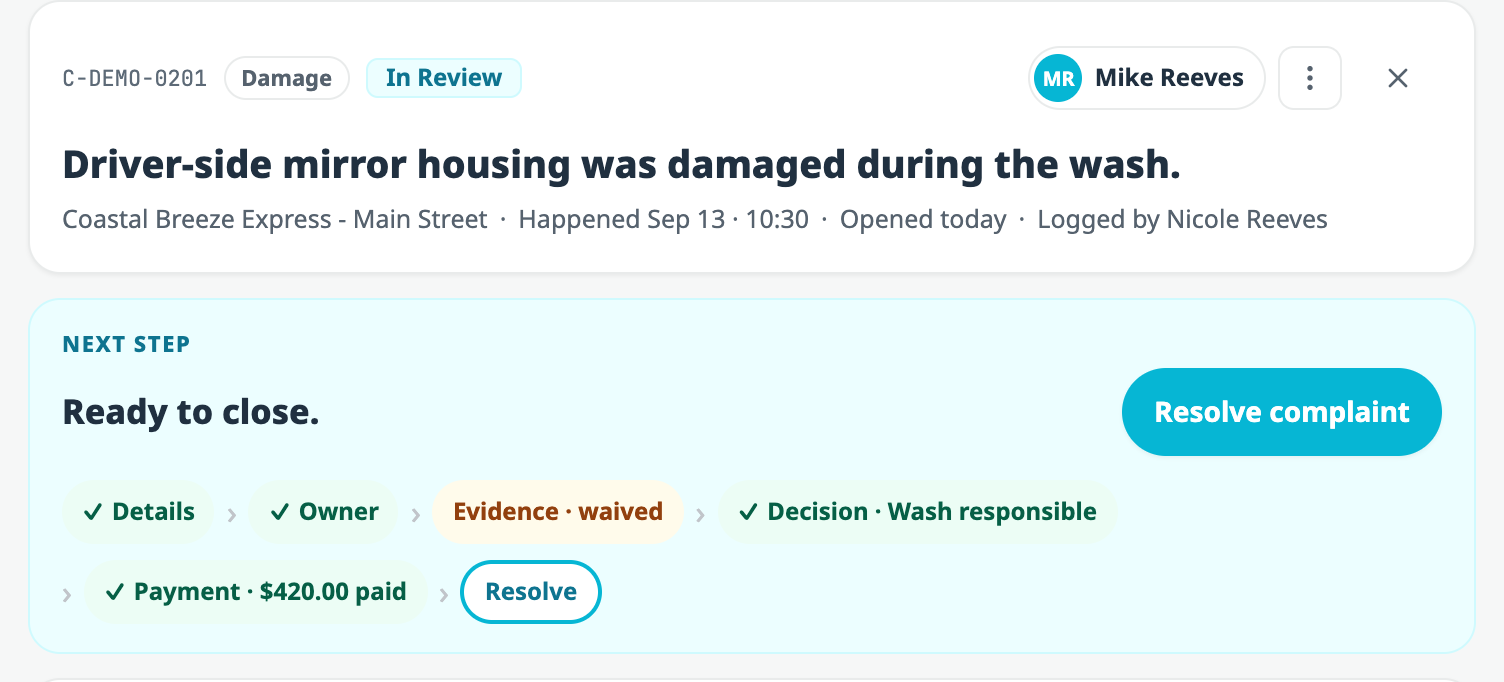
Step 6: Close It Out
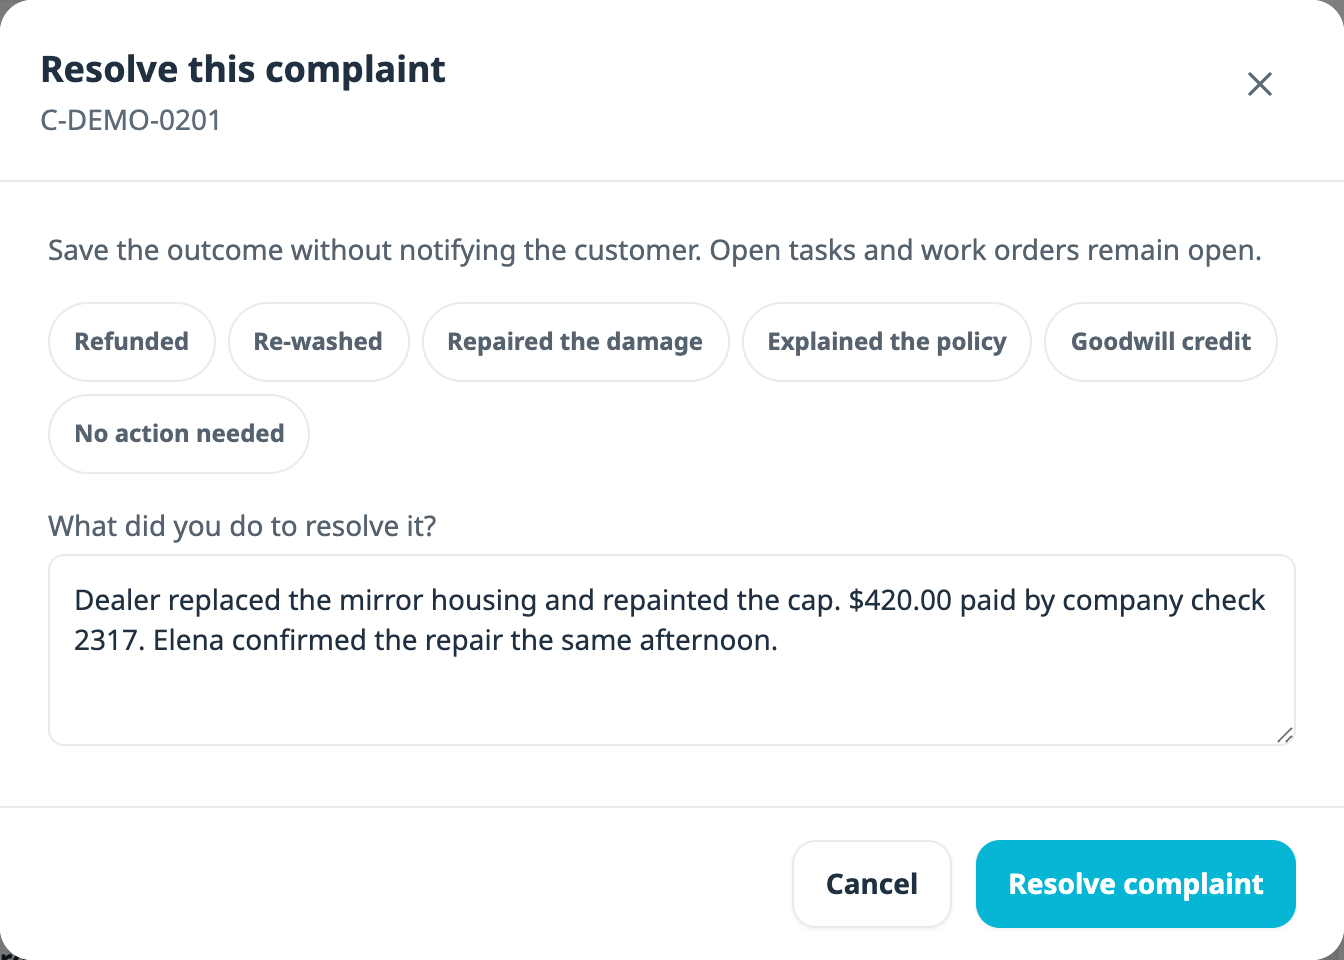
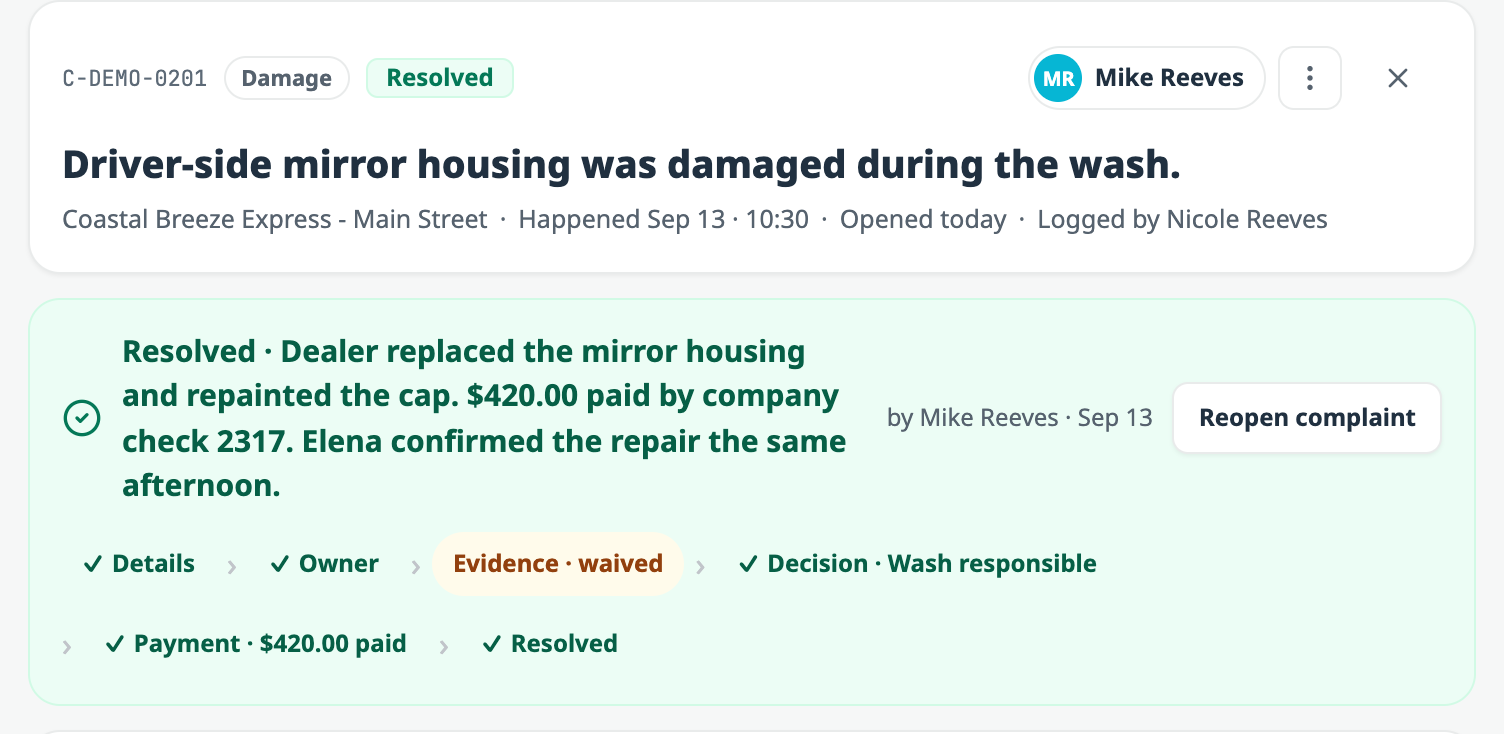
On the closed case, five steps are ticked green and Evidence · waived sits in amber. Waiving something never promotes it to satisfied. Six months from now the record still shows that the photograph never arrived, the evidence list underneath still carries the reason and the name of whoever waived it, and the printable Claim Summary lists it under Skipped.
Six steps, each one named by the app at the moment it became the thing to do.
Build Your Own Complaint Forms
The built-in types cover vehicle damage, wash quality, billing, refunds and safety. They will not cover the thing your wash deals with every week that nobody else does.
Open Customize form on the Complaints page and switch to Custom forms.
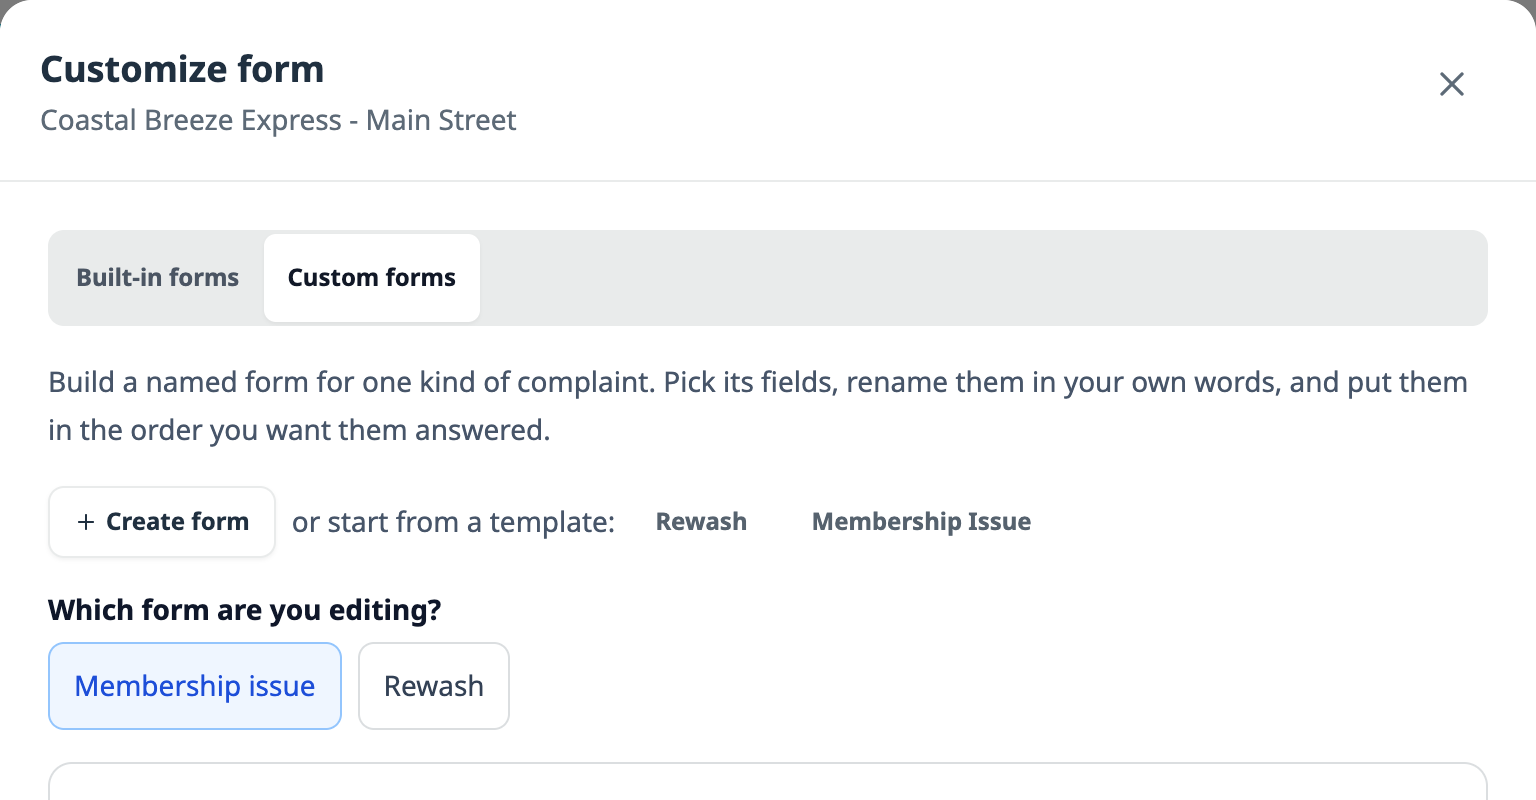
Name the form first, because that name is what staff pick when they start a complaint. Then set Handle as, which decides how much process the case gets and is the easiest thing on the screen to skim past.
| Handle as | What the case asks for | Use it for |
|---|---|---|
| Standard complaint | An owner, then an outcome note | Rewashes, lost items, service issues, anything with no money attached |
| Refund | A decision and the refund amount, then proof of payment | Double charges, membership billing disputes, goodwill credits |
| Damage | A decision, the evidence checklist, approved costs, then payment | Anything where the wash may be liable for a repair |
A Lost item form handled as a standard complaint skips the evidence checklist, because there is no liability question to answer. A wheel damage form handled as Damage gets the full claim process above, with your wording on the questions.
Then pick the fields, put them in the order you want them answered, and rename them to match how your customers talk.
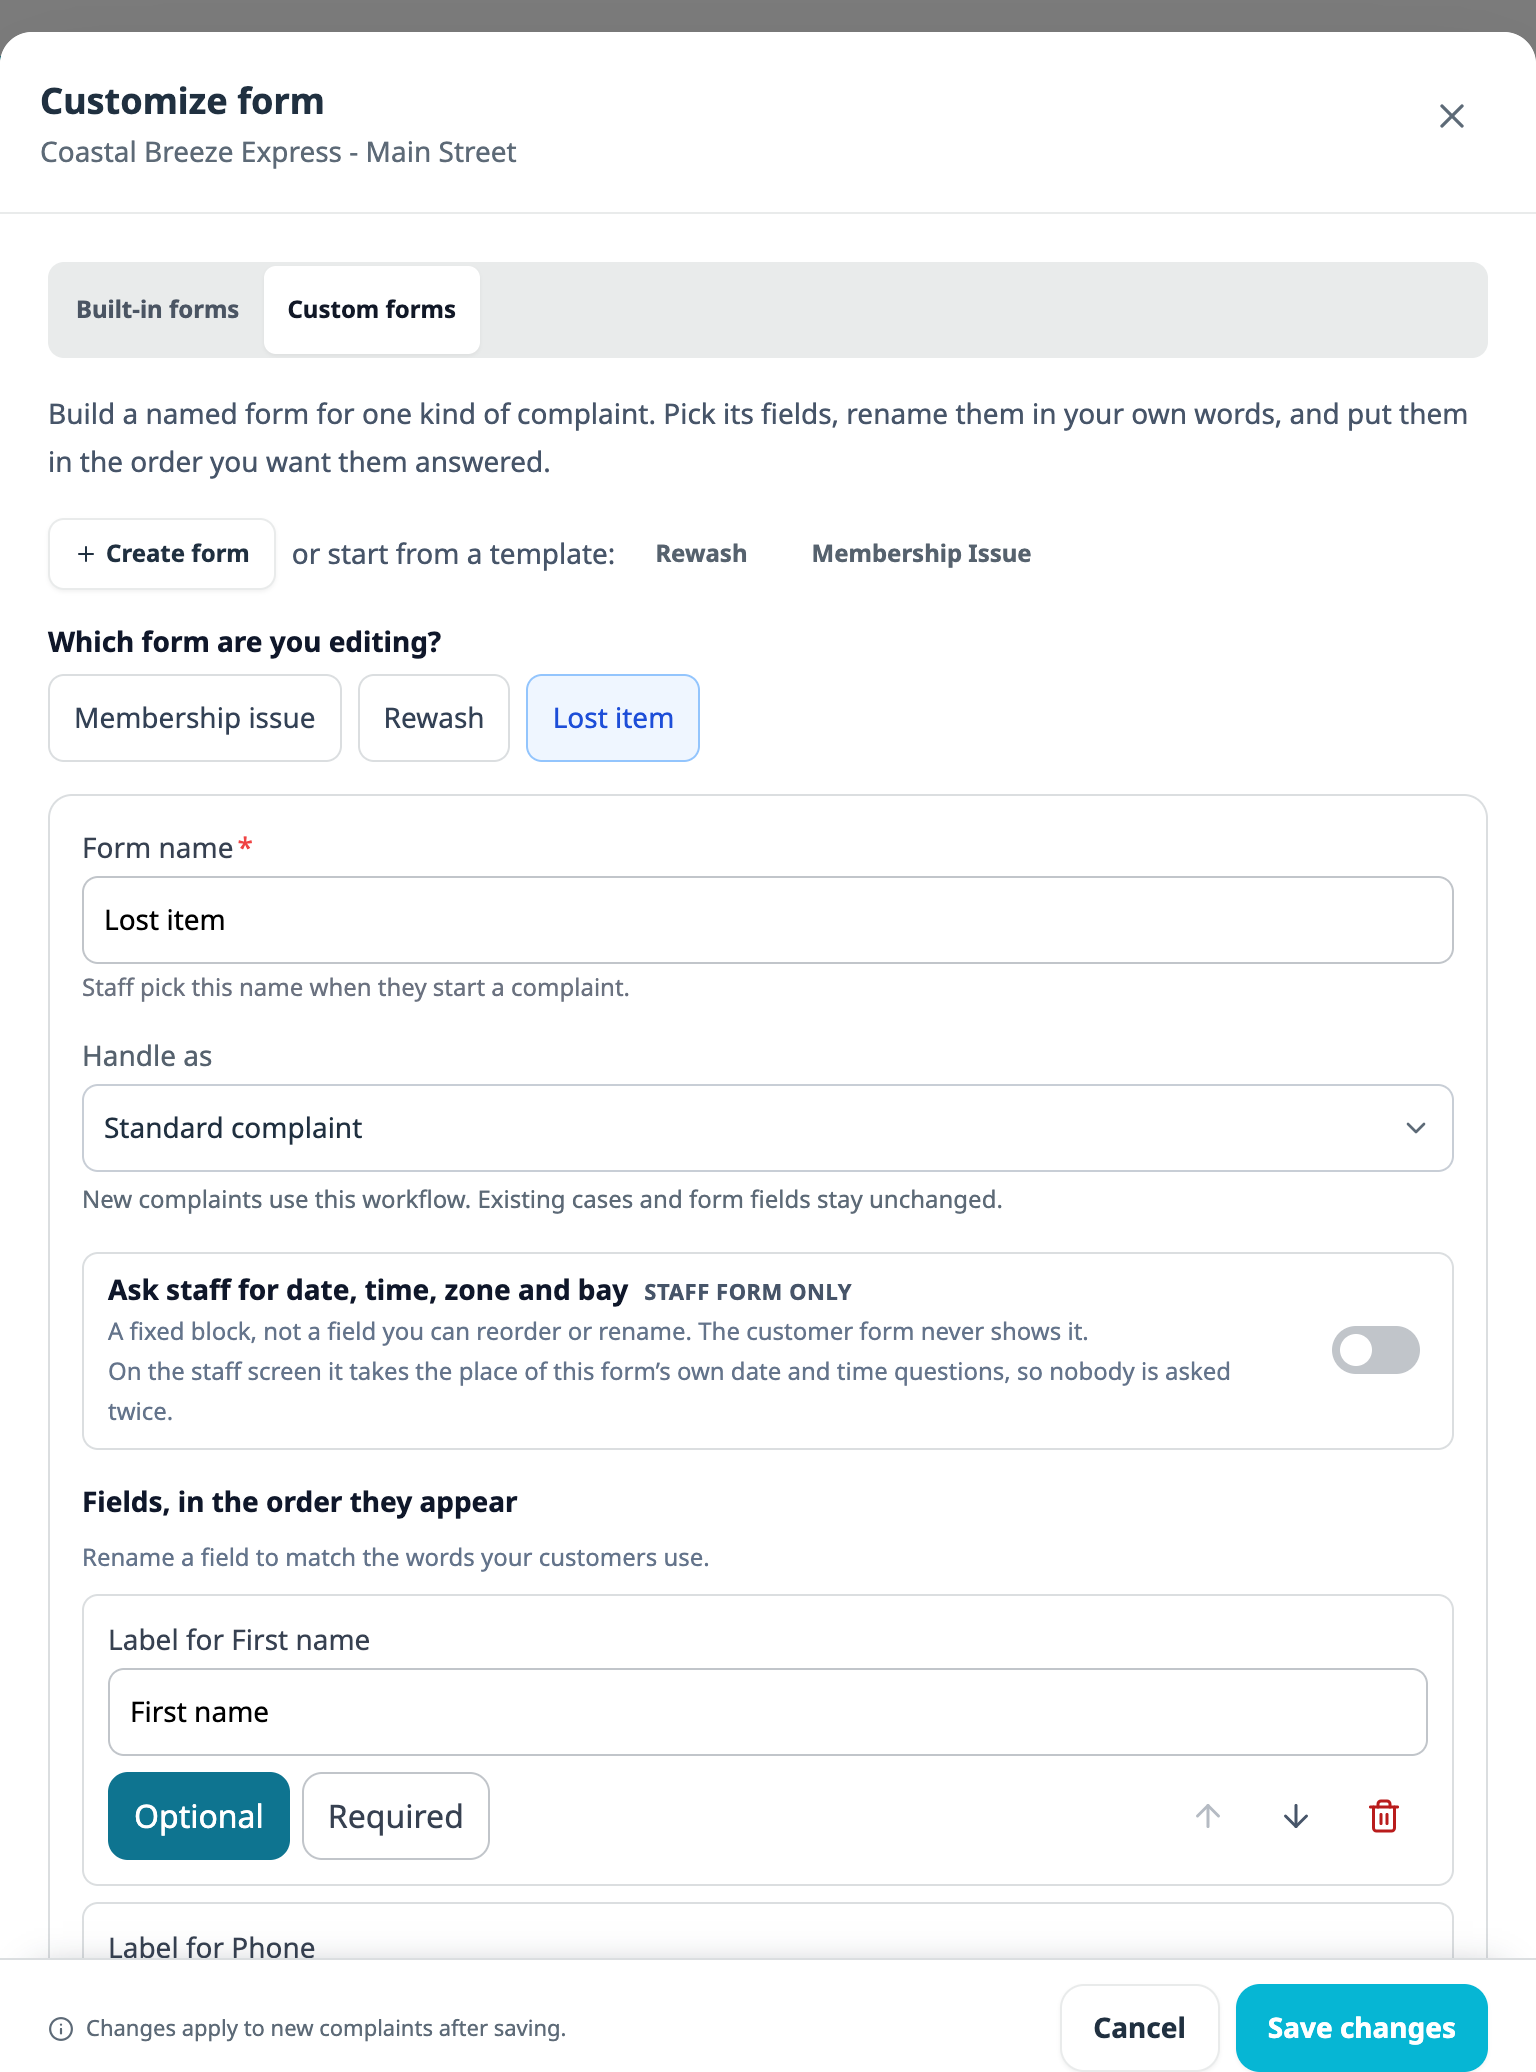
Changing Handle as is safe on a form already in use, and the screen says so: New complaints use this workflow. Existing cases and form fields stay unchanged. Switch a form from Standard to Damage and only complaints created after the save get the evidence checklist.
Field edits work a little differently, and it is worth knowing which way. Answers already collected are stored on the complaint itself and are never touched. Labels and order are not stored with them: those are read from the form as it stands now. Rename Description to What was left behind and a complaint filed last month shows the new wording next time somebody opens it, which is usually what you want, since it is the same question either way.
Deleting a field does not bury the answers people already gave. A complaint still holding an answer in a field you have since removed keeps showing it, listed after the fields the form asks for today.
Each field is Optional or Required, the arrows set the order, and the staff-only block at the top adds date, time, zone and bay to the staff version without ever showing it to a customer.
The Same Case on Every Screen
Web and iOS do not each carry their own idea of what a case needs. The rule that works out the next step is written once and mirrored on iOS, and both platforms are held to a shared set of test cases that spell out the expected answer, so the two stay in step as the rule changes.
Getting It Out Again
Export complaints to CSV on the Complaints page gives your bookkeeper the case columns: the decision, what was asked for and what was approved in each category, what has actually been paid, what is still outstanding, and what was overpaid.
Export summary on a single case produces a printable Claim Summary covering the incident, the vehicle, the customer, the photographs grouped by the part they belong to, the decision and its reasoning, the money, and any waived evidence with the reason. It builds in your browser and opens straight into the print dialog, so a PDF for an insurer or an attorney is one click and no export queue.
Where to Find It
It is live now in the web app, on the iPad, and in the iOS app. Open OpsConsole, then Complaints. Who can see and act on a complaint follows the same role rules as before.
Complaints from before this change still open and still work. An older one shows a short line reading Case management has not been enabled for this complaint, with a Turn on decisions and payments button beside it. Pressing it adds decisions, follow-up tasks and payment tracking to that case and keeps every existing answer and every entry in its history.
The test of a complaints process is whether anyone can tell you what the claim opened nine days ago is waiting for. That is now the first line on the screen.