Everything released since WashConsole 5.0: punch corrections from a person's hours, breaks on the same shift, payroll import files and Netchex for every account, custom time-off reasons, a Schedule grouped by Job Title, new inspection answer types with camera footage, configurable complaint forms, a table view for chemicals, branded training and the Associate account type. Organized by console.
WashConsole Team/September 11, 2026/12 min read
This update covers changes to WashConsole since version 5.0. It follows the console order in the app, with platform availability noted where it differs.
Managers can now correct punches while reviewing a team member's hours. The Schedule groups people by Job Title, and owners can set the reasons employees choose when requesting time off. Inspection templates also have more answer types and options for reviewing camera footage.
TeamConsole
Time Clock
You can correct a missed punch from the same place you review a team member's hours.
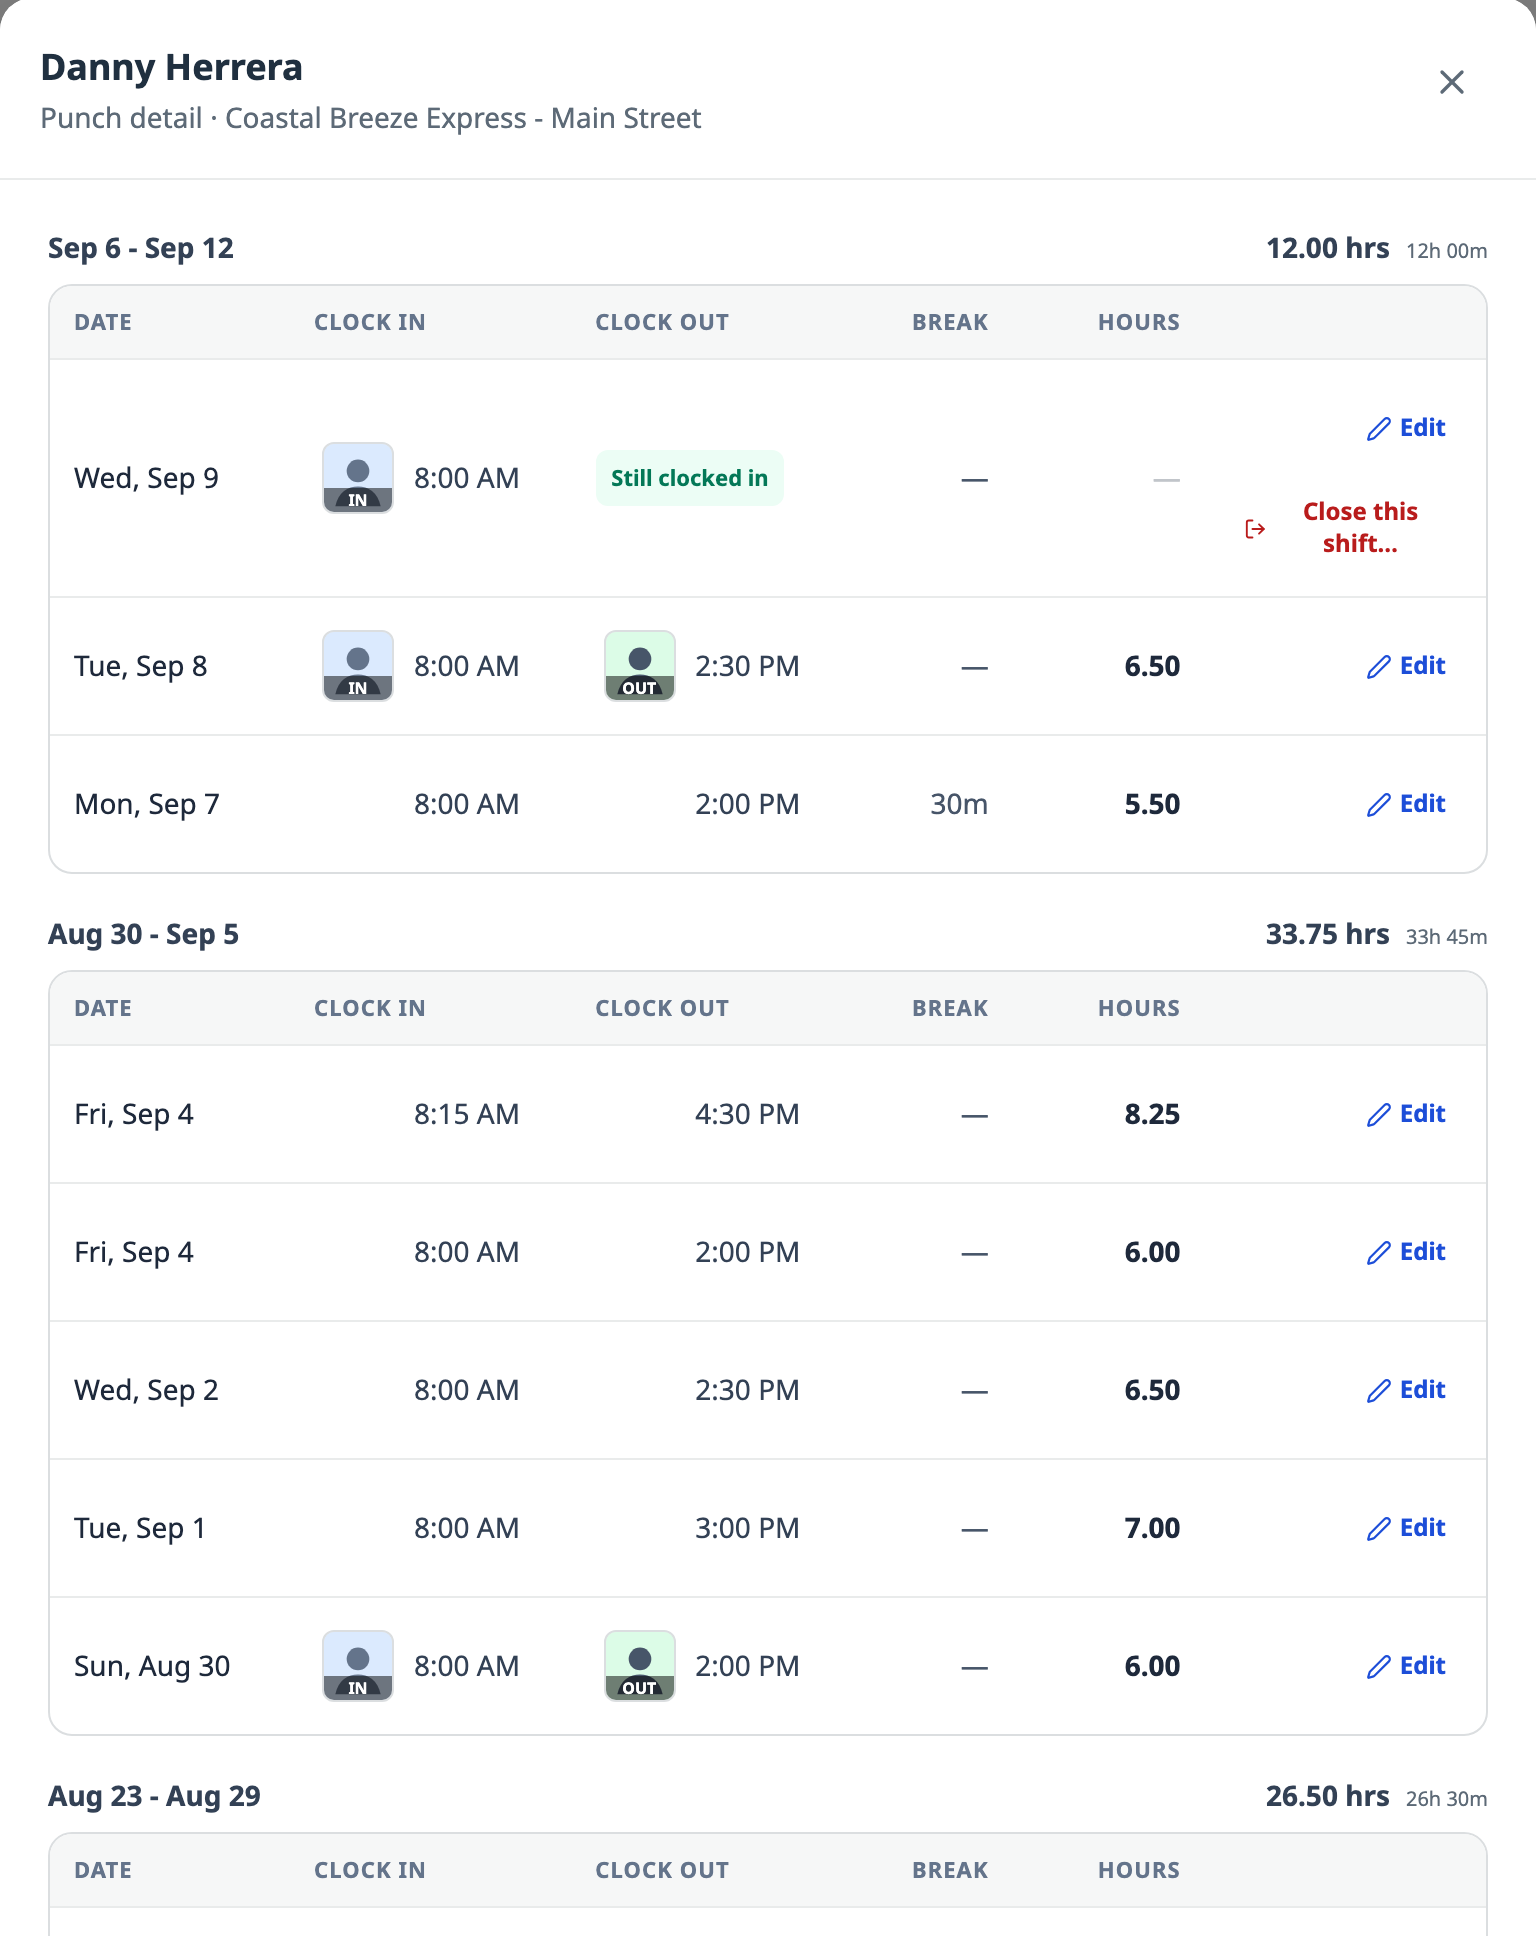
Punch detail shows Edit on each row and Close this shift on the open entry.
Edit a punch from Hours by Team Member. Open a person's hours, then select Edit beside the entry. If they forgot to clock out, choose Close this shift… and enter the time they left. If they clock out while you are editing, their recorded clock-out is kept and your change is not saved.
Past-day edits open the worked hours. In the Schedule, Edit on a past day opens the time entry. You can still reach the planned shift from that screen.
Breaks stay on the open shift. Employees can start and end a break on the web or iPhone app. If a break has no recorded end time, no time is deducted for it.
Overnight entries have separate dates. Web shift forms include Clock-in date and Clock-out date, so you can enter, request a correction for or approve a shift that crosses midnight.
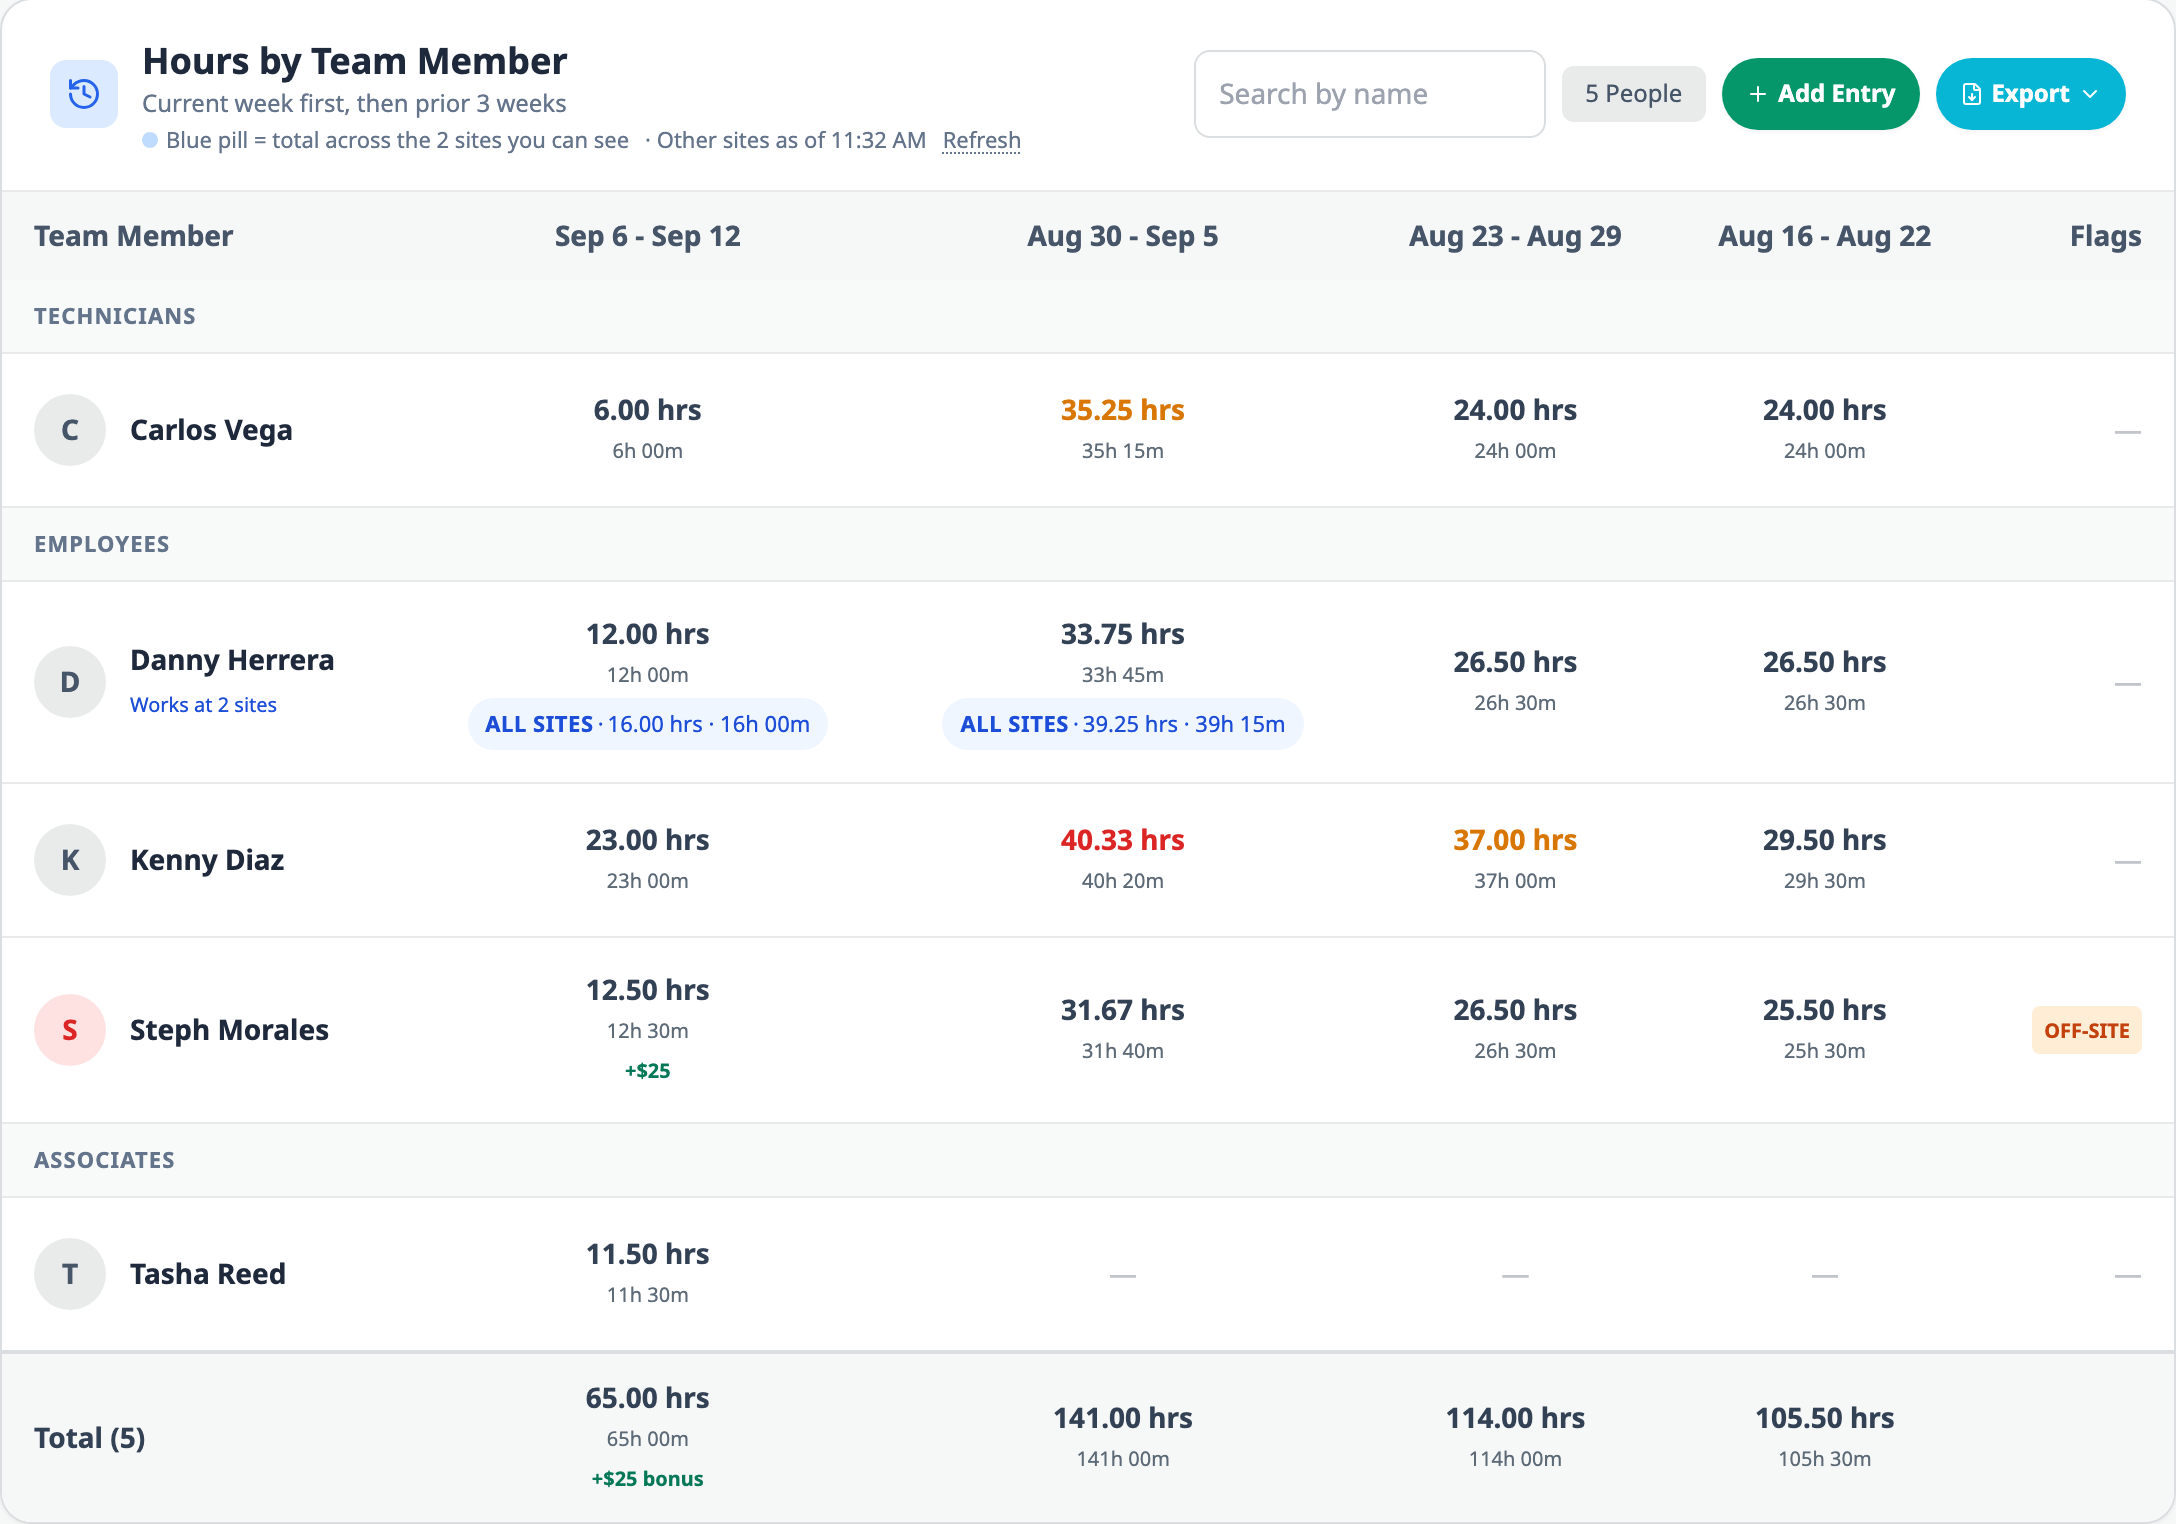
ALL SITES shows hours across the sites you can access. In Hours by Team Member, the label appears under a person's weekly hours when they work at multiple sites. You can see it on the web and iPhone app.
Hours use the same rounding calculation. Breaks and overtime are calculated from exact time before the final hours are rounded for display, export and Netchex.
Times display in 12-hour format by default, such as 6:00 AM. Accounts that selected 24-hour time keep that setting.
Hourly staff start on Time Clock. Employees, technicians, site leads and associates open on Time Clock when they sign in on the web, kiosk or iPhone app. Managers and owners keep their existing starting screen.
In Hours by Team Member, the blue ALL SITES label shows the employee's total across the sites you can access.
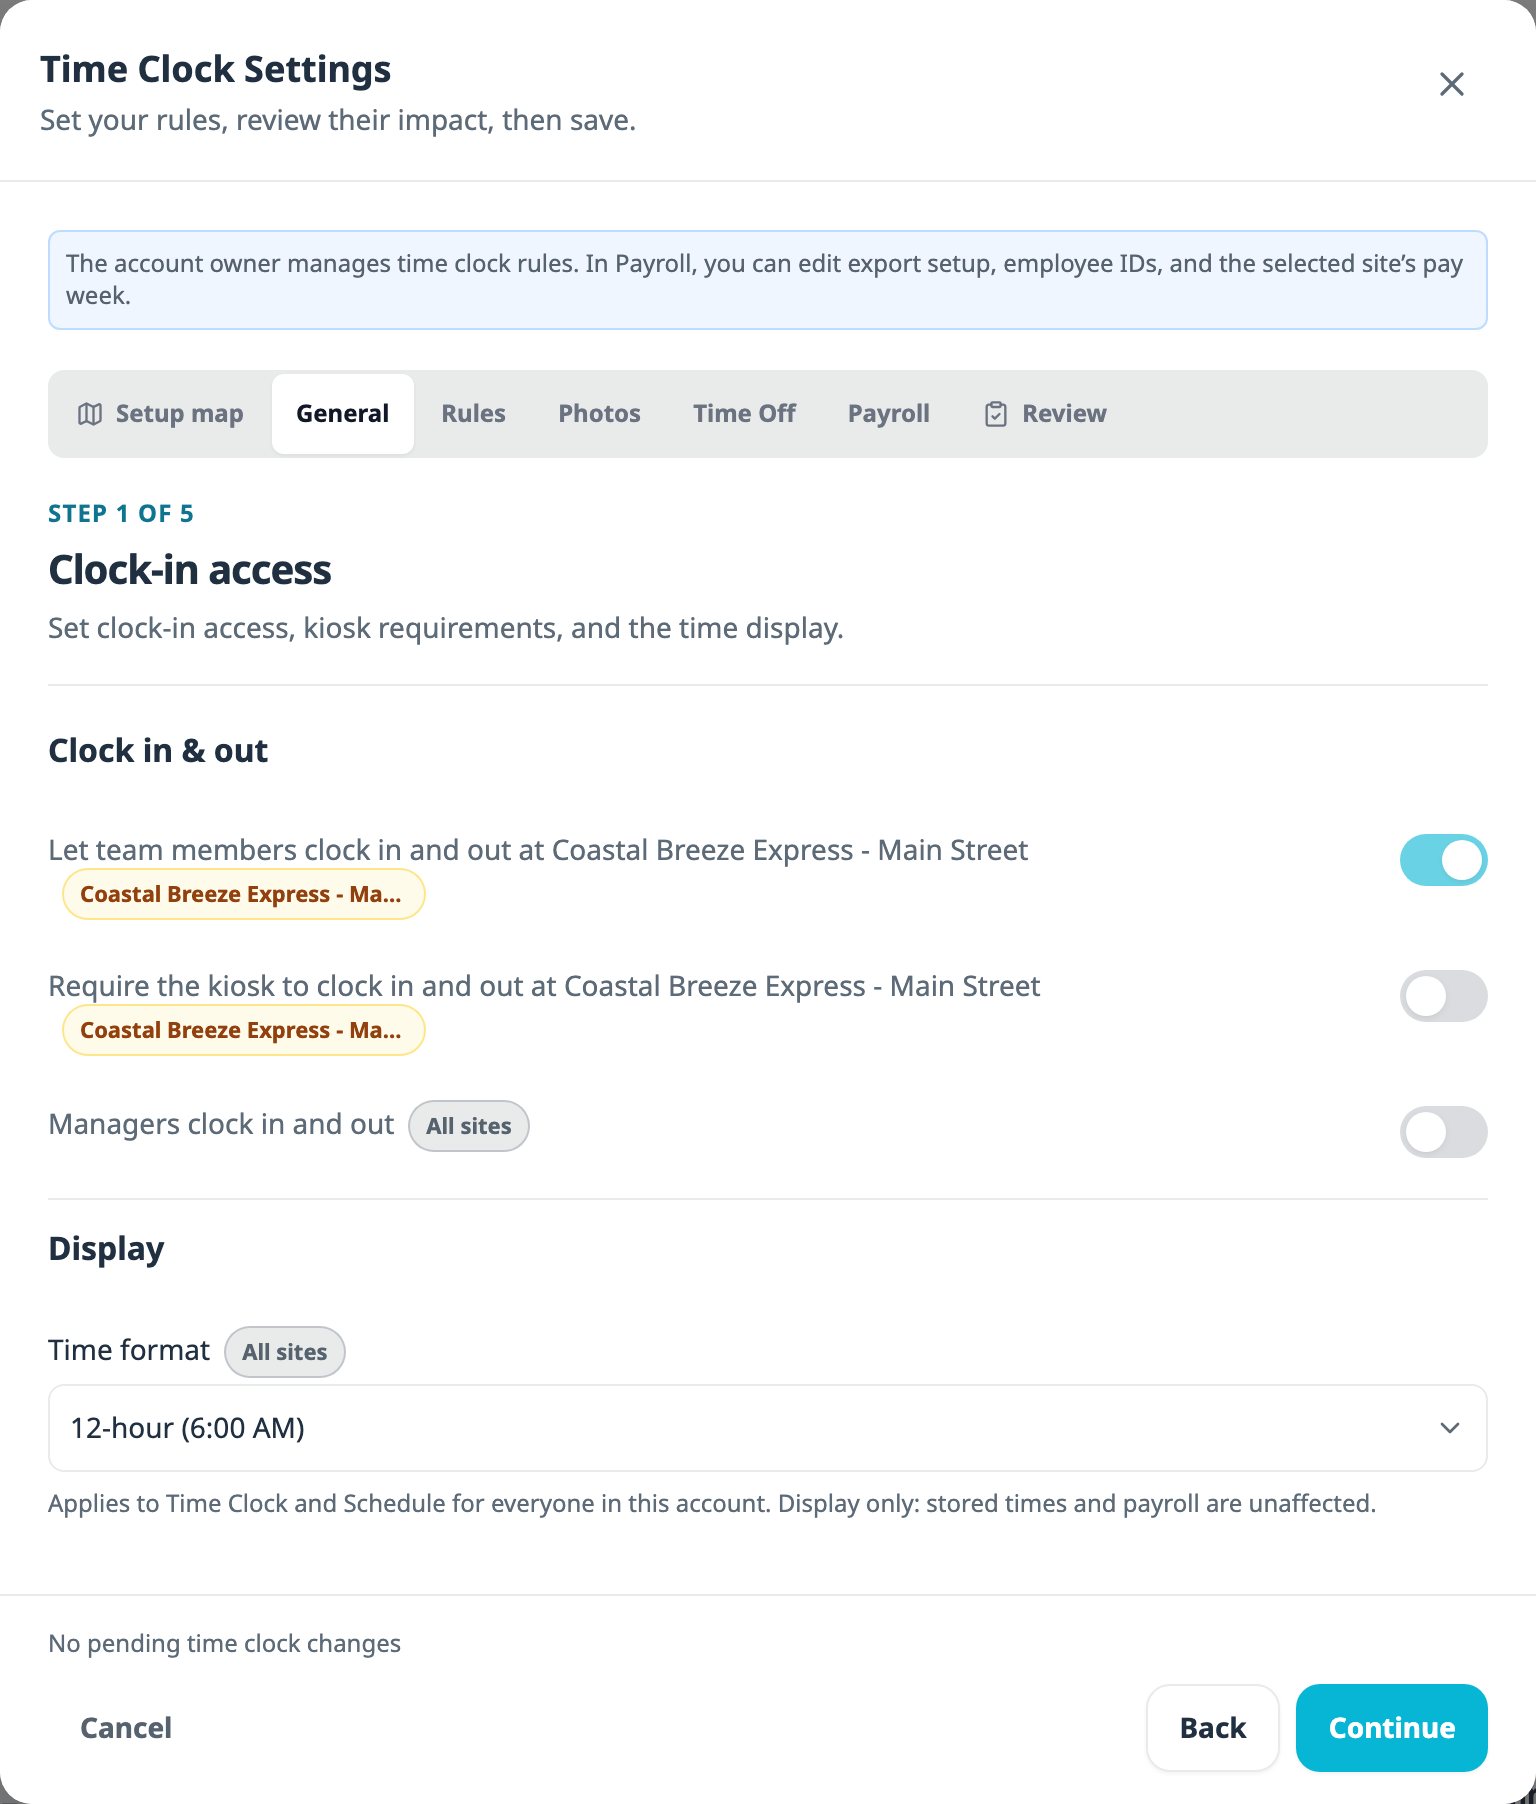
Time Clock Settings now opens with a setup map. Each setting identifies whether it applies to the account or a selected site.
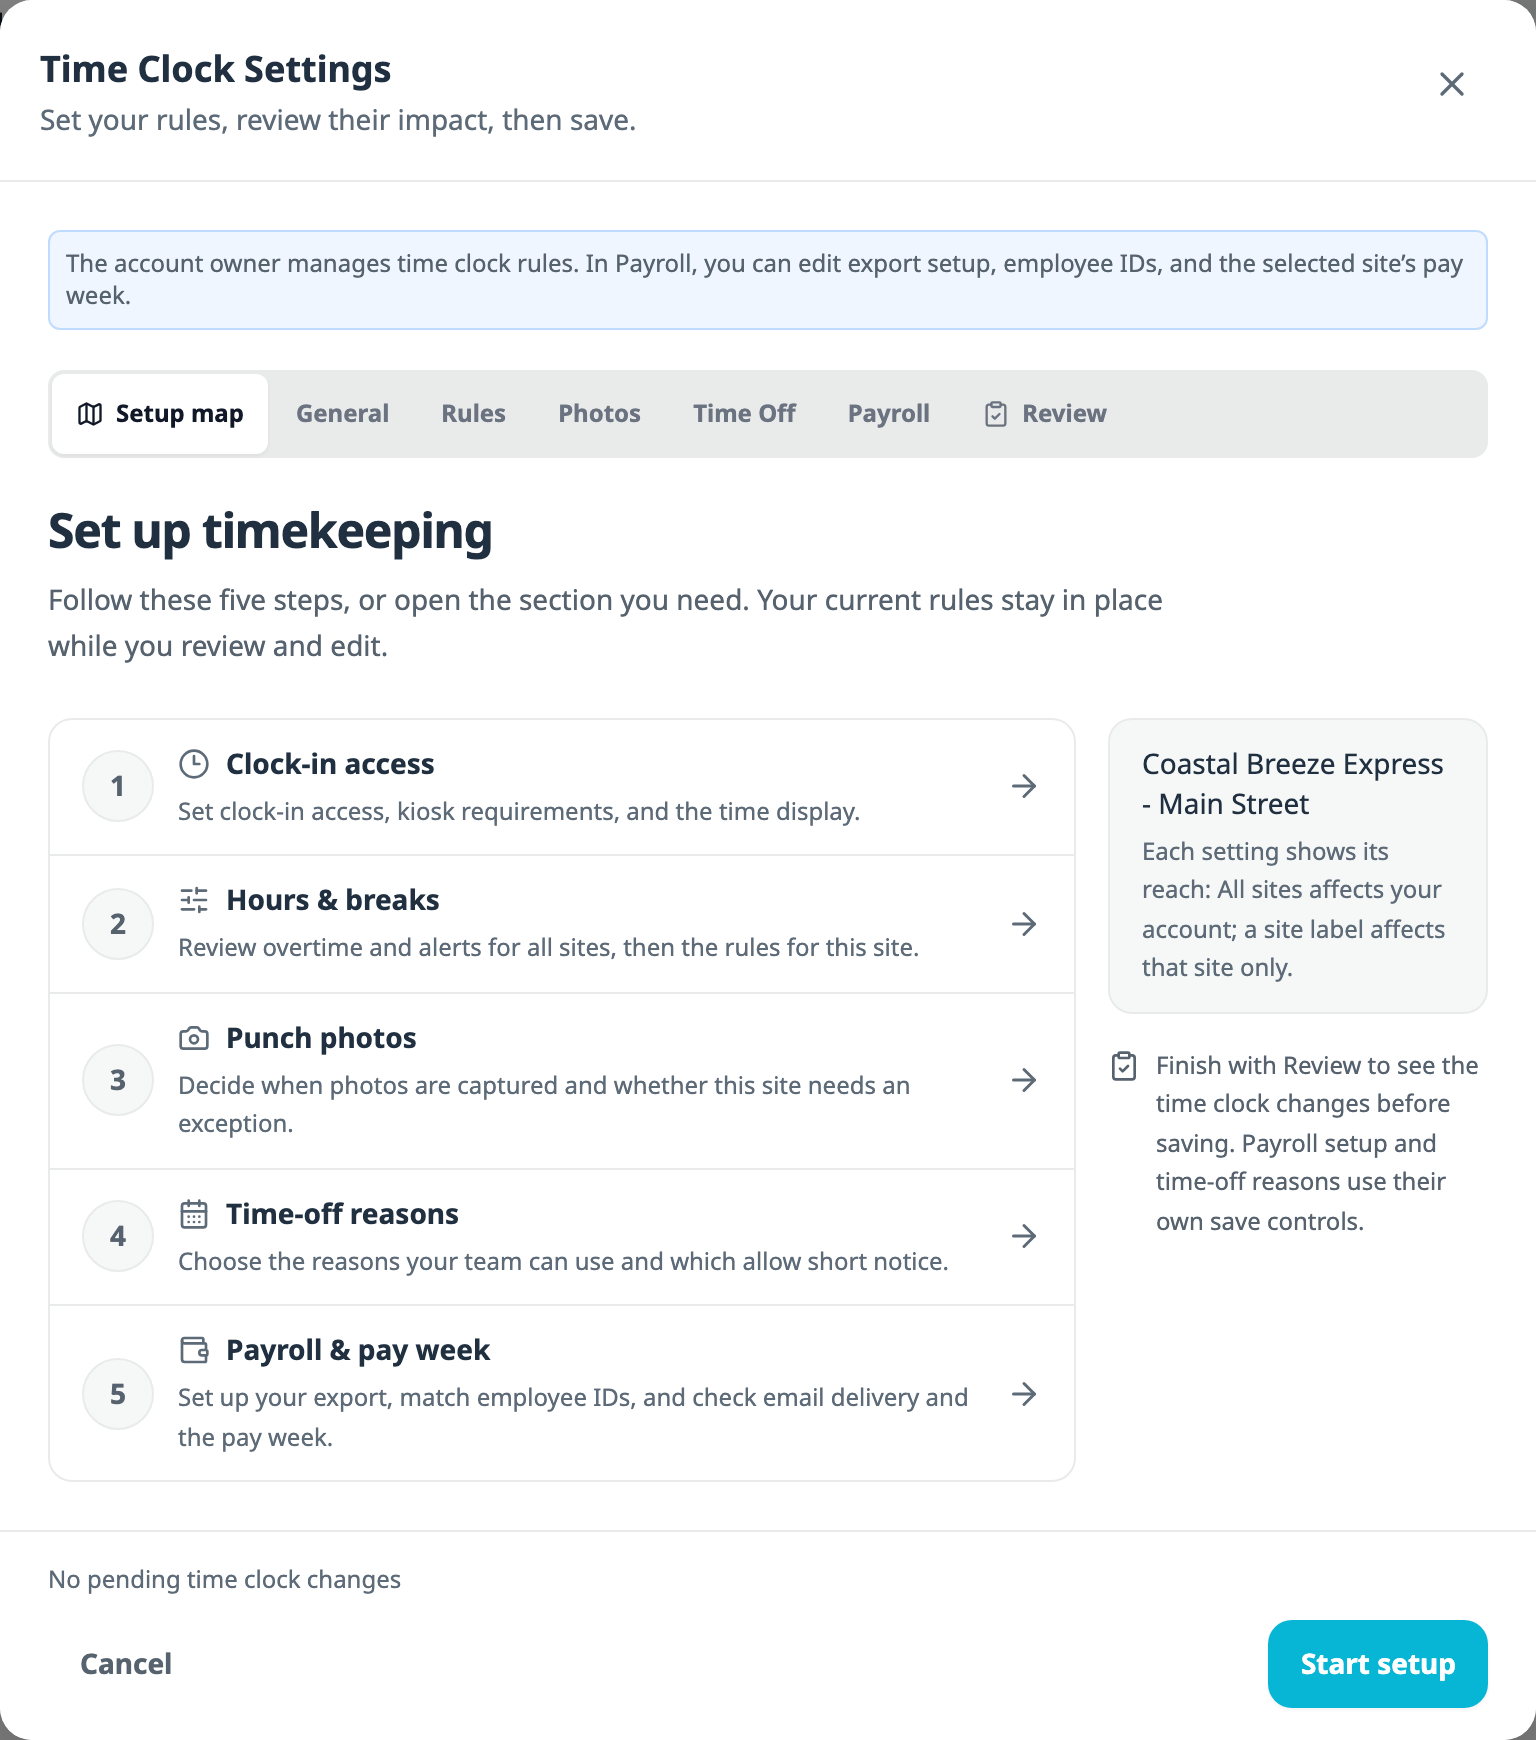
The Setup map opens each settings section. Review covers pending time clock changes; payroll setup and time-off reasons save separately.
Use the setup map to find a setting. Its five sections are Clock-in access, Hours & breaks, Punch photos, Time-off reasons, and Payroll & pay week. Review shows pending time clock changes before you save them. Payroll setup and employee IDs have separate save controls, and changes to time-off reasons save immediately. The setup is also available in the iPhone app.
Require kiosk punches at a site. Owners can turn on the kiosk requirement under Clock-in access; it is off by default. The requirement applies to clock-in and clock-out at that site. Managers can still add or correct hours, and punches saved while a phone was offline are accepted when they sync. Kiosk Mode must already be on, and staff need kiosk PINs and accepted email invites. The geofence continues to flag off-site punches.
Managers clock in and out is an account-wide setting that is off by default. When the owner turns it on, managers get a My Shift card and their punches count toward recorded hours. Missed and late punches appear in Attendance.
Each Clock-in access control identifies whether it applies to the selected site or all sites.
TeamConsole
Payroll
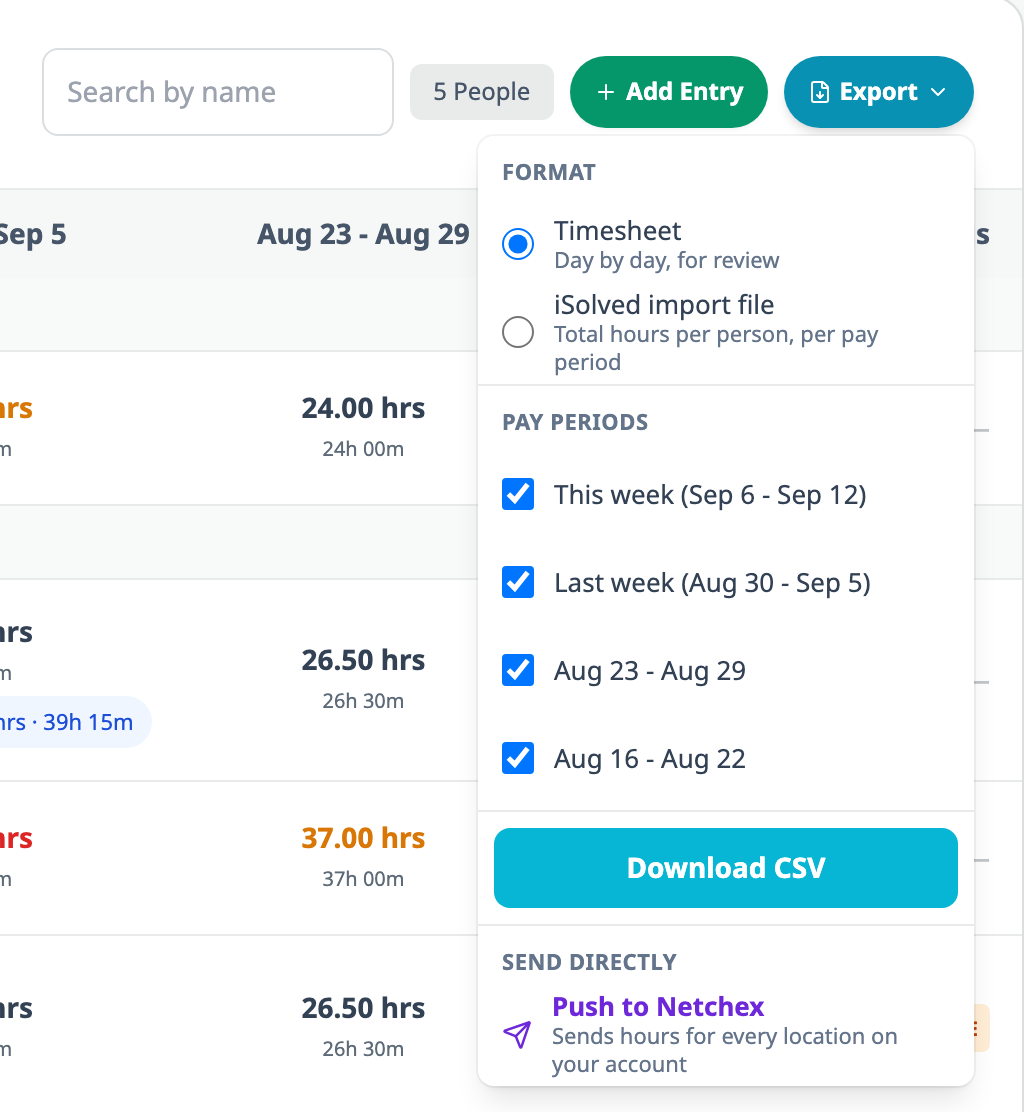
The Export menu in Hours by Team Member now includes payroll import files and Push to Netchex.
In Export, choose the format and pay periods to download, or select Push to Netchex.
Choose an import file for your payroll provider. Export offers Paychex and isolved import files, plus a generic CSV for other providers to map. The isolved file has one row per person per pay period, with separate regular and overtime columns. Files use the payroll employee IDs entered in setup. Before your first live payroll, confirm a sample file with your Paychex or isolved representative.
Push to Netchex is beside the hours you are reviewing. Open Export in Hours by Team Member to start the payroll review and send.
Netchex is available to every account. Setup checks your API key, lets you select the payroll company and earnings codes, and matches WashConsole team members to their Netchex records.
Review bonuses before sending payroll. Pickup bonuses that need to be added manually appear in the Add these bonuses in Netchex card, with the people, amounts and dates.
Partial-day time-off checks use the requested hours. Payroll now checks the request's time window when identifying conflicts with worked time.
Payroll setup is available on the web.
Time Off
Owners can define the reasons employees choose when requesting time off. Managers can review pending requests from the Schedule and see how approval would affect coverage.
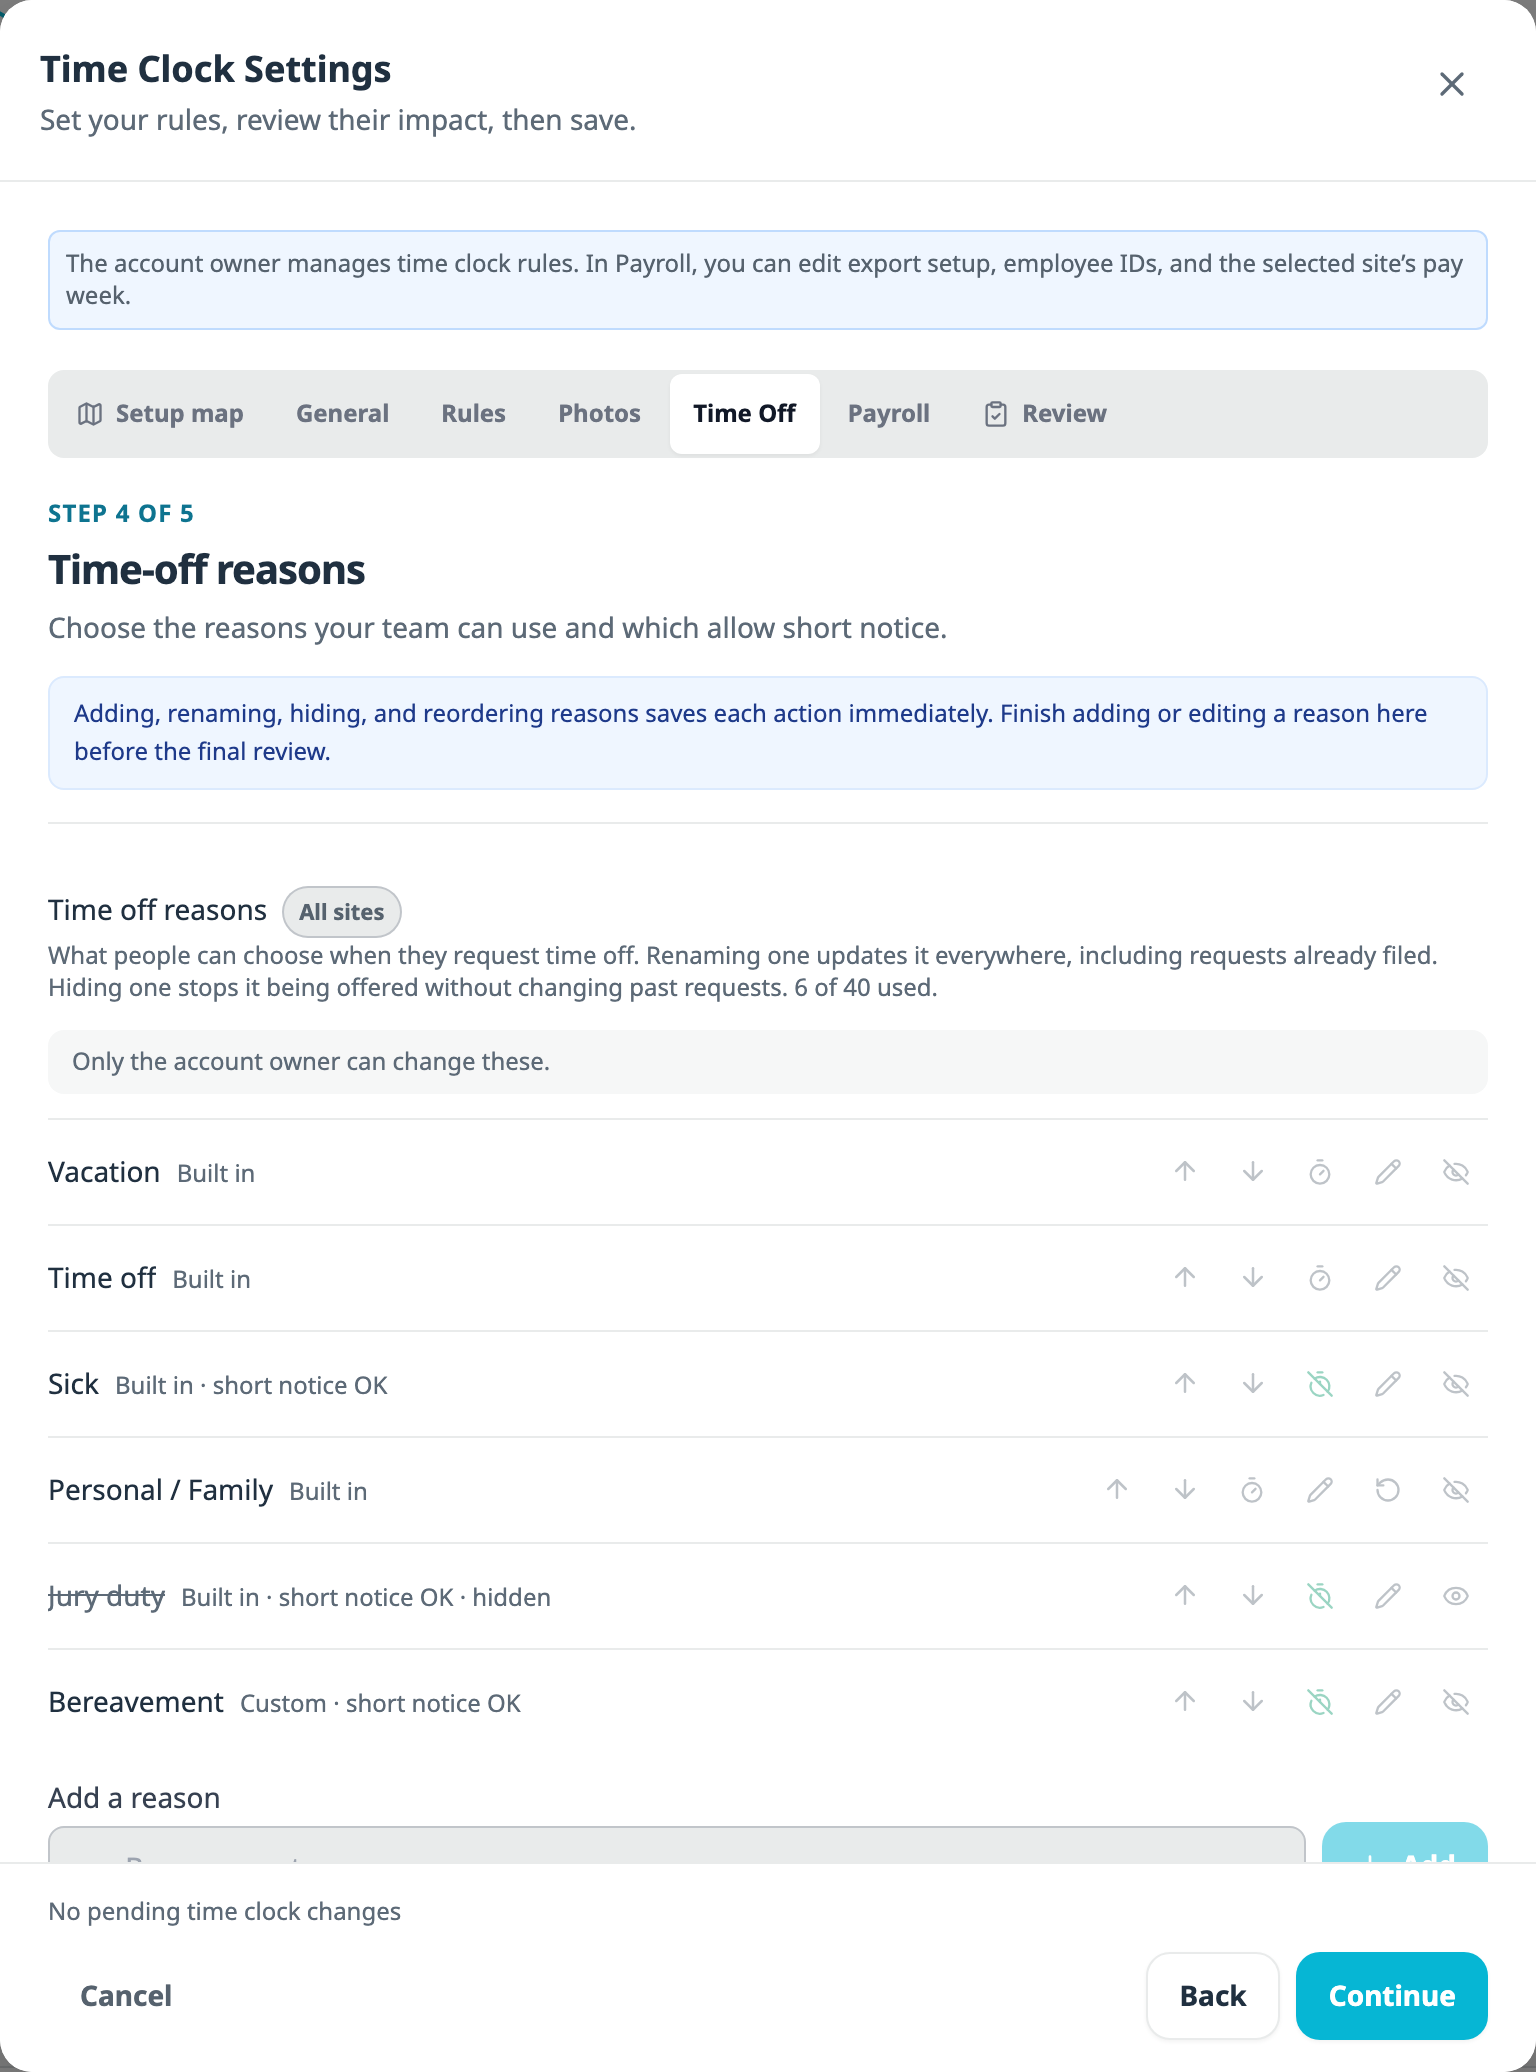
In Time Clock Settings, owners can rename or hide built-in reasons and add custom reasons.
Set your team's time-off reasons. In Time Clock Settings, owners can rename, hide, reorder or add reasons, up to 40 including hidden reasons. A renamed reason displays under its new name on existing requests. Hiding a reason removes it from future choices while preserving past requests.
Allow short notice for a custom reason. Owners can let employees select that reason inside the site's minimum-notice window. Built-in reasons keep their existing notice rules, including the short-notice exceptions for Sick and Jury duty.
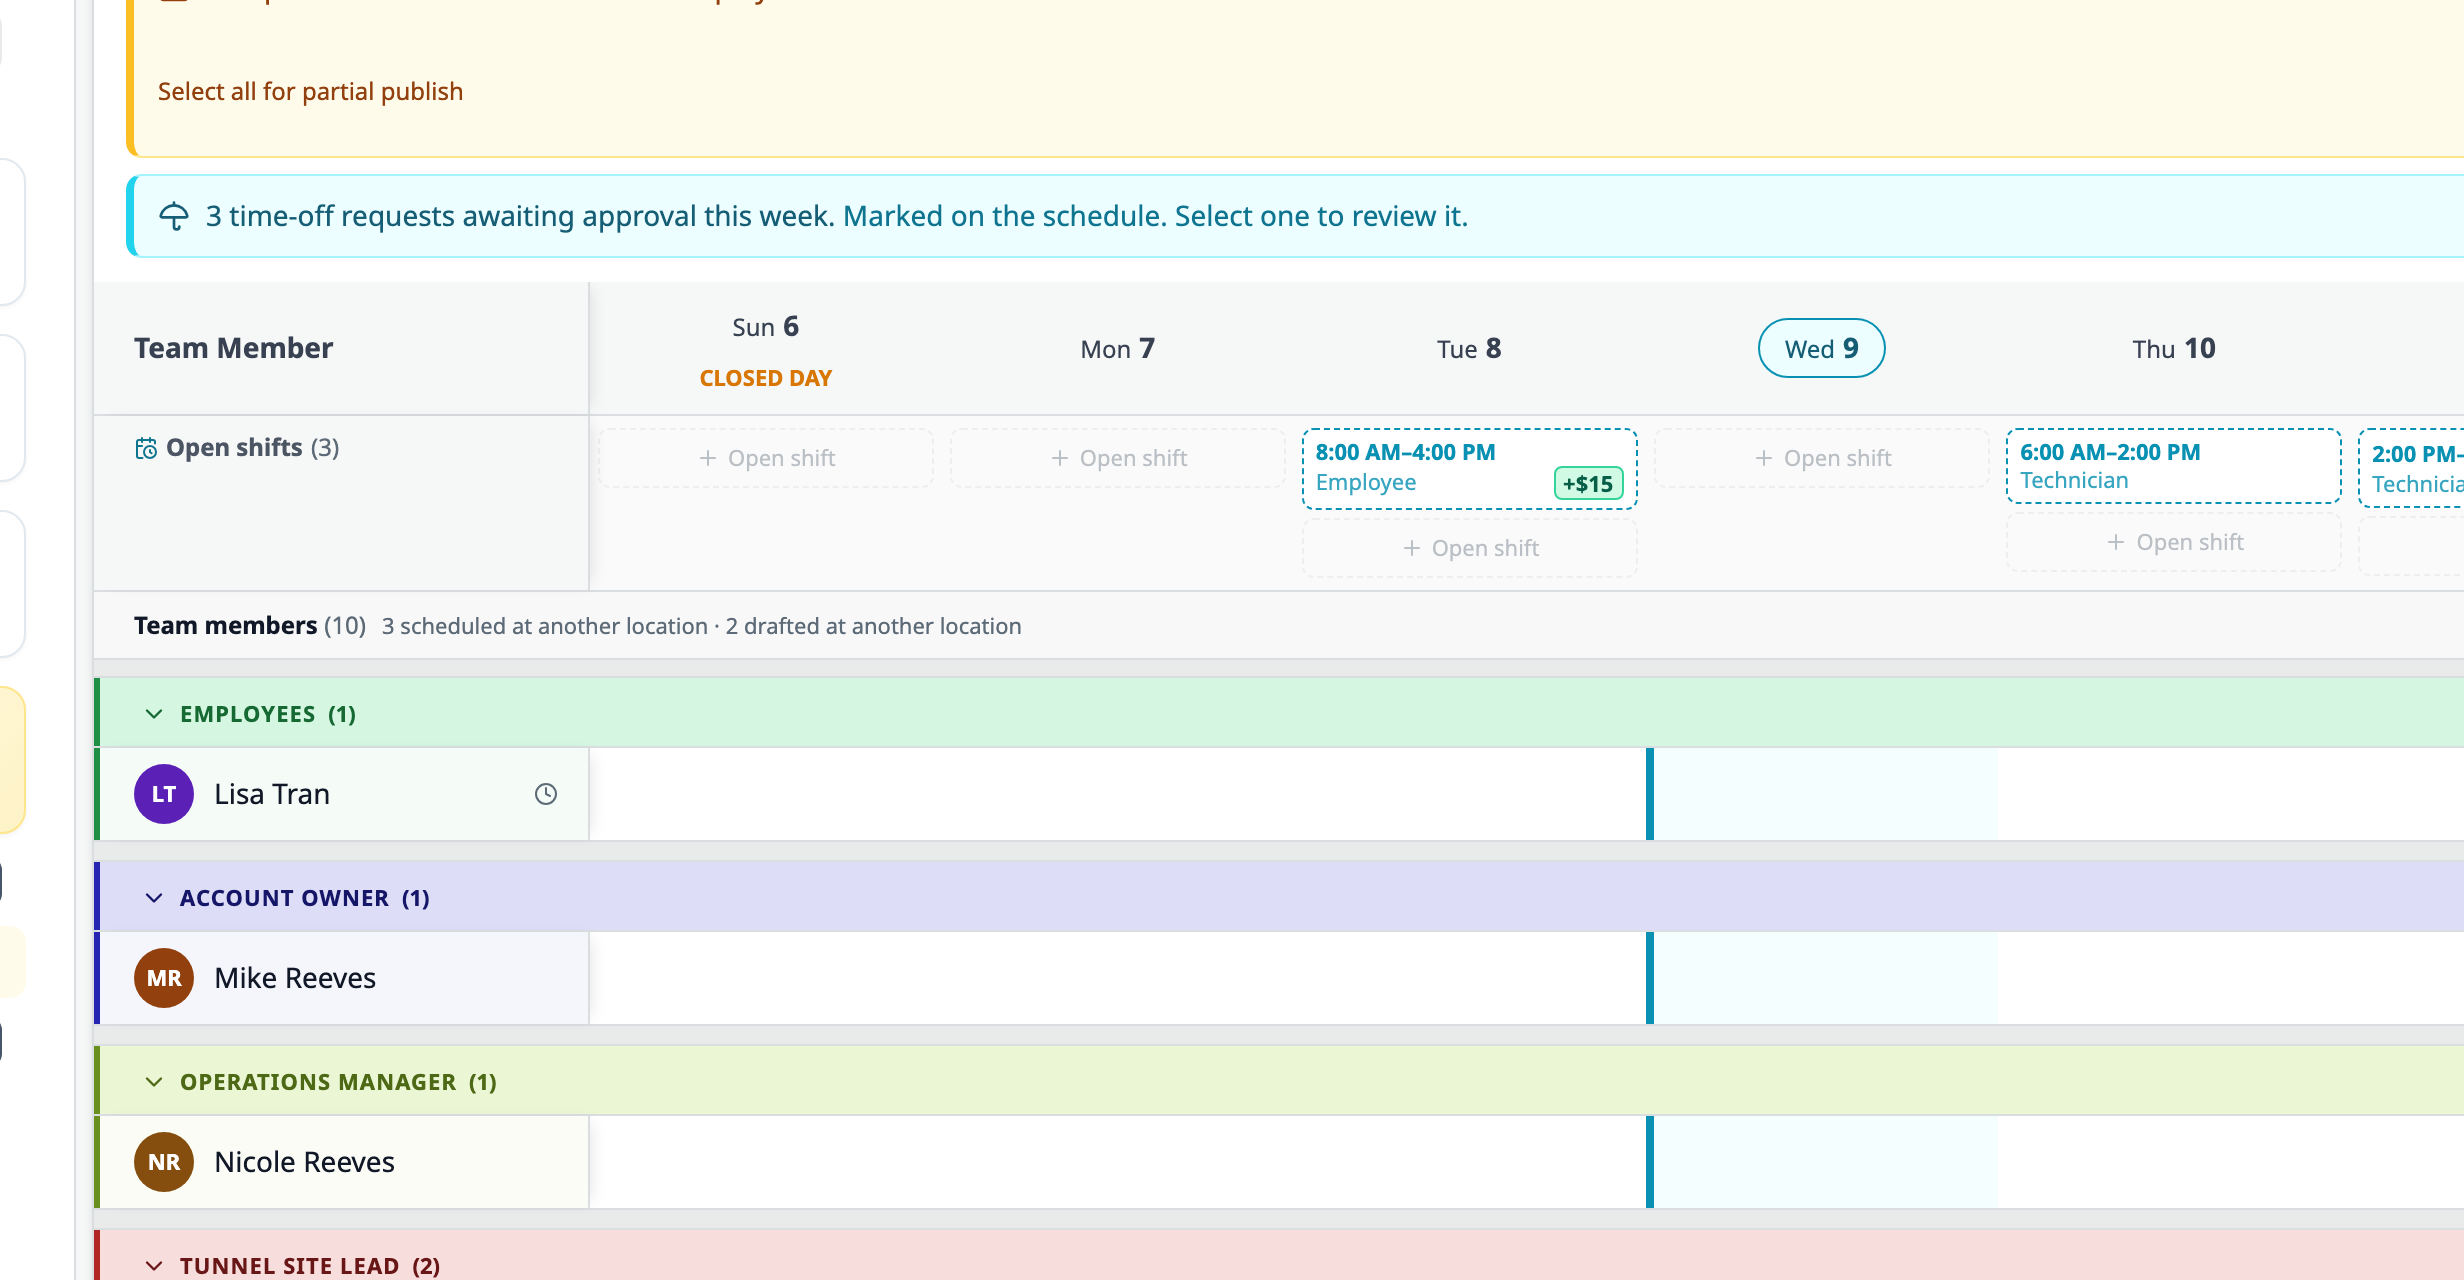
Review pending requests on the Schedule. Dashed purple markers show requested time off in the grid, list views and Daily Coverage. A banner counts requests awaiting approval. Managers can open a request to see which shifts approval would remove and decide it there. Pending requests leave existing shifts scheduled.
Employees request time off for a day away. A manager reviews the request, and approval blocks scheduling for the approved time off. Date overrides remain available to managers.
Owners manage the reasons. Employees submit requests, and managers review them. Time-off requests are available on the web, iPhone app and kiosk.
TeamConsole
Schedule
The Schedule groups people by Job Title. Owners also have account-wide controls for displaying owner rows and allowing employees to exchange shifts.
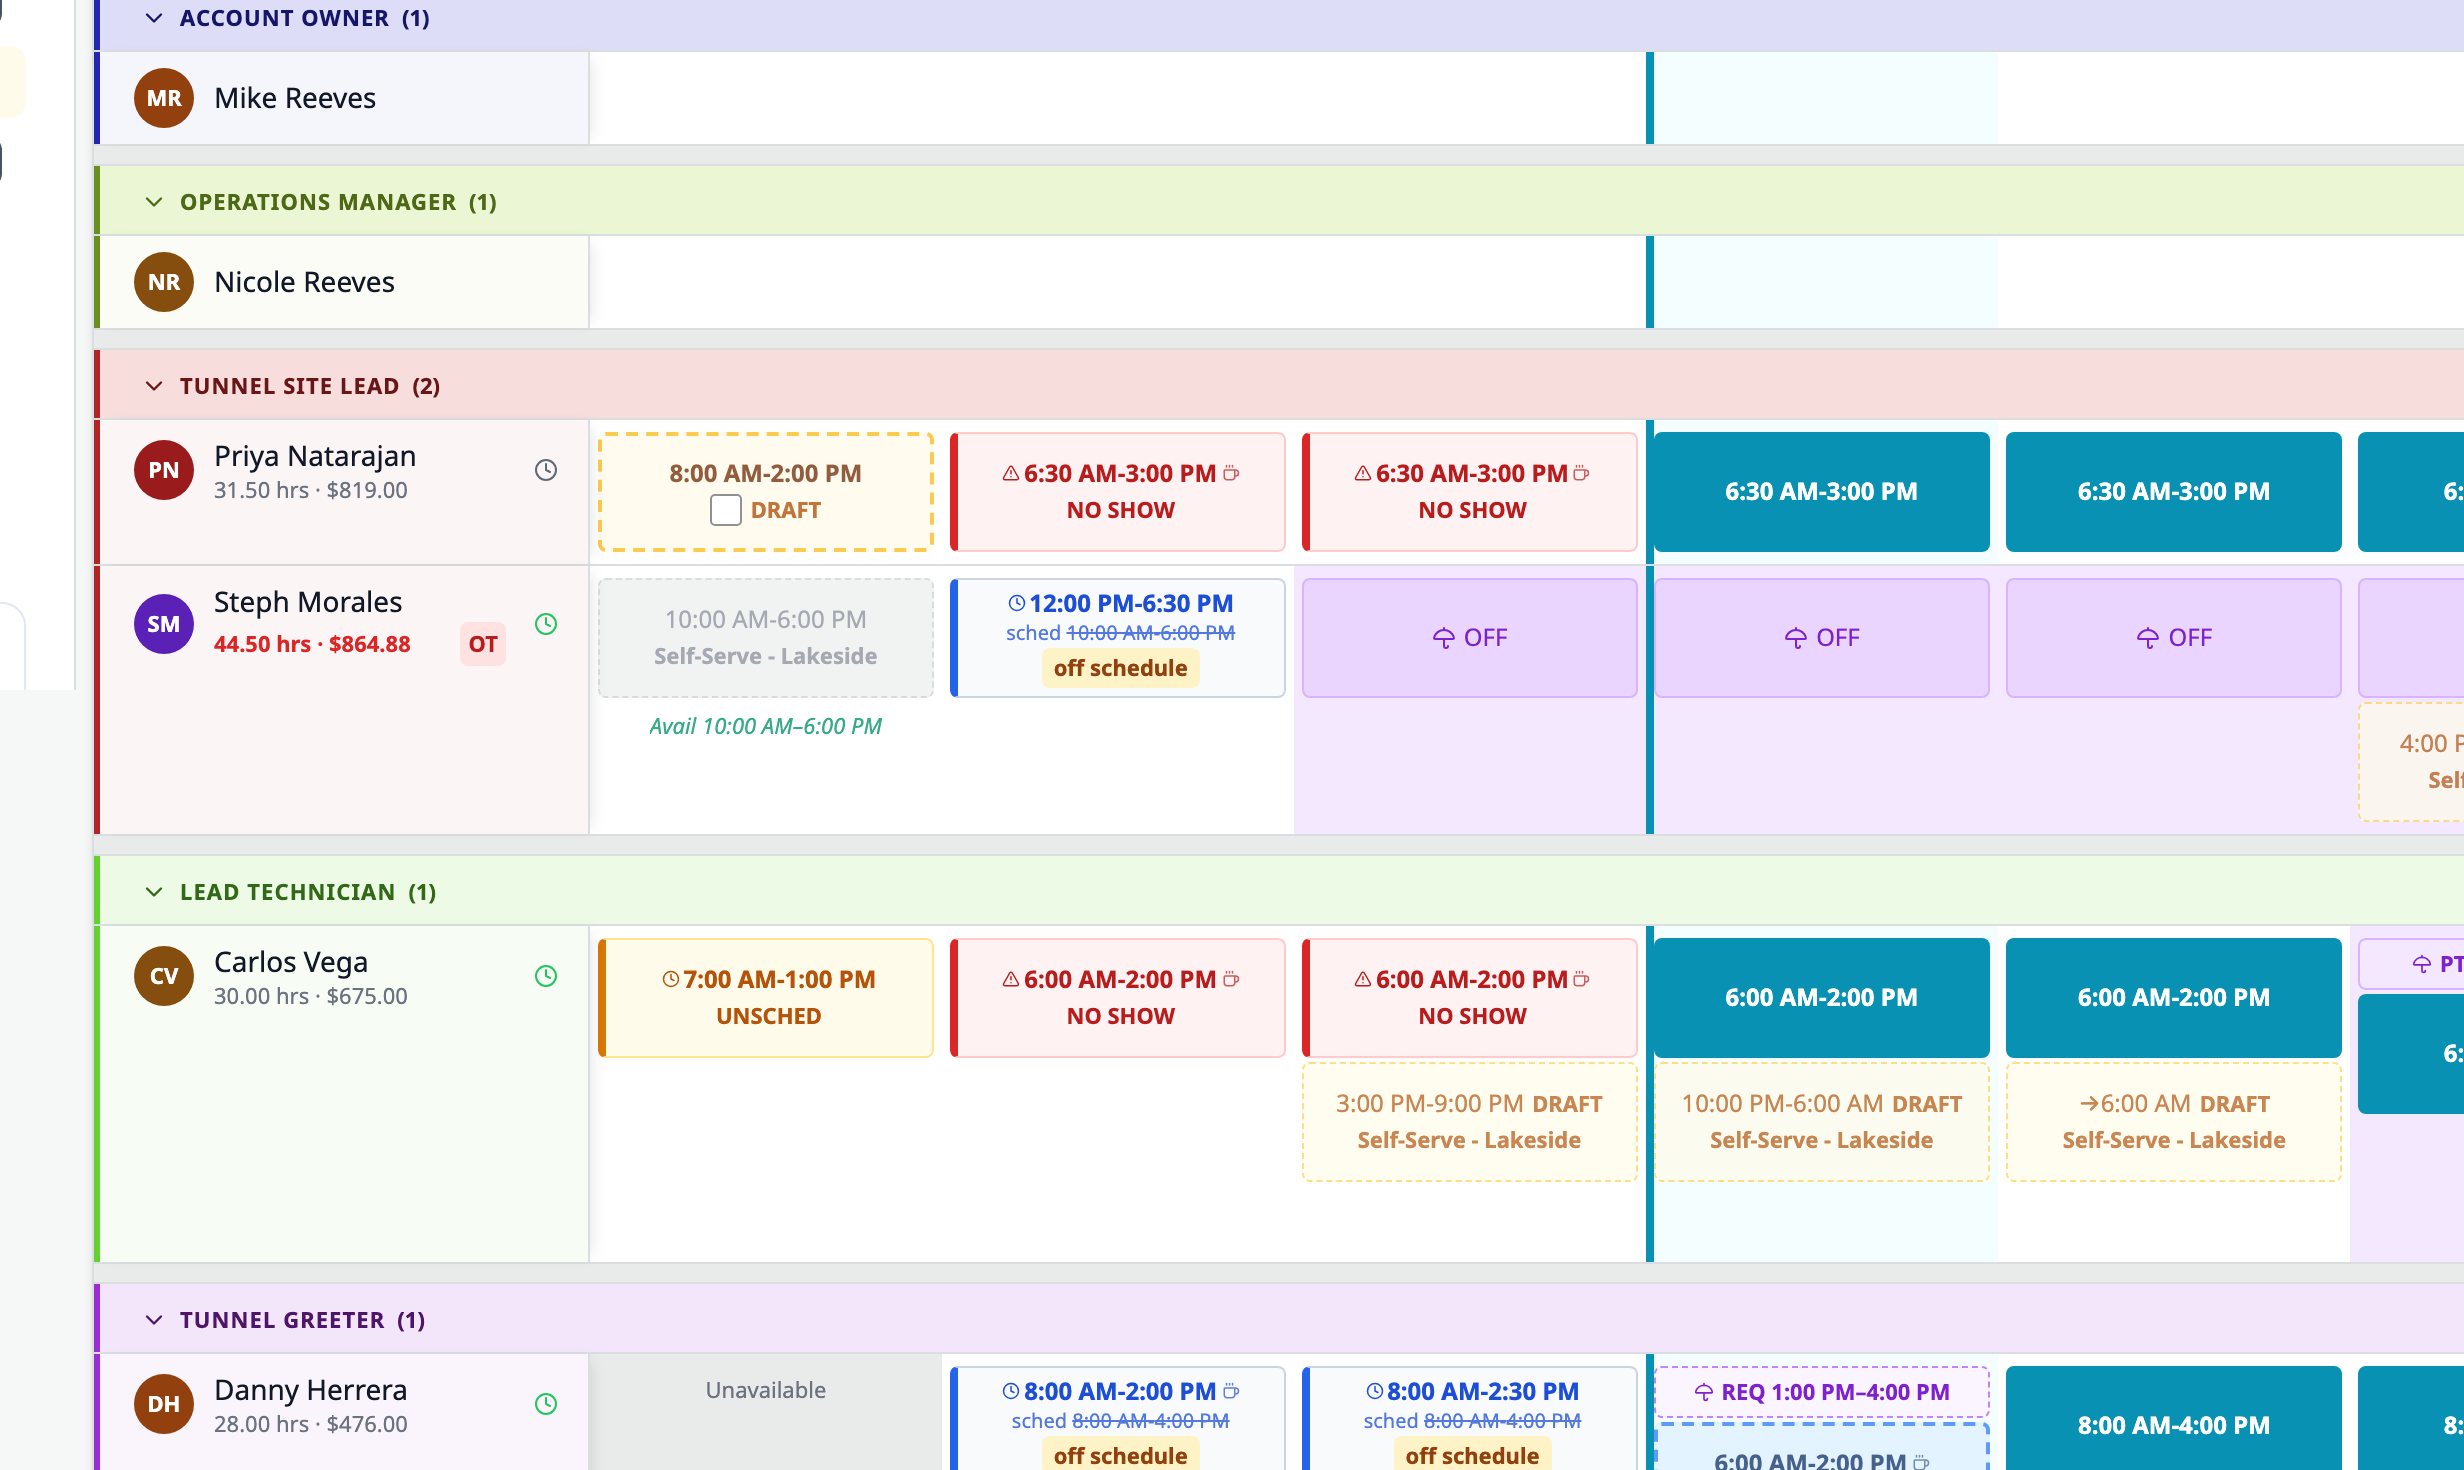
The schedule grid shows pending time-off requests above the Open shifts row and color-coded Job Title groups.
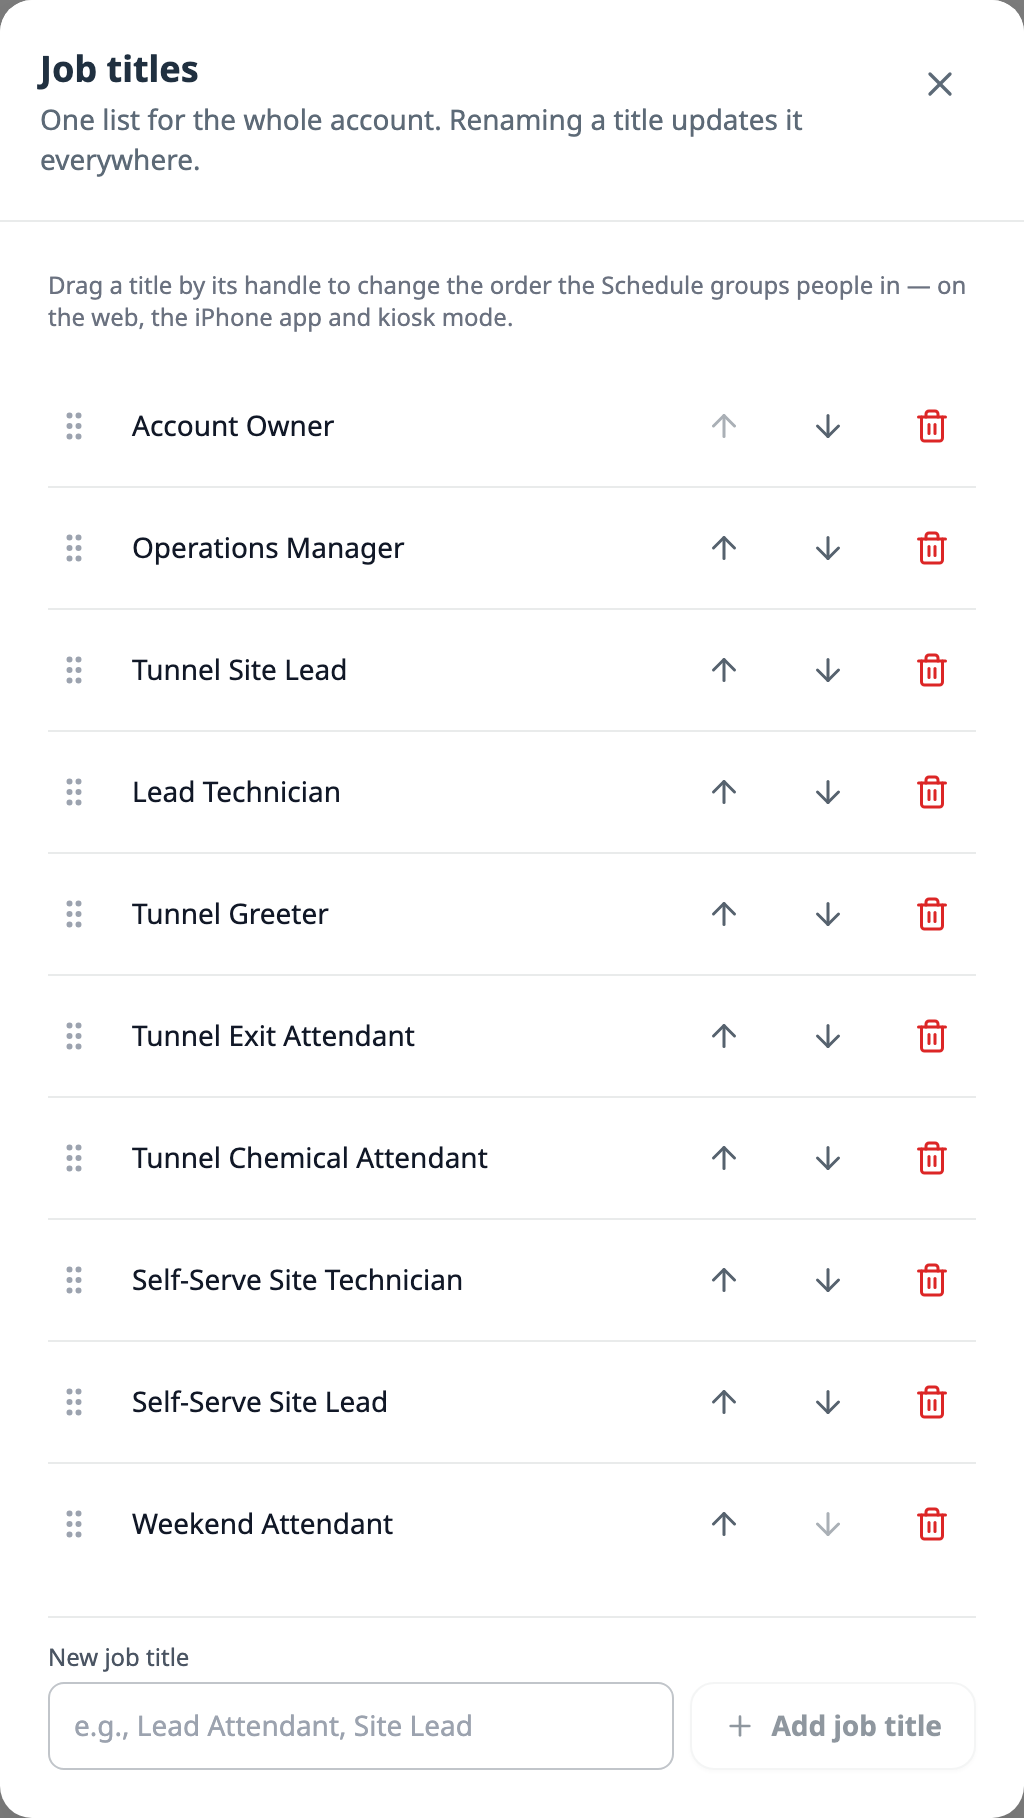
Job Title determines schedule grouping. The Shift Role field has been removed from individual shifts. Job titles come from one account-wide list; Account Type still controls what a person can see and do. Use Edit job titles to rename a title or change its position. The list order sets the group order on the web, iPhone app and kiosk. Existing free-text titles still group people together; add one to the list to control its position.
Each group shows its team member count and has a color band. You can collapse a group to reduce the number of rows on screen.
Owners appear on the Schedule for planning. They do not clock in or out. An owner can turn off Show owners to hide owner rows across the account.
Manager scheduling is on for every account. In 5.0 it had to be switched on per account.
Drafts at other sites are visible. An amber DRAFT label shows when someone has a draft shift at another of your sites. Overlapping times produce a warning while you are planning, so you can resolve the conflict before publishing.
Managers cannot change their own published shifts or an owner's. This restriction covers editing, deleting and reassigning a published shift. Draft shifts can still be changed.
Control swaps and giveaways separately. Owners can use Allow shift swaps and Allow shift giveaways to turn each option on or off across the account.
Type abbreviated times. The time field accepts entries such as 7am, 7a or 7, and 3p for an end time.
The order of the Job titles list sets the group order on the Schedule.
OpsConsole
To-Do
The Add menu separates individual tasks from reusable lists. Lists can also repeat at an interval you choose.
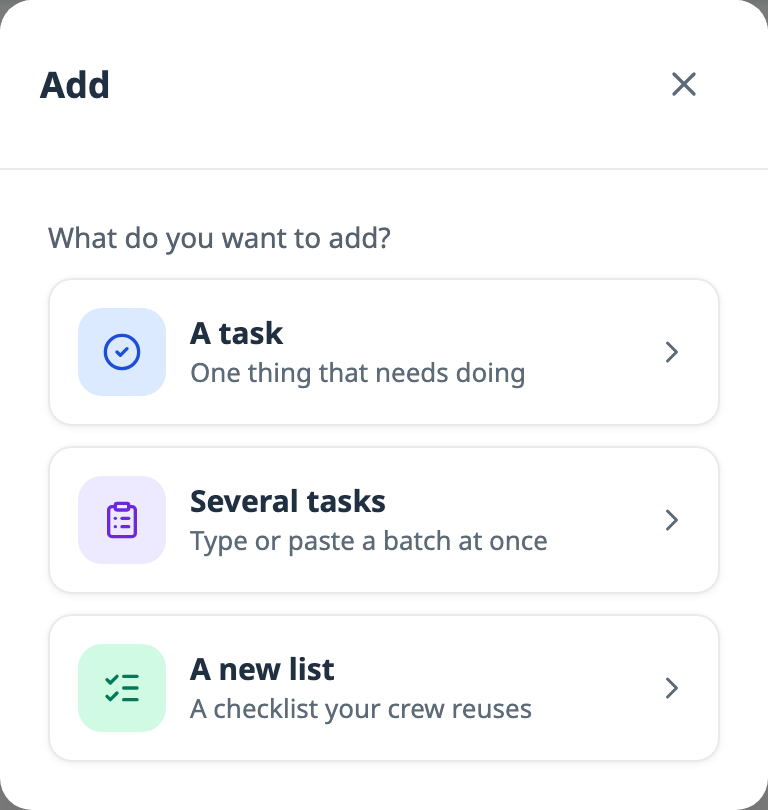
Add offers separate choices for a single task, several tasks or a reusable list.
Choose what to add. On the web and iPhone app, Add offers A task, Several tasks and A new list. Each choice opens the form for that type of work.
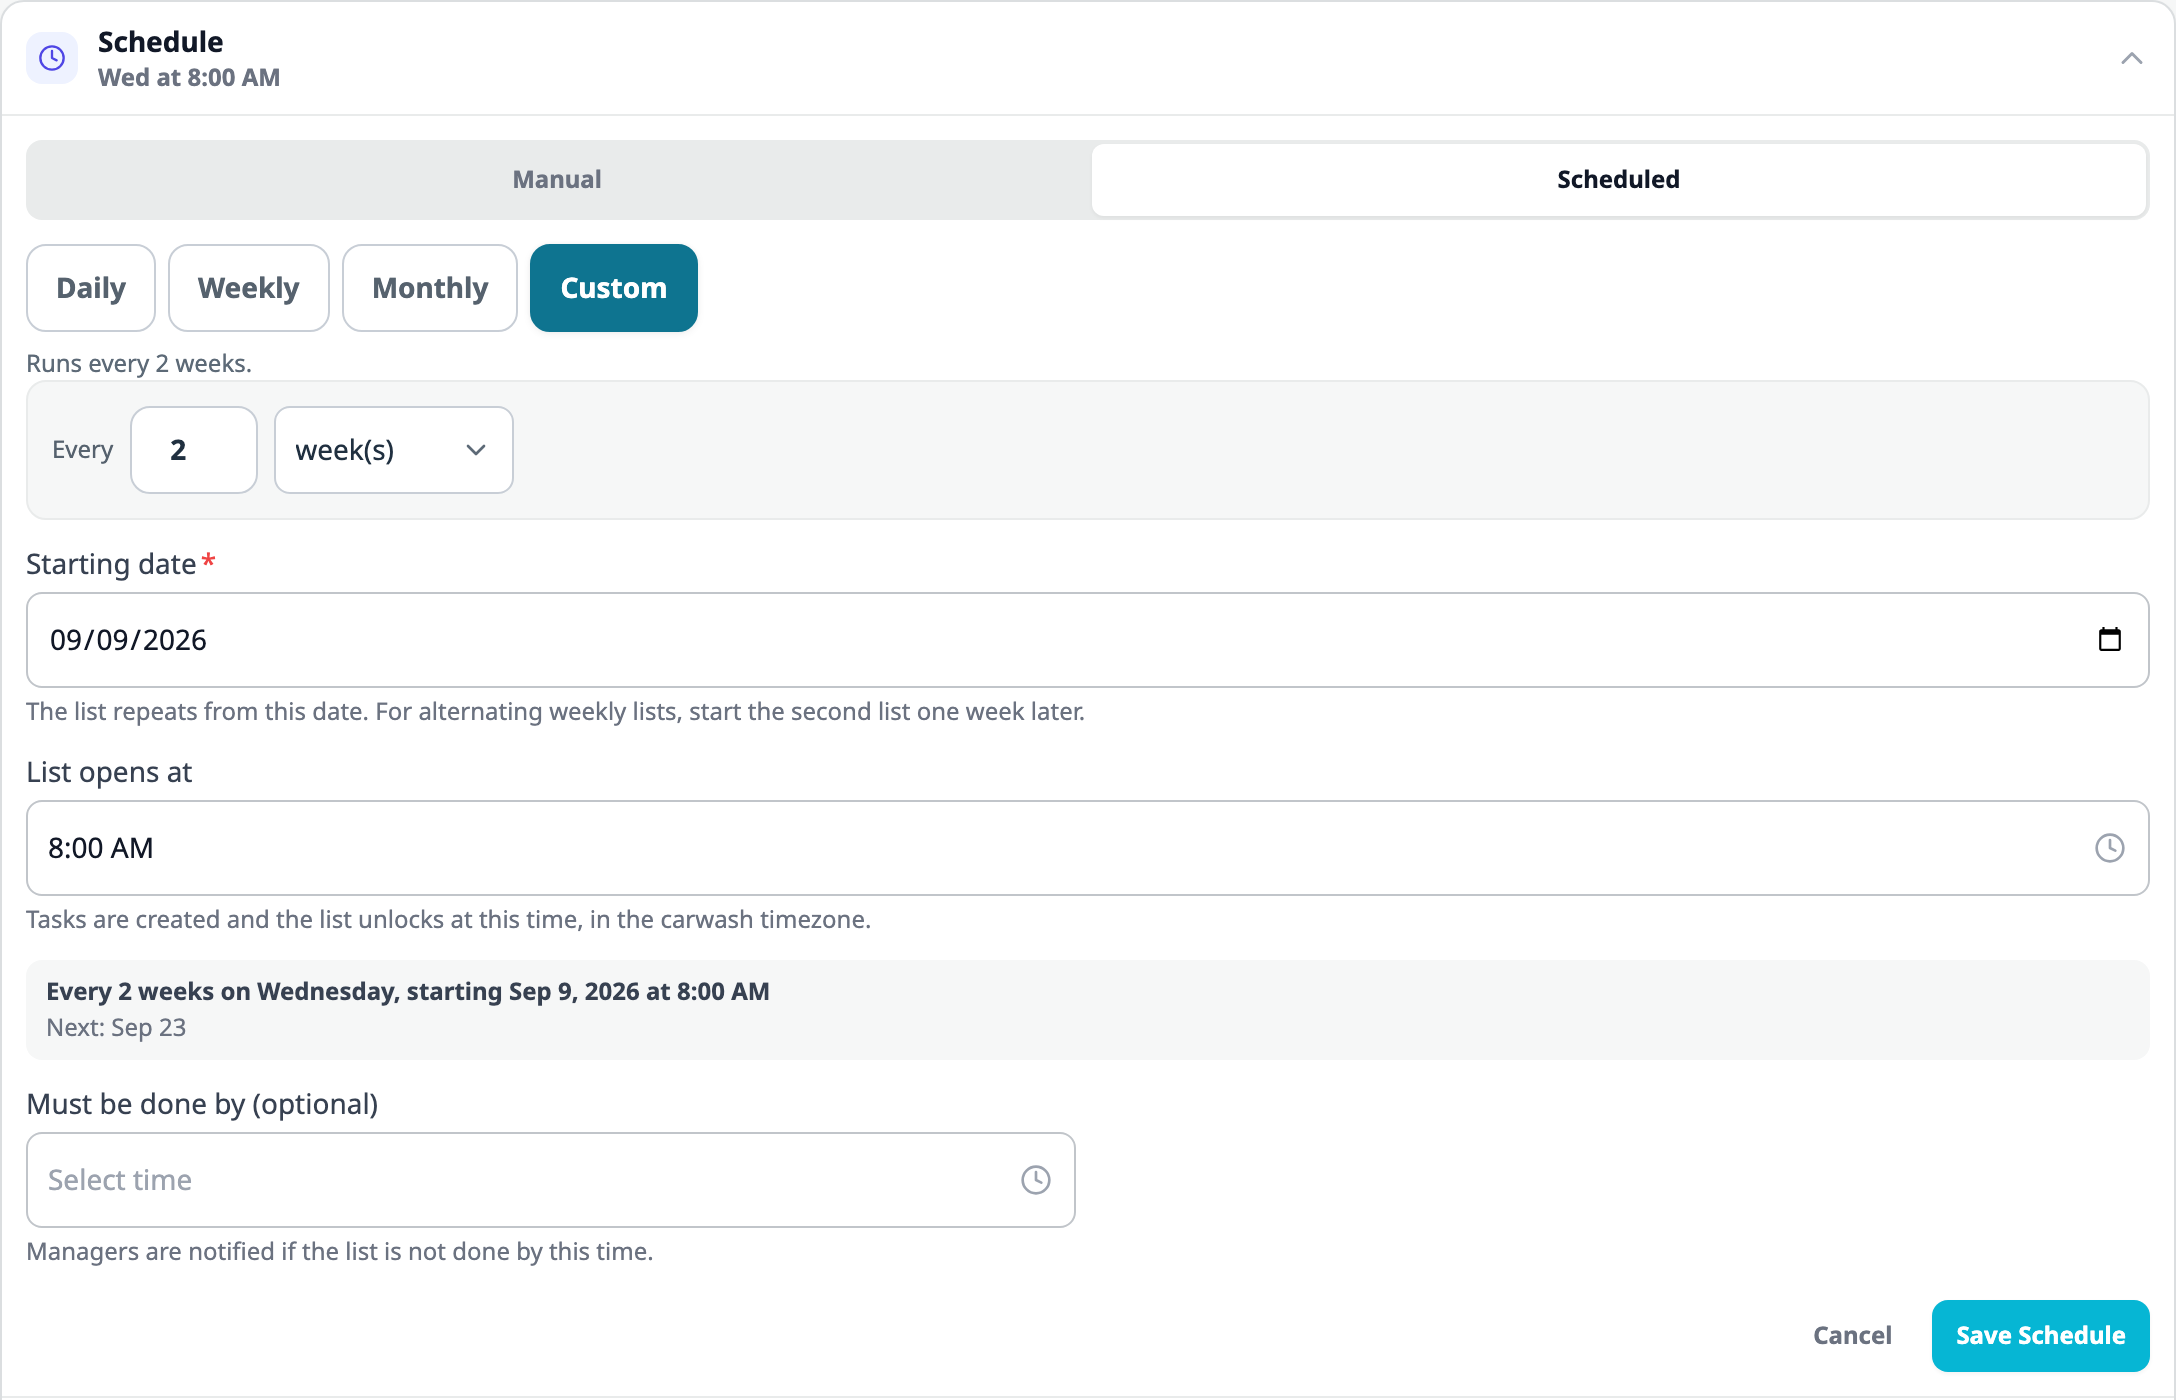
Set a custom repeat interval for a list. In the list's Schedule settings, choose Custom and enter an interval in days, weeks or months, along with a Starting date. The next run appears in the preview. To alternate two lists, set both to repeat every two weeks and start the second one a week later. Completing a list late does not move its future dates.
Lists assigned by role are visible to that role and higher roles. For example, a technician-assigned list is visible to technicians, site leads, managers and owners. A manager-assigned list is generally hidden from site leads, unless they have access through a direct assignment or work within that list.
This list repeats every two weeks from its starting date, with the next run shown in the preview.
OpsConsole
Inspections
Inspection templates have more answer types. You can also record who helped complete an inspection and link individual items to camera footage.
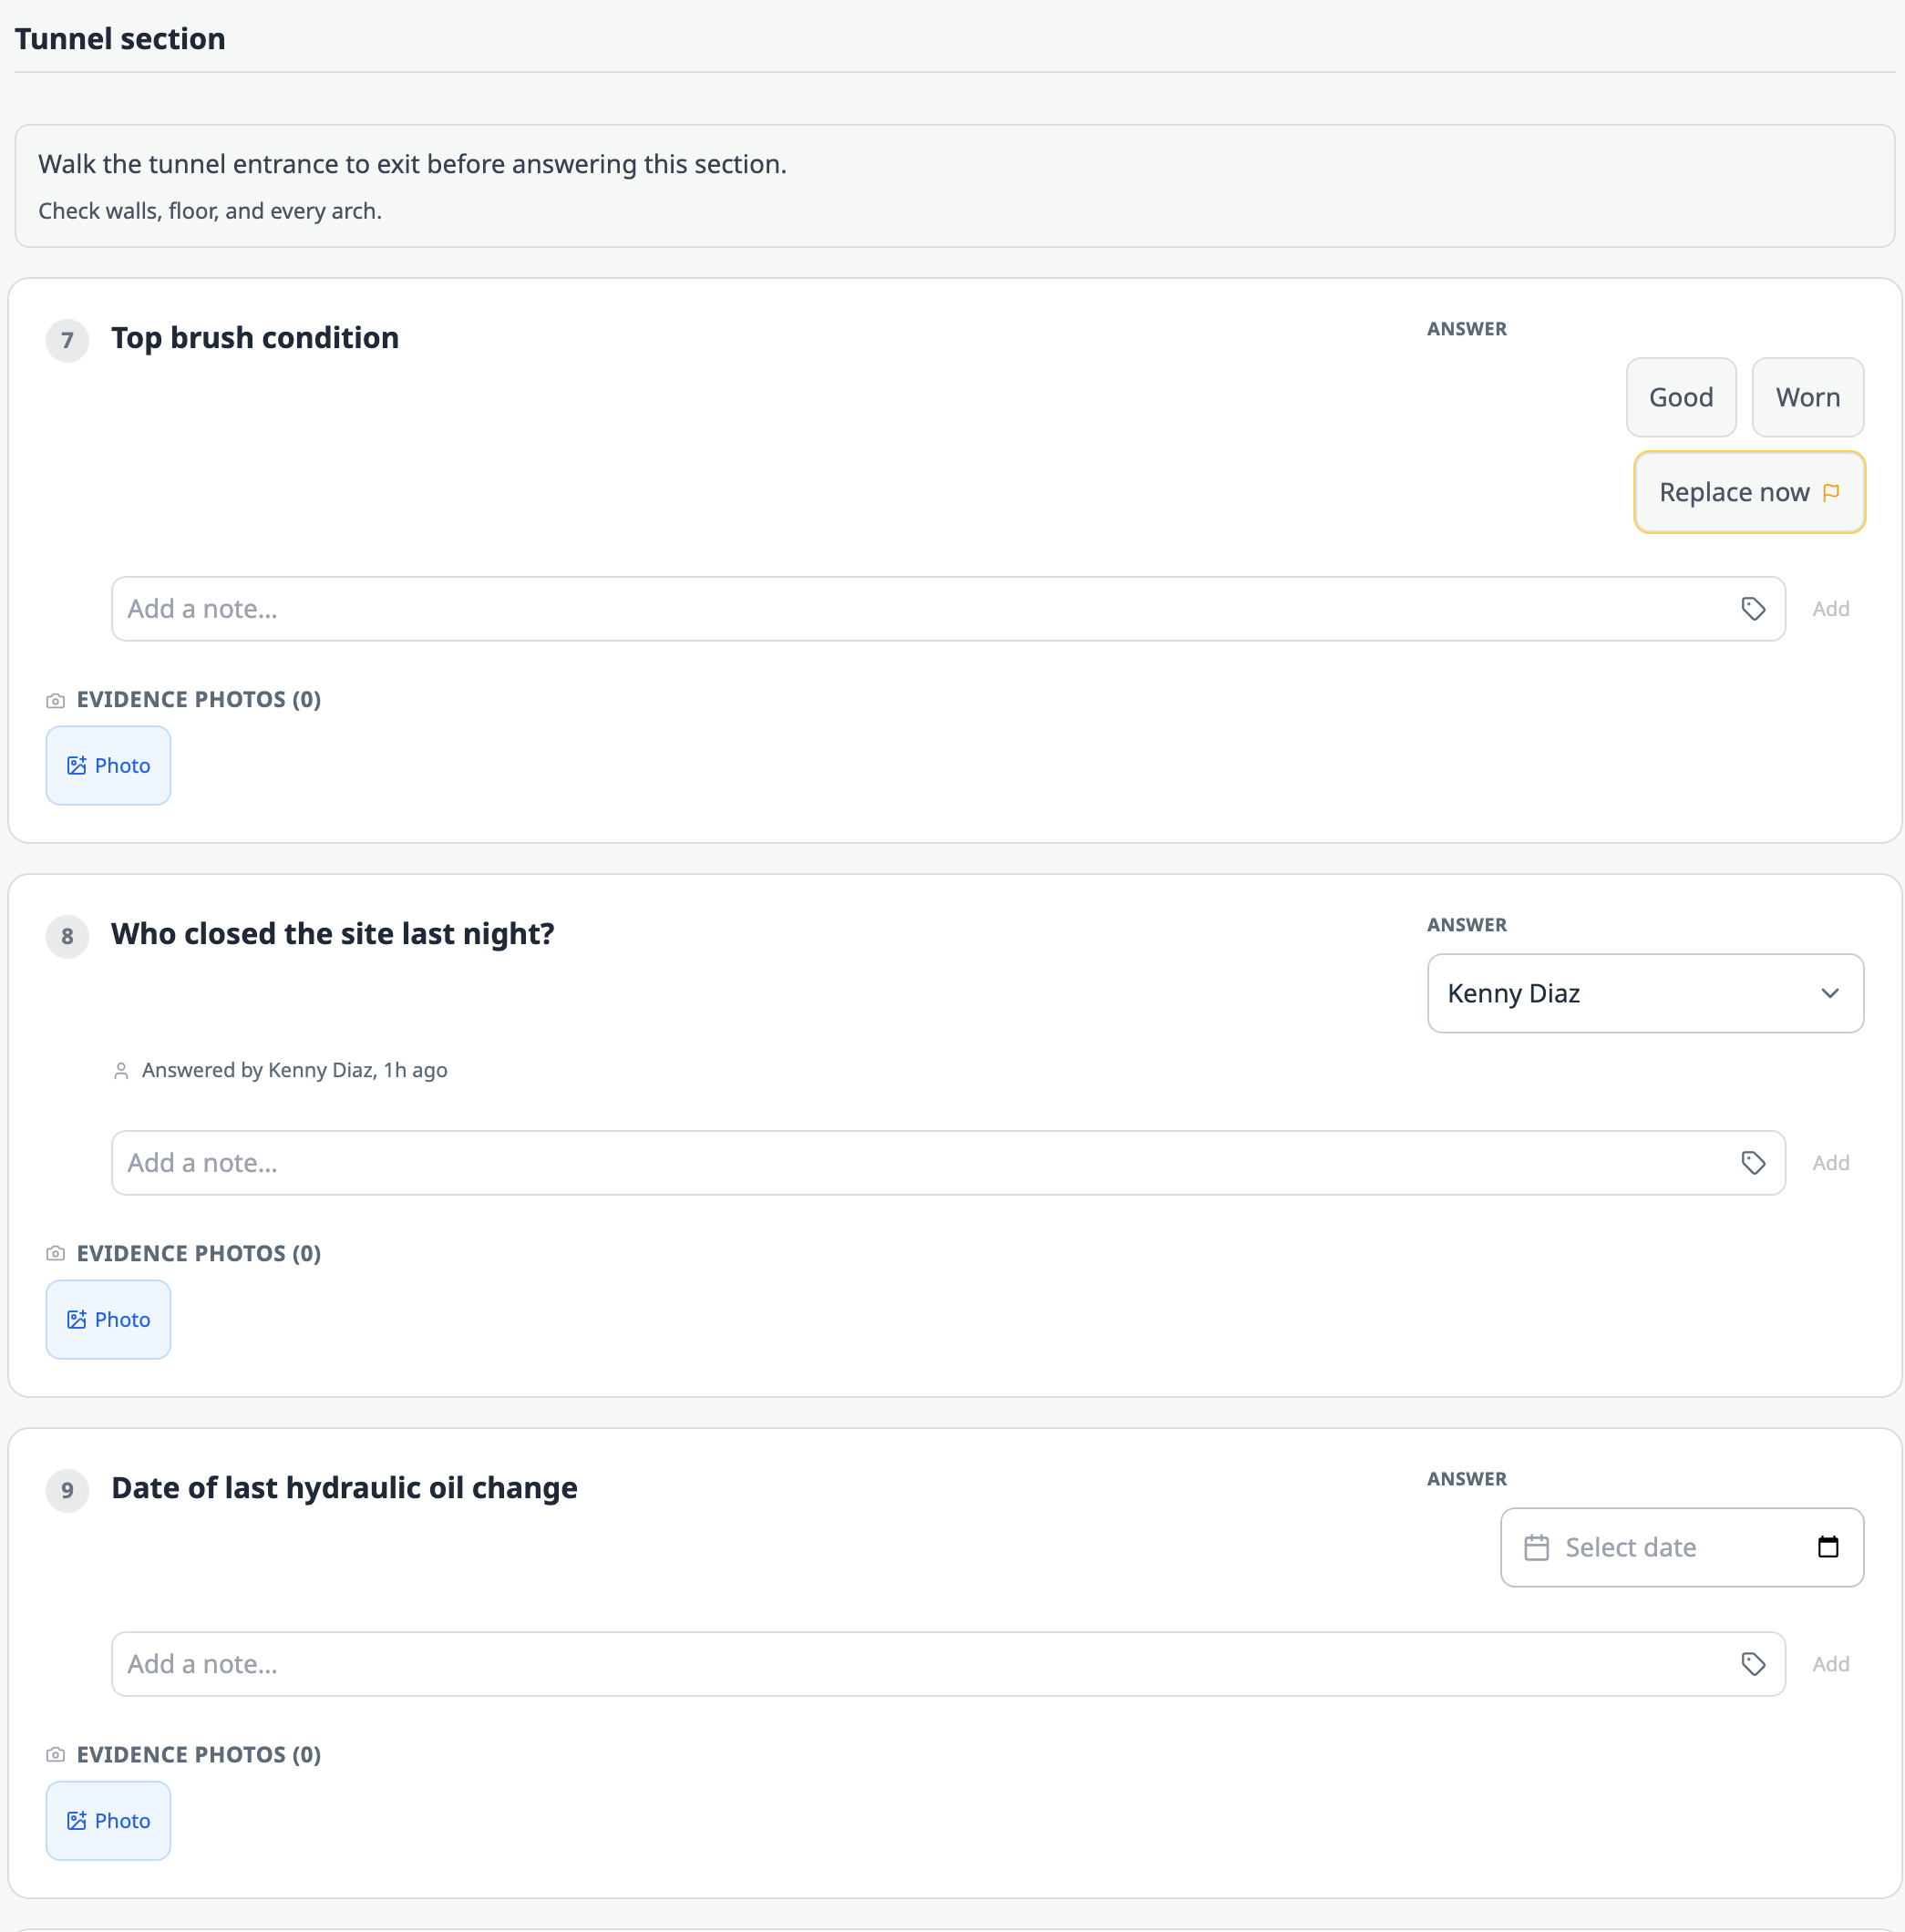
This inspection uses a section heading with instructions, multiple choice, an employee picker and a date field.
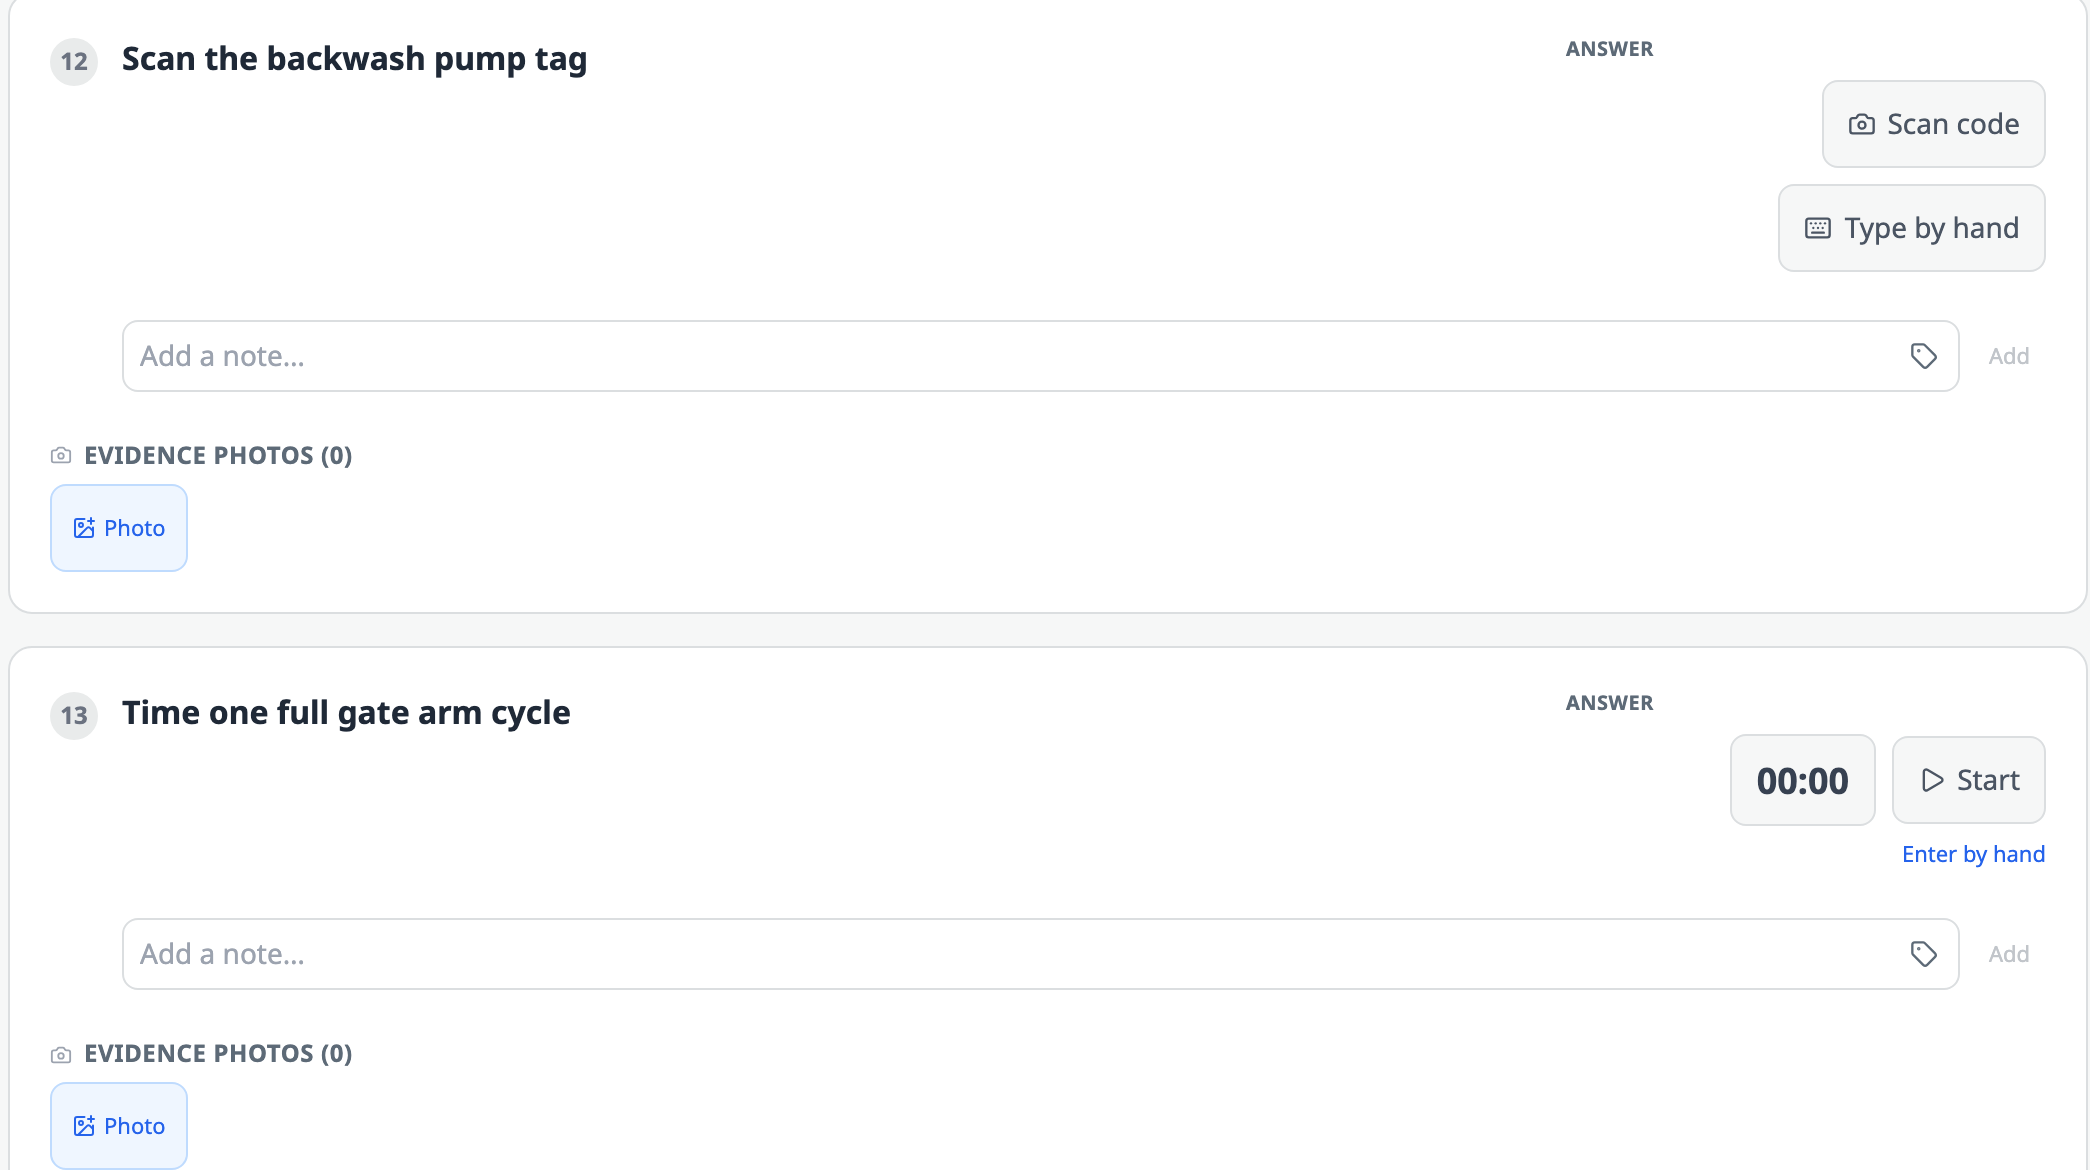
Choose an answer format for each item. New choices include Photo, Scan a code, Multiple choice, Employee, Date, Time, Date and time, and Stopwatch. Existing pass/fail, done/not done, yes/no, rating and text answers remain available. You can mark specific multiple-choice answers for follow-up and require a photo with an answer.
Add directions between questions. Section subtitle and Instruction text let you organize an inspection and explain what the person completing it should check.
Link a Number item to a gauge. The item shows the gauge's target and acceptable range, along with the previous reading and who took it. The answer changes color as it is entered to show whether it is in range. Submitting the inspection records the value on the linked gauge.
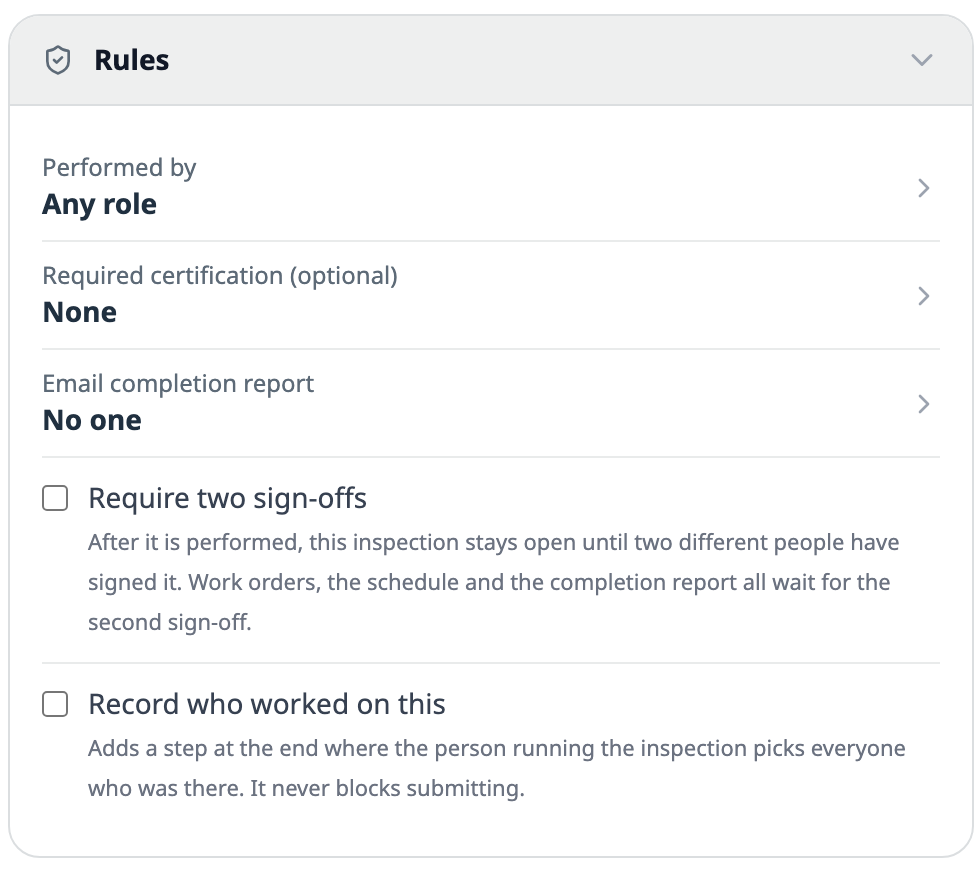
Record who worked on this adds a team member picker at the end of the inspection. Selected names appear on the completed inspection, printed report, completion email, export and History.
Review camera footage for an item. With UniFi Protect or LiveReach connected, owners and managers can select cameras and a review duration for each item. UniFi Protect provides clips; LiveReach opens its recording player and shows the time window to review. The window uses the recorded answer time, with the inspection time as a fallback when needed. Completion emails link to the inspection. UniFi Protect is available by default, and LiveReach remains in beta.
Check an equipment tag during an inspection. Set the Expected tag by scanning the equipment, using its existing label or choosing Create a tag. Print label produces a QR sticker for the unit. QR label generation works offline. During the inspection, a scan that does not match the expected tag is marked for follow-up.
Repeated failures stay with an open work order. If an item fails again while its work order is open, the new failure is added to that work order.
Choose who can provide the second sign-off. Templates that require two sign-offs can specify the roles allowed to countersign. An inspection can also be assigned to more than one role.
Reports identify the site. Printed reports and history exports include the site name, so you can tell which wash a record belongs to.
The template editor shows one settings group at a time on the web and iPhone app.
Inspection actions stay in consistent positions. Each inspection appears in one row, with View, Start, Resume and History controls placed consistently as applicable.
The scan item checks an equipment tag, and the stopwatch item records how long a gate cycle takes.Rules includes Require two sign-offs and Record who worked on this.
The answer types are supported on the web, kiosk and iPhone app.
OpsConsole
Complaints
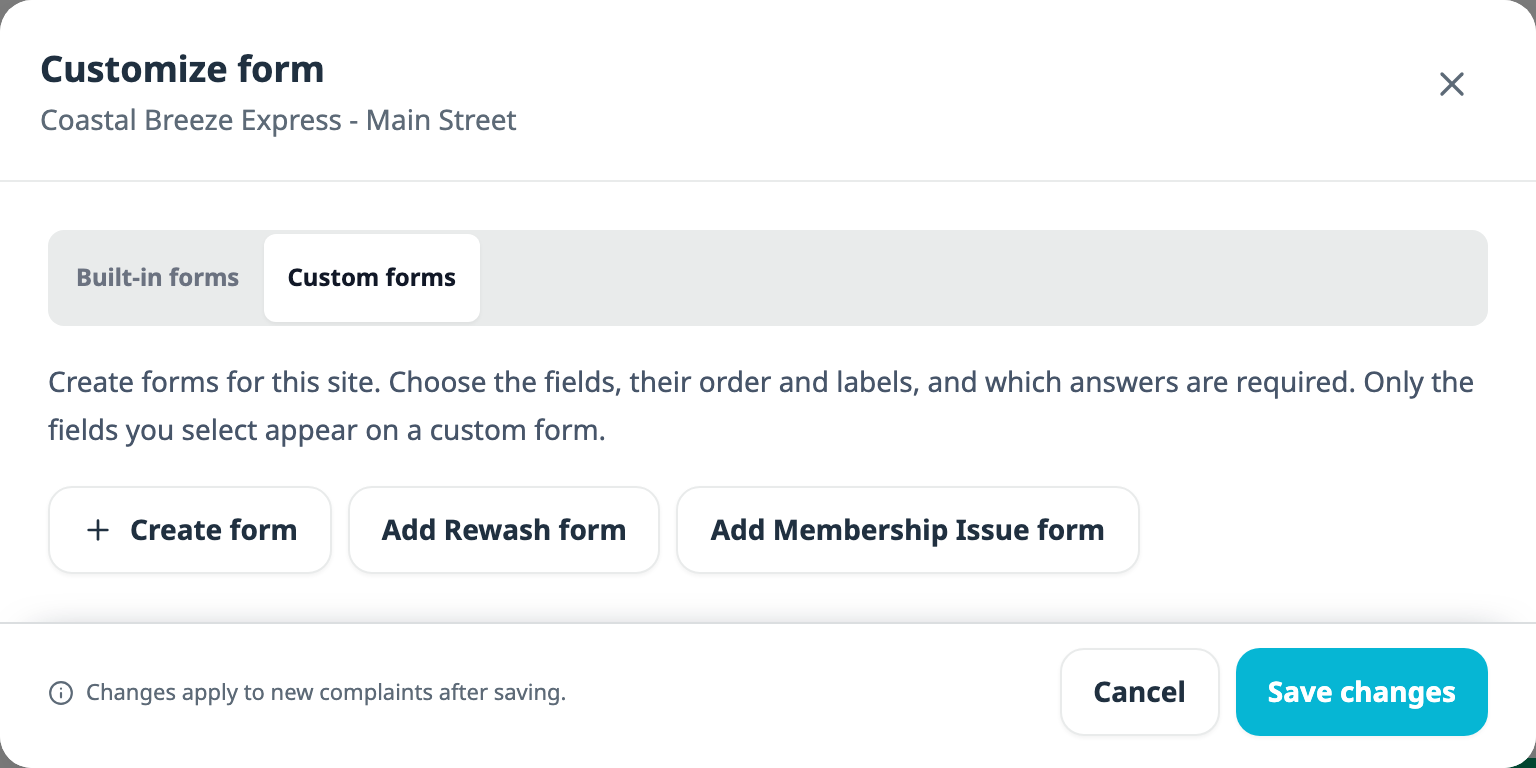
Use Customize form on the Complaints page to configure forms for the selected site.
On the Custom forms tab, you can create a blank form or start with the Rewash or Membership Issue preset.
Build a form for the information you need. Choose the fields, rename and reorder them, and make each answer required or optional. Each site can have up to six custom forms.
Start with a preset. Rewash asks for a license plate and reason. Membership Issue includes the customer's name, phone number, email address, license plate and a description.
Field rules apply across intake screens. Field visibility and required-answer settings apply to staff forms, customer QR forms and the iPhone app. Section switches affect staff forms only. You can hide the payment card's last four digits, VIN and address fields.
Email requirements can be changed. Built-in customer forms require the customer's email address by default, as do staff damage forms. You can change that requirement in Customize form.
Repeated taps do not send a second complaint. The customer form prevents another submission while the first one is in progress.
UniFi Protect can prepare complaint cases. After connecting a recorder, enable Collect evidence for this site and Prepare complaint cases and footage. New complaints then create cases on the connected recorders for a manager to review.
Work Orders and Equipment
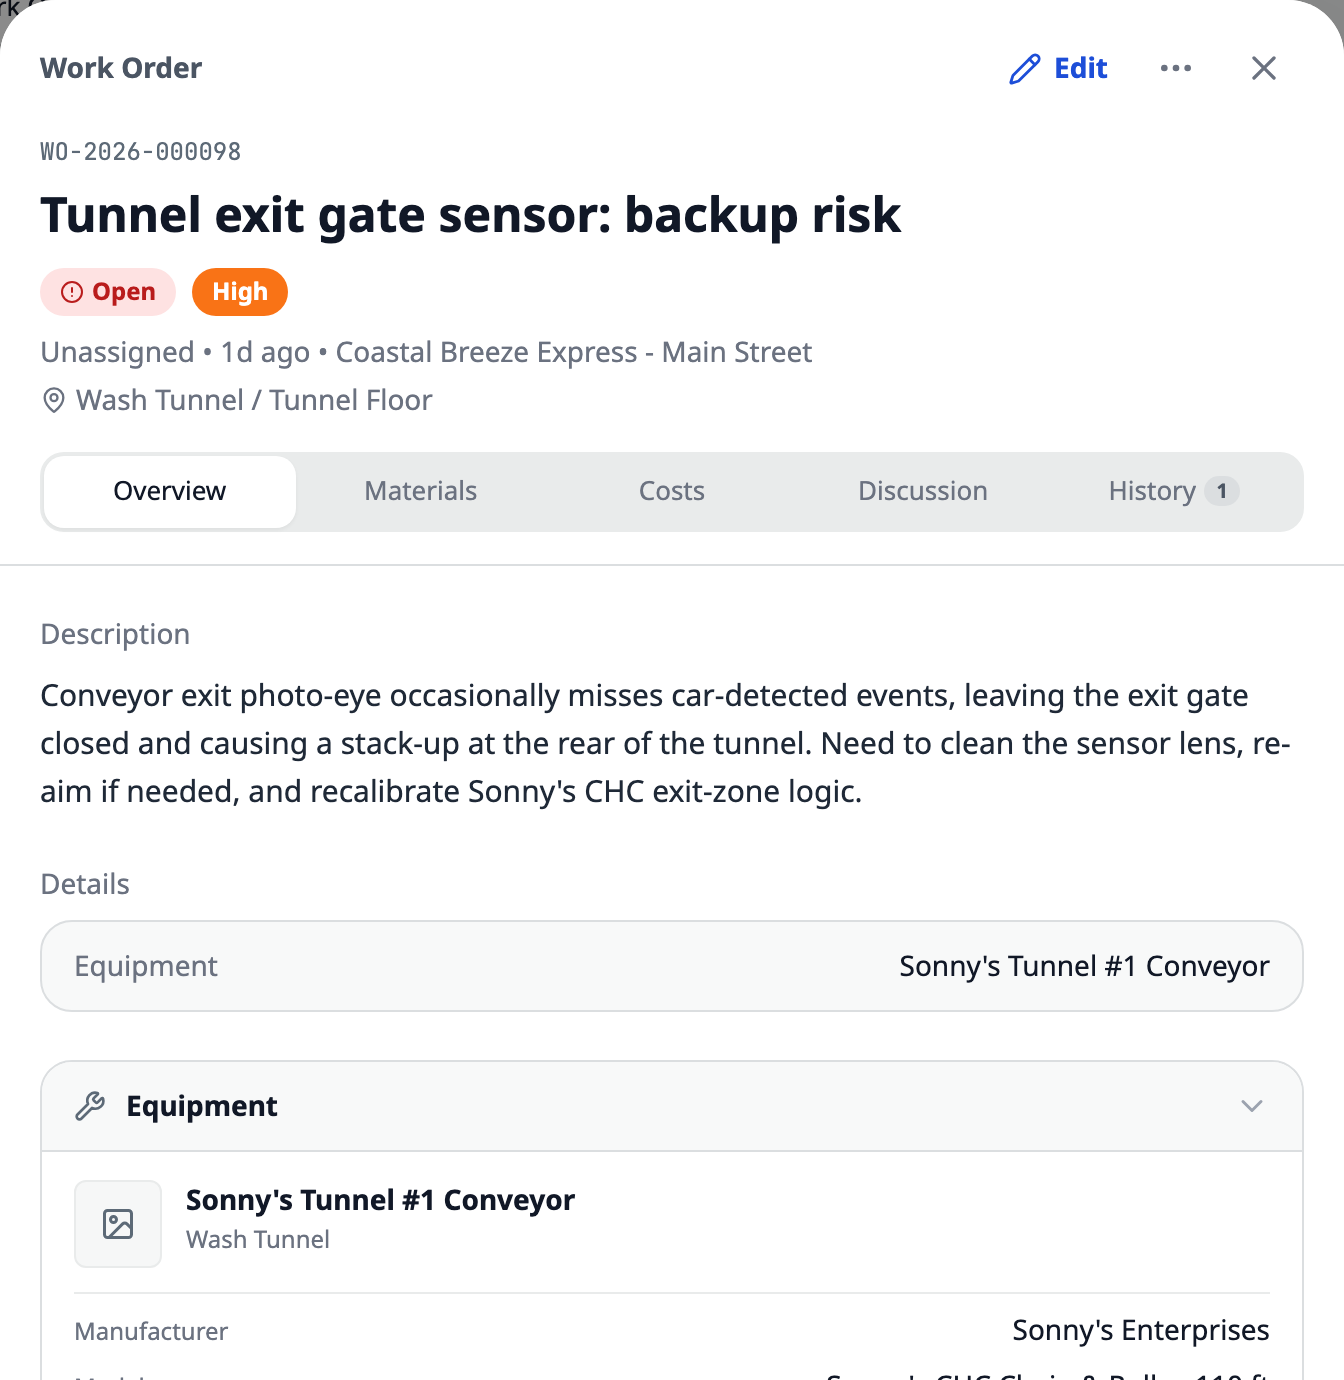
The equipment card on a work order includes the manufacturer, model, serial number and manuals.
Find equipment details on the work order. The equipment card shows the machine's manufacturer, model, serial number and manuals. Compatible parts appear first when choosing materials, and the equipment keeps a history of installed parts.
Use parts stocked at another site. A part's details show stock at other sites, and search can find parts the current site does not stock. When a part is used, inventory is deducted at the supplying site and the cost is recorded at the work order's site.
Removing an inventory material returns the recorded quantity to stock. This works on the web and iPhone app.
Set a preventive maintenance interval for equipment or a zone. Schedules can be hourly, daily, weekly, monthly, annual or custom, using the same repeat controls as To-Do lists.
StockConsole
Inventory and Orders
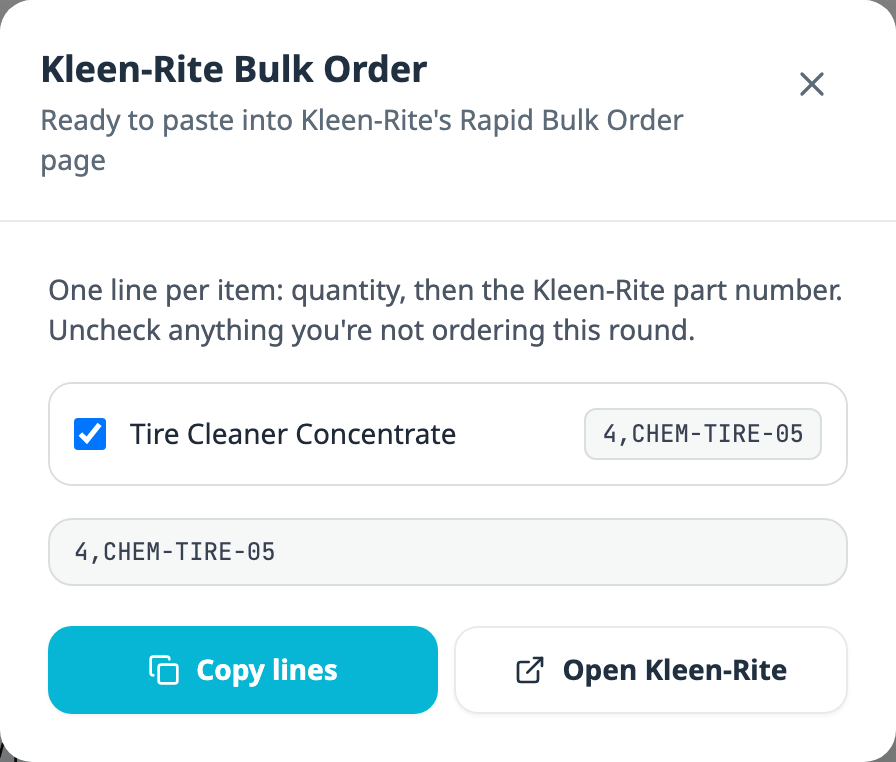
Kleen-Rite Bulk Order prepares a quantity and part number for each selected item.
Prepare a Kleen-Rite order from pending orders. Kleen-Rite Export creates the lines used by Kleen-Rite's Rapid Bulk Order page, with quantities rounded up to whole purchase units. It reports how many pending orders belong to other suppliers and excludes them from the export. Choose Copy lines, then Open Kleen-Rite. Sign in and paste the lines into the Rapid Bulk Order box.
Tools and Uniforms are now preset inventory categories on the web and iPhone app.
ChemConsole
Chemicals
Grid view lets you edit several tanks in one place. Chemical orders can also show the packaging you buy, and sites can send low-chemical alerts to a chat channel.
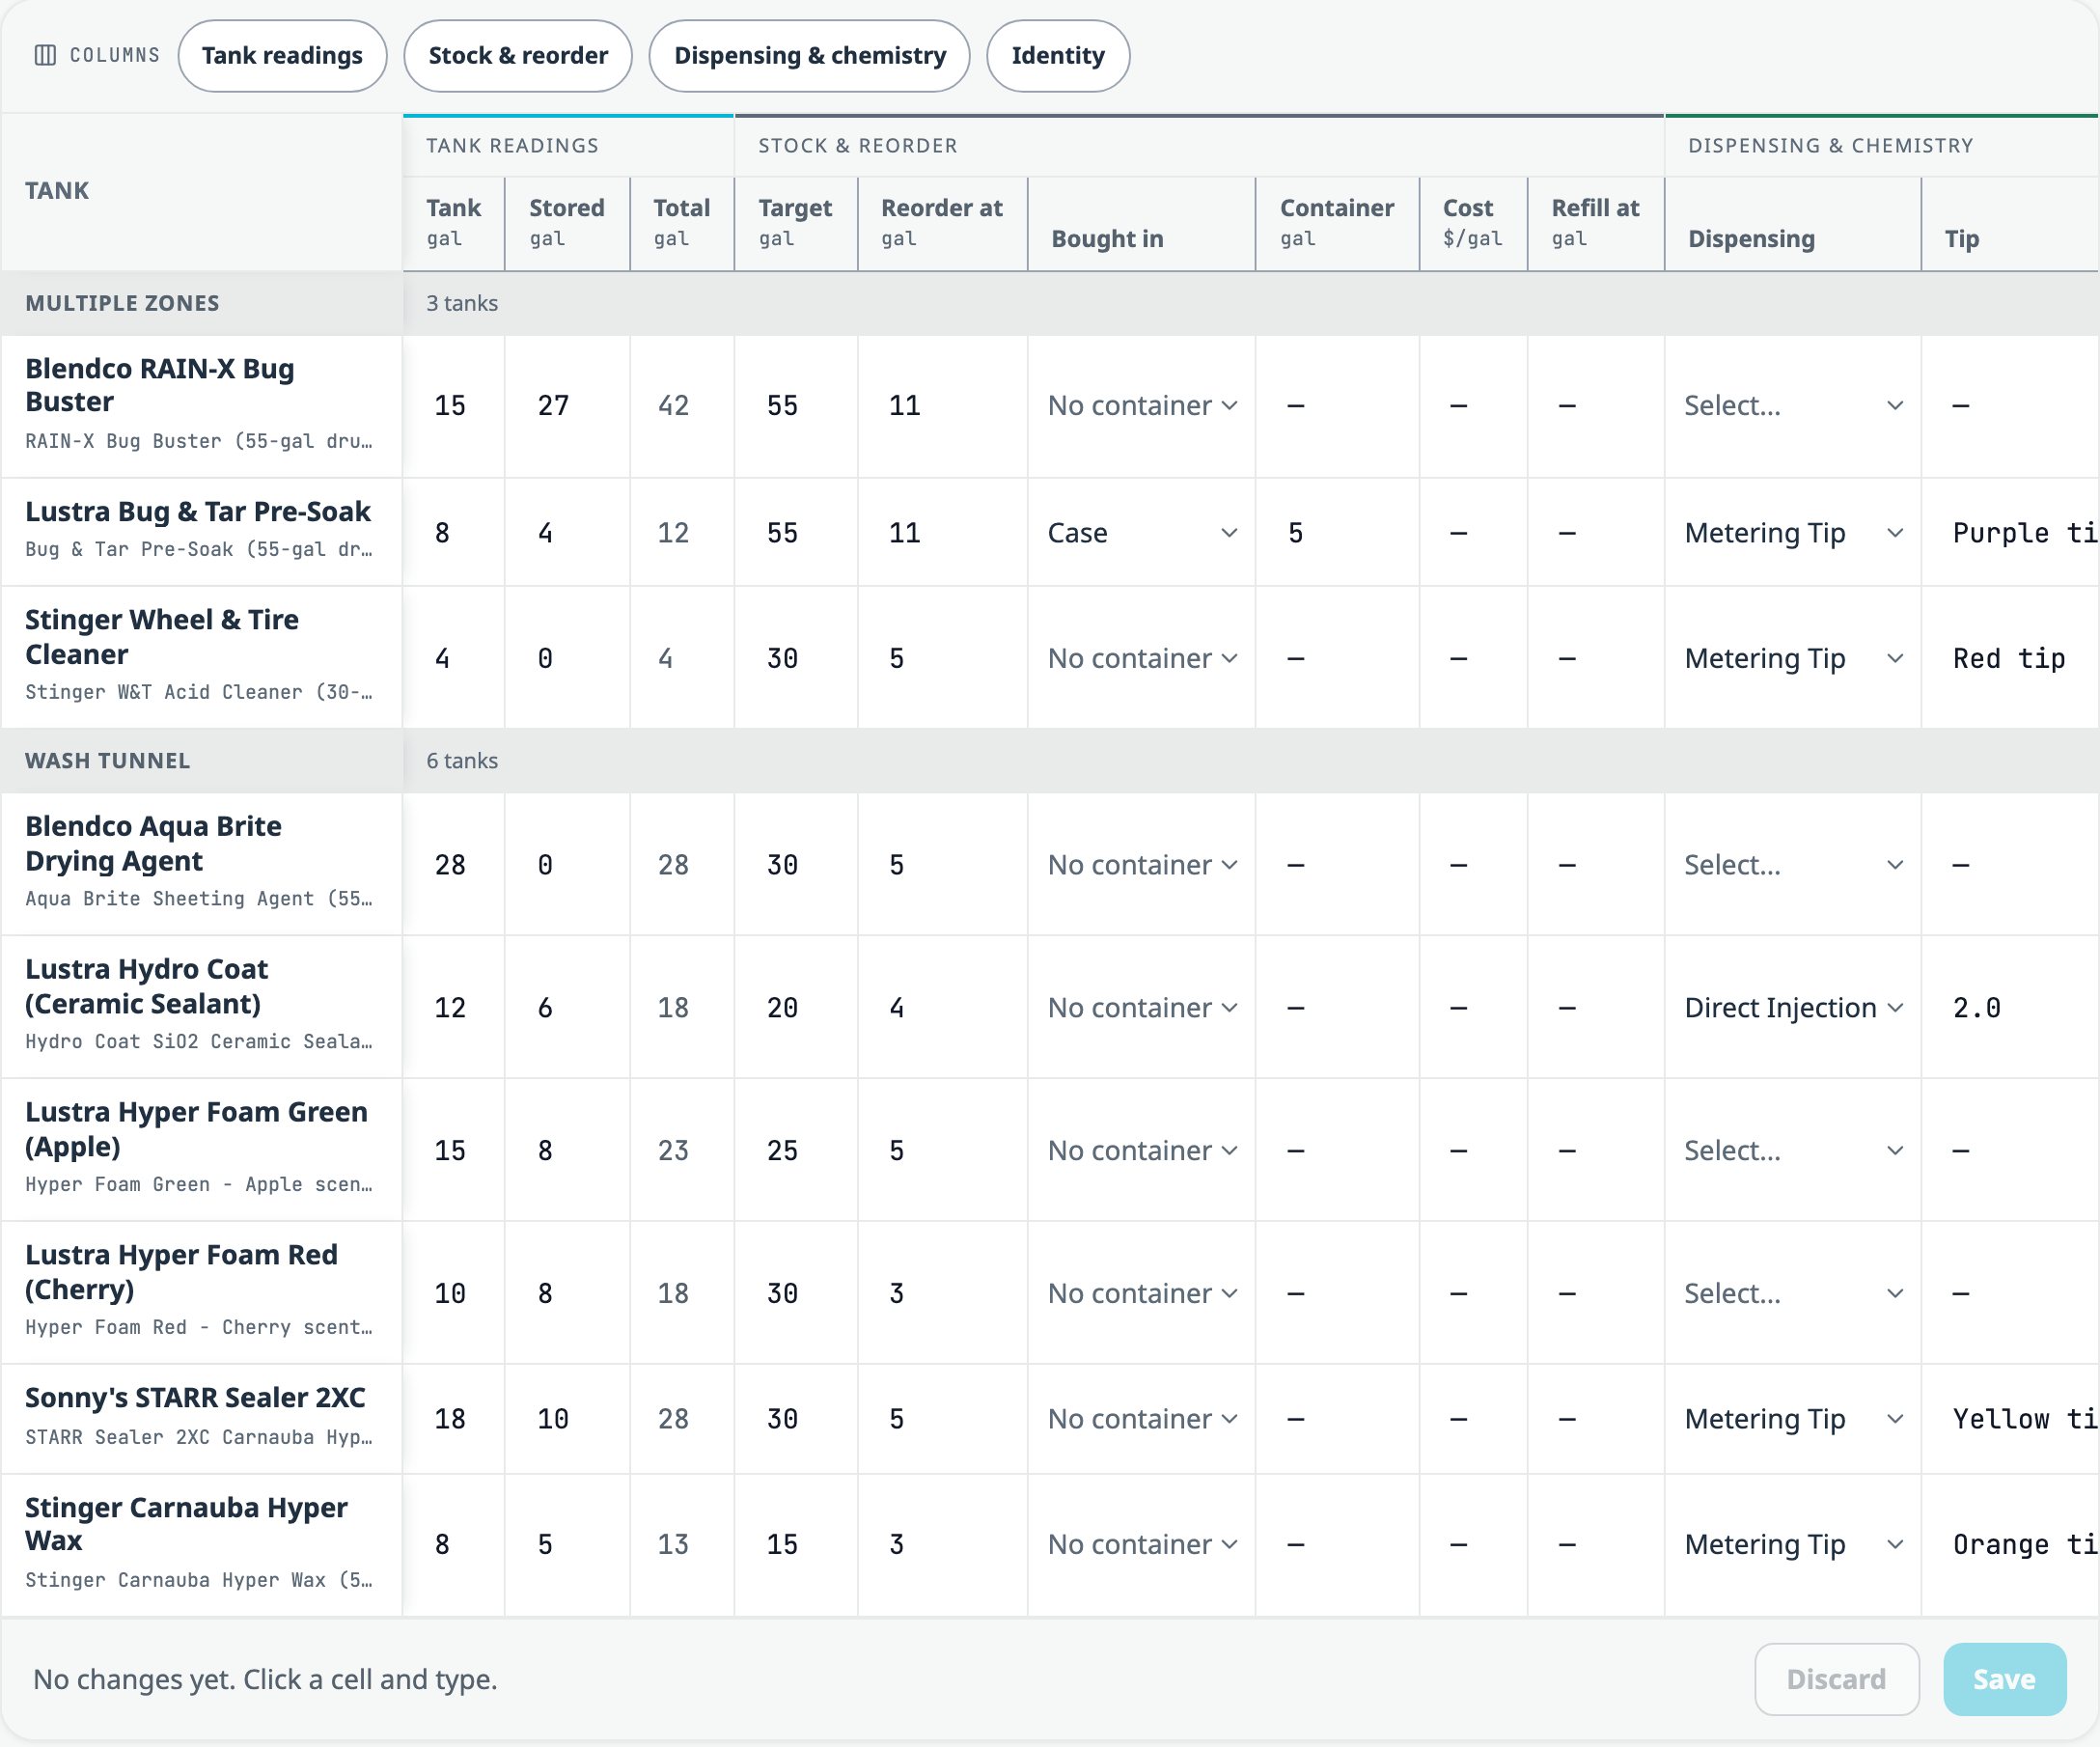
Grid view on the Chemicals page puts tanks in rows and groups their settings into columns.
Edit tanks in Grid view. On the Chemicals page, switch from cards to Grid, edit the cells you need and save the changes together. Anyone with access to Chemicals can edit readings. Site leads, managers and owners can also edit stock, dispensing and tank details. The iPad displays the table; the iPhone shows one column at a time across all tanks.
Record the packaging you buy. Bought in records the container, count and size, such as a case of two 2.5-gallon bottles, and calculates the total gallons. Orders use those purchase units. A line below the reorder thresholds shows what the next order will contain.
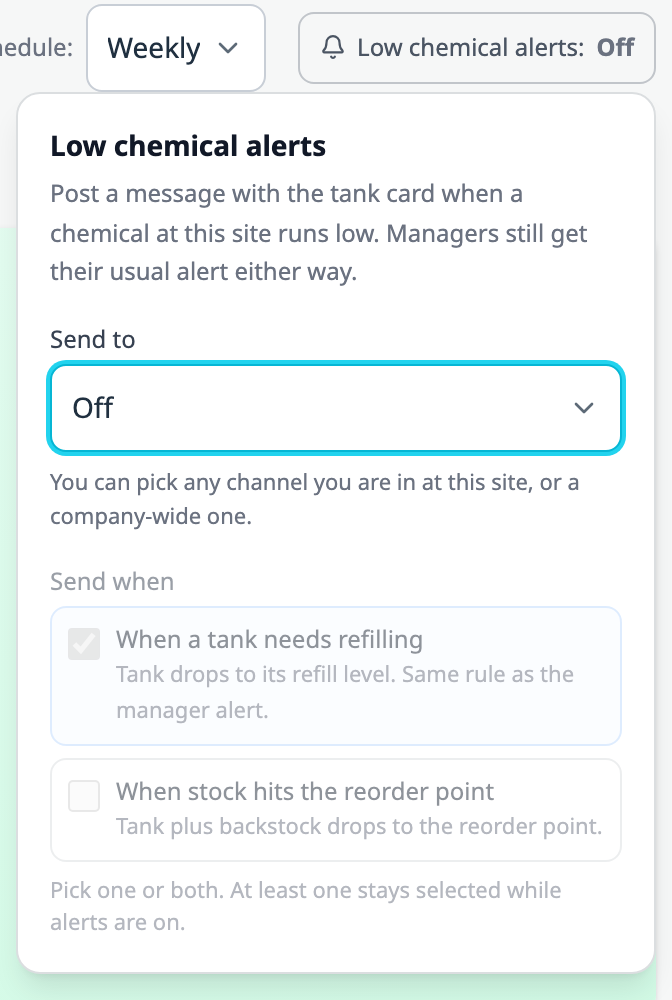
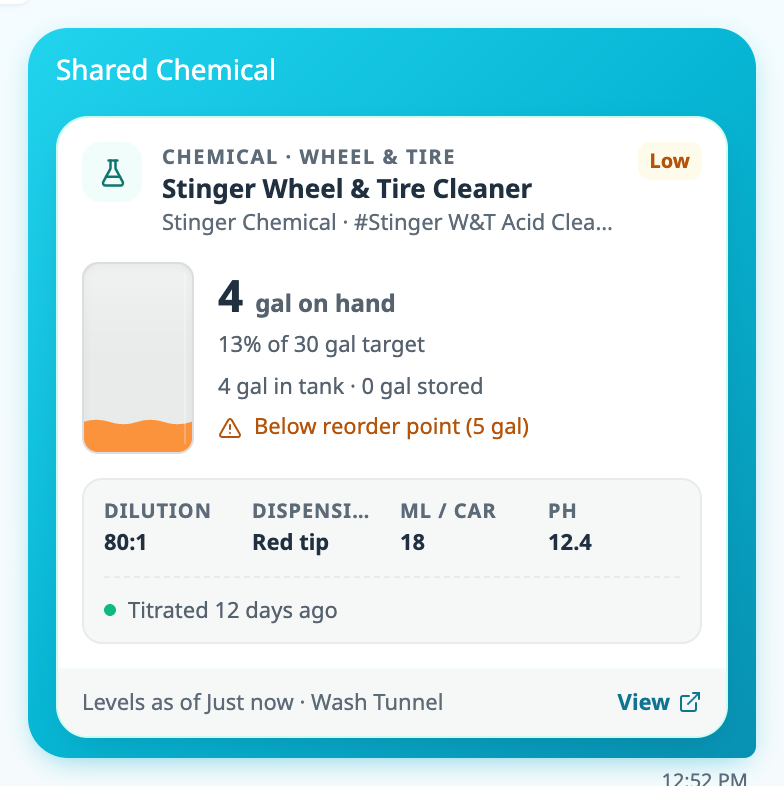
Send low-chemical alerts to chat. In Low chemical alerts, choose a channel under Send to. Under Send when, select When a tank needs refilling, When stock hits the reorder point, or both. The reorder-point check includes backstock, and the alert includes the tank card.
Ver-tech Labs safety data sheets have been added to the shared library.
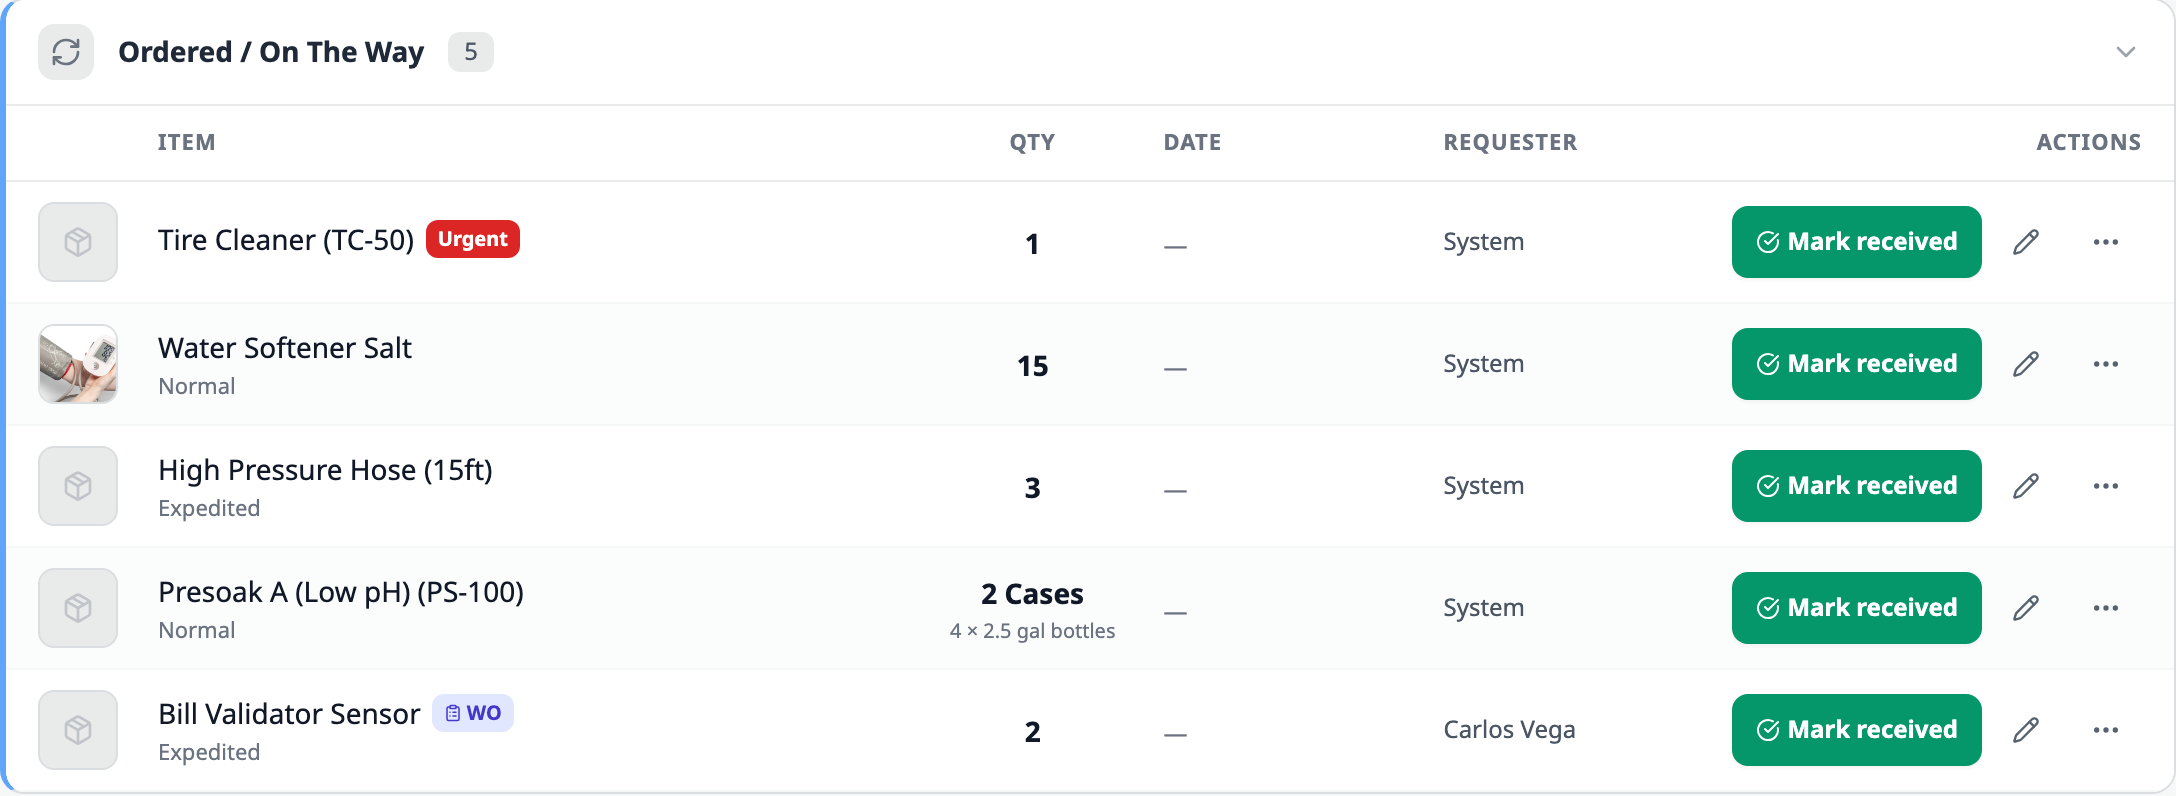
Ordered / On The Way shows the order quantity in cases, with the bottle count underneath.Low chemical alerts lets you choose the chat channel and the conditions that trigger a message.A low-chemical alert posts the same tank card shown here in chat.
Feed
Feed
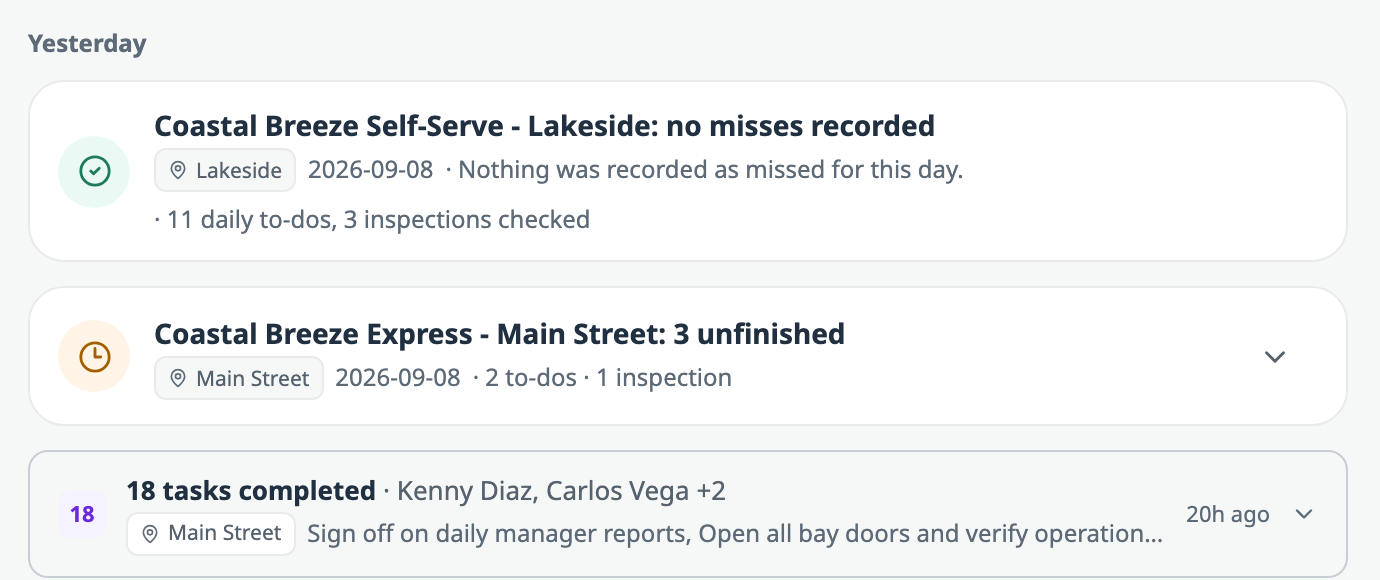
The Feed shows an end-of-day card for each of these two sites.
Review unfinished work after the site closes. The Feed adds an end-of-day card for the site, listing work that was due and not completed. The card preserves the record from that day's close.
The Feed uses one centered column across screen sizes.
On the phone, filters fit in a compact strip. Videos play within the Feed, and comment drafts are kept during a slow send.
Directory and People Review
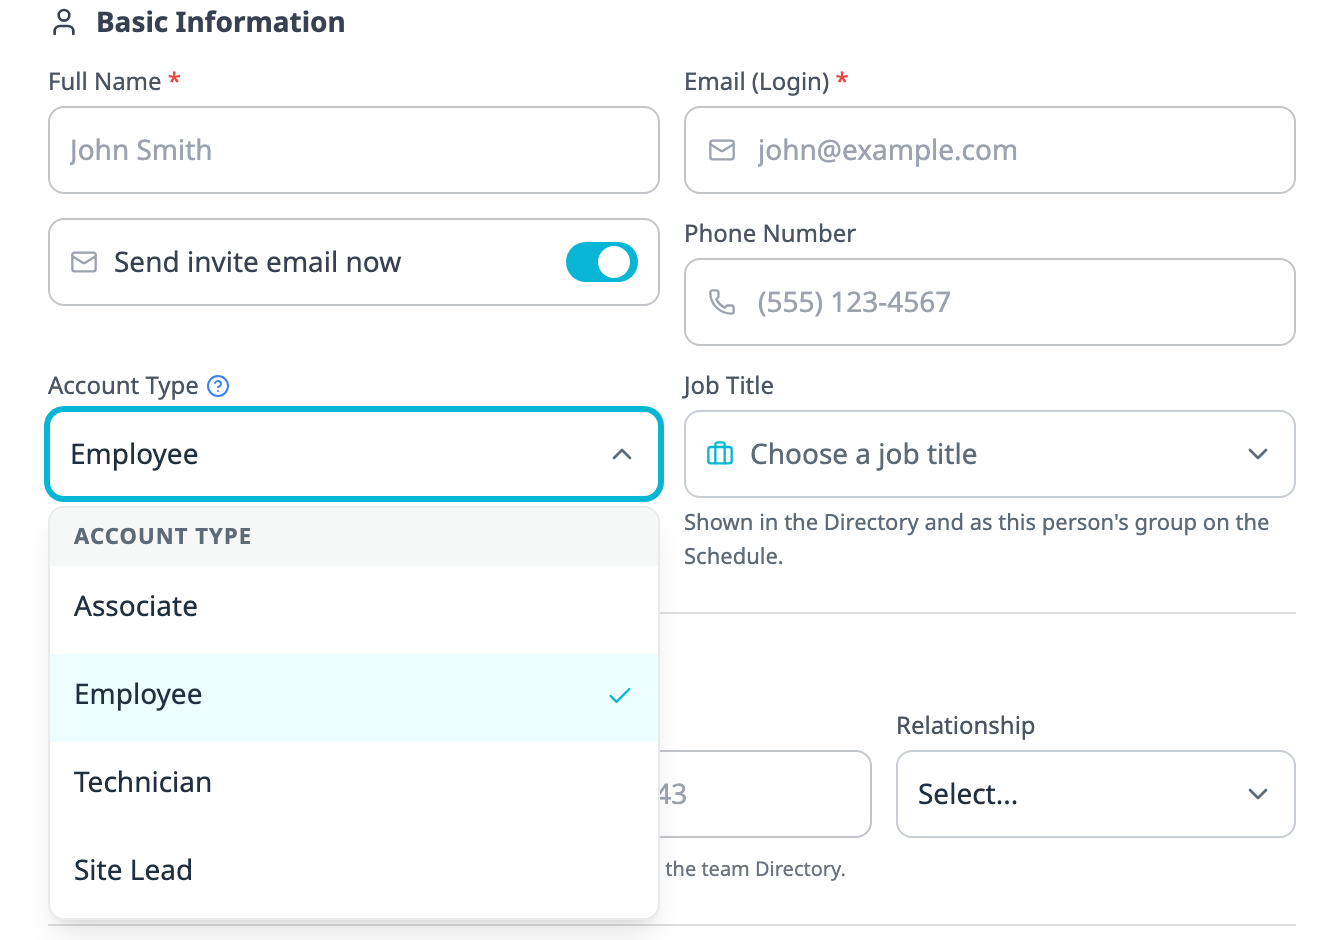
Associate is an option in the Account Type list when adding a team member.
Choose Associate for staff who need access to their own work. Under Account Type, Associate provides access to the person's hours and schedule, assigned tasks and inspections, chat and training. Associates do not have access to the Directory, Feed, work orders or inventory. The account type is supported on the web, iPhone app and kiosk.
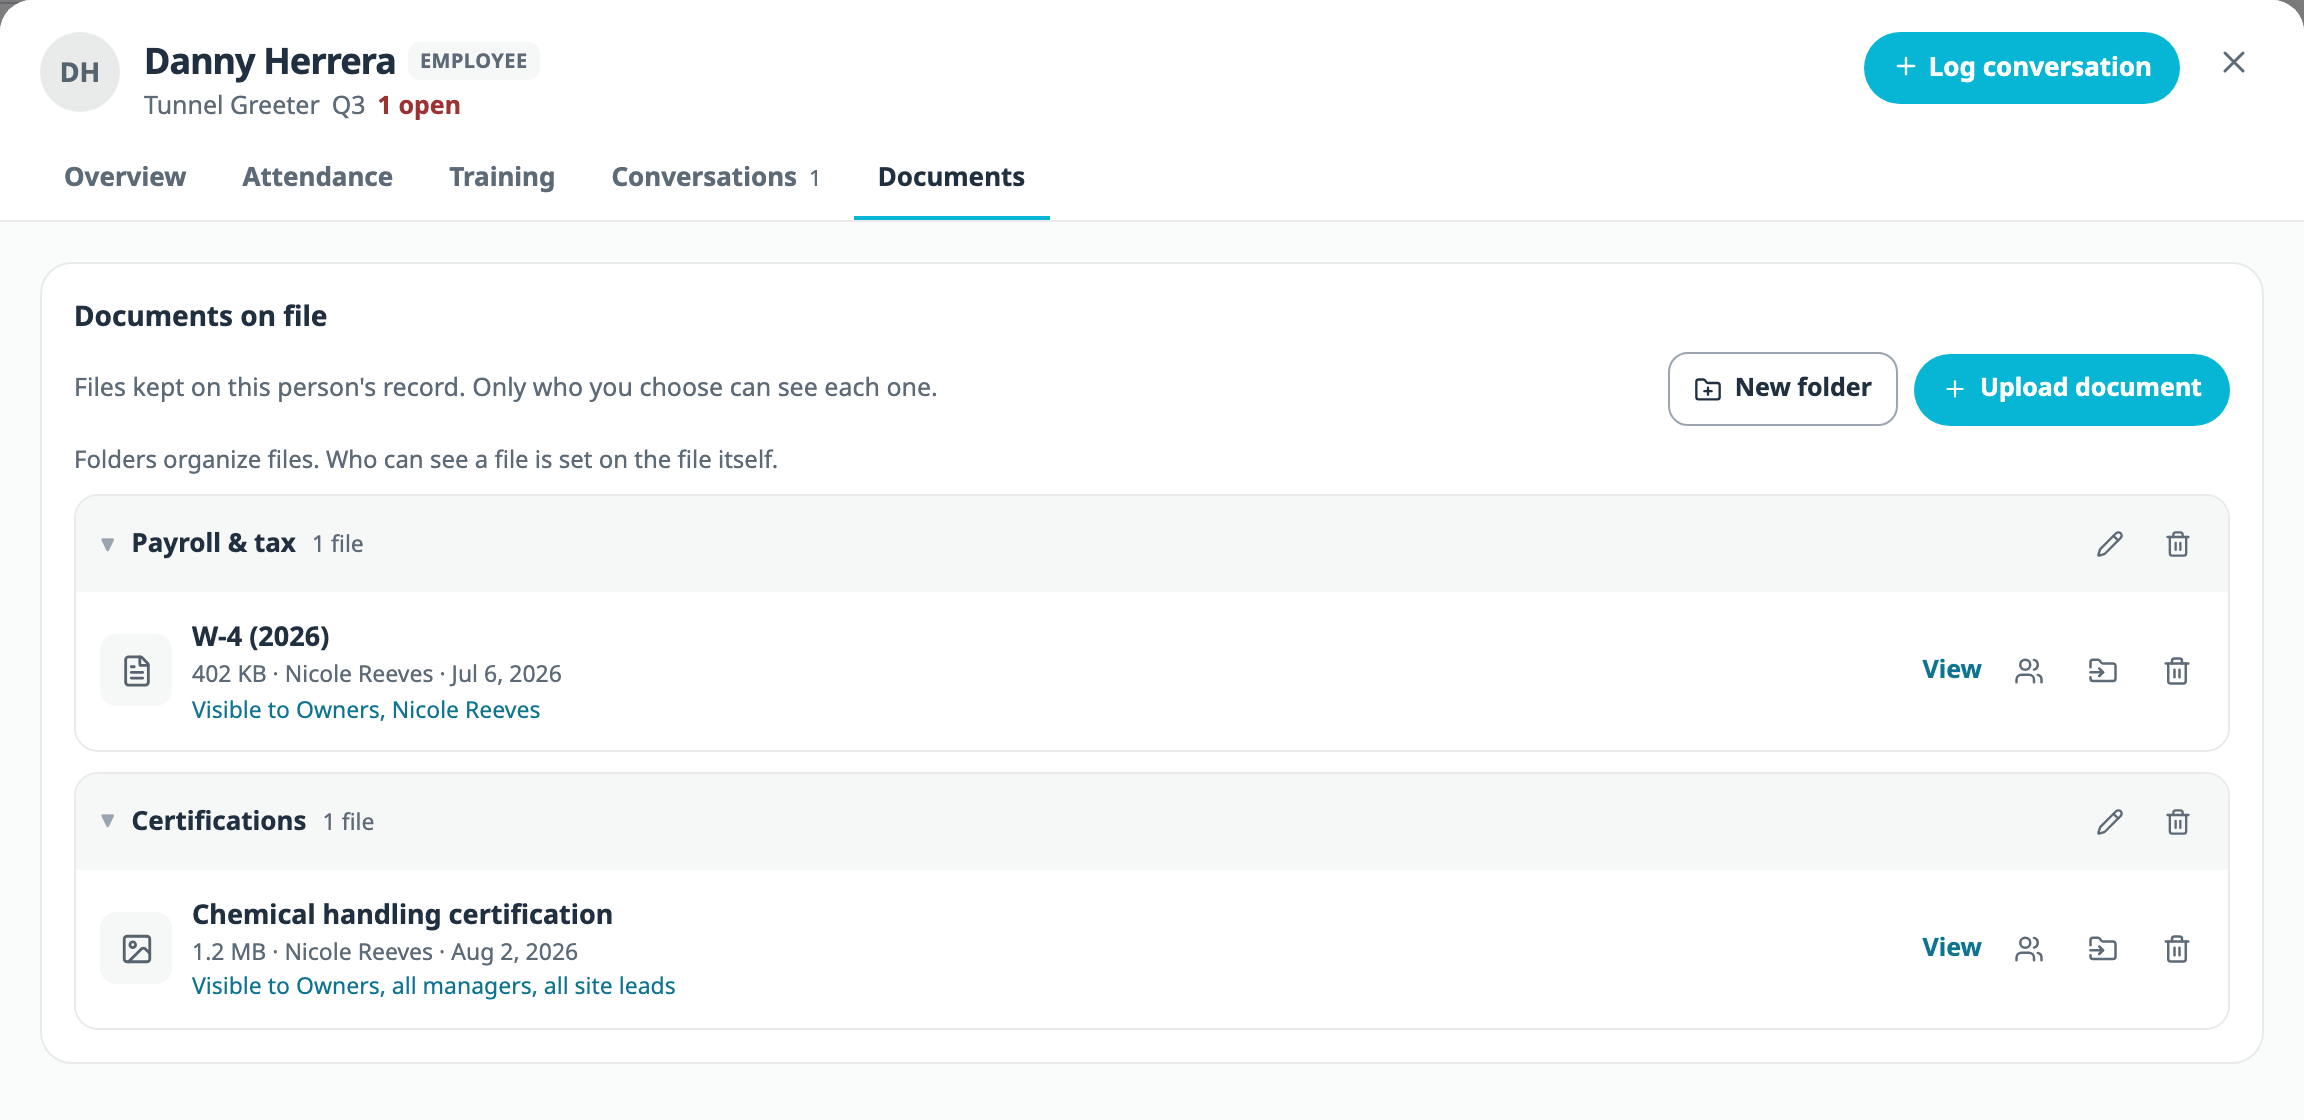
Keep documents on a person's record. In Documents, upload files such as a signed handbook acknowledgment or certificate, organize them in folders and choose who can view each file. In the iPhone app, you can upload a photo of a signed sheet directly to a folder.
Control contact details shown in the Directory. Owners have separate settings for showing coworkers' phone numbers and email addresses to employees and technicians. Site leads, managers and owners can still see both.
Invite links remain valid for seven days, giving a new team member more time to accept.
People Review shows ratings for reviews credited to each person. Reviews displays the average star rating and review count, such as 4.6 stars from 7 reviews.
Print disciplinary forms in Spanish. The printed write-up follows the manager's language setting.
Documents are organized in folders on the employee's record, and each file has its own audience.
LearnConsole
WashConsole Learn
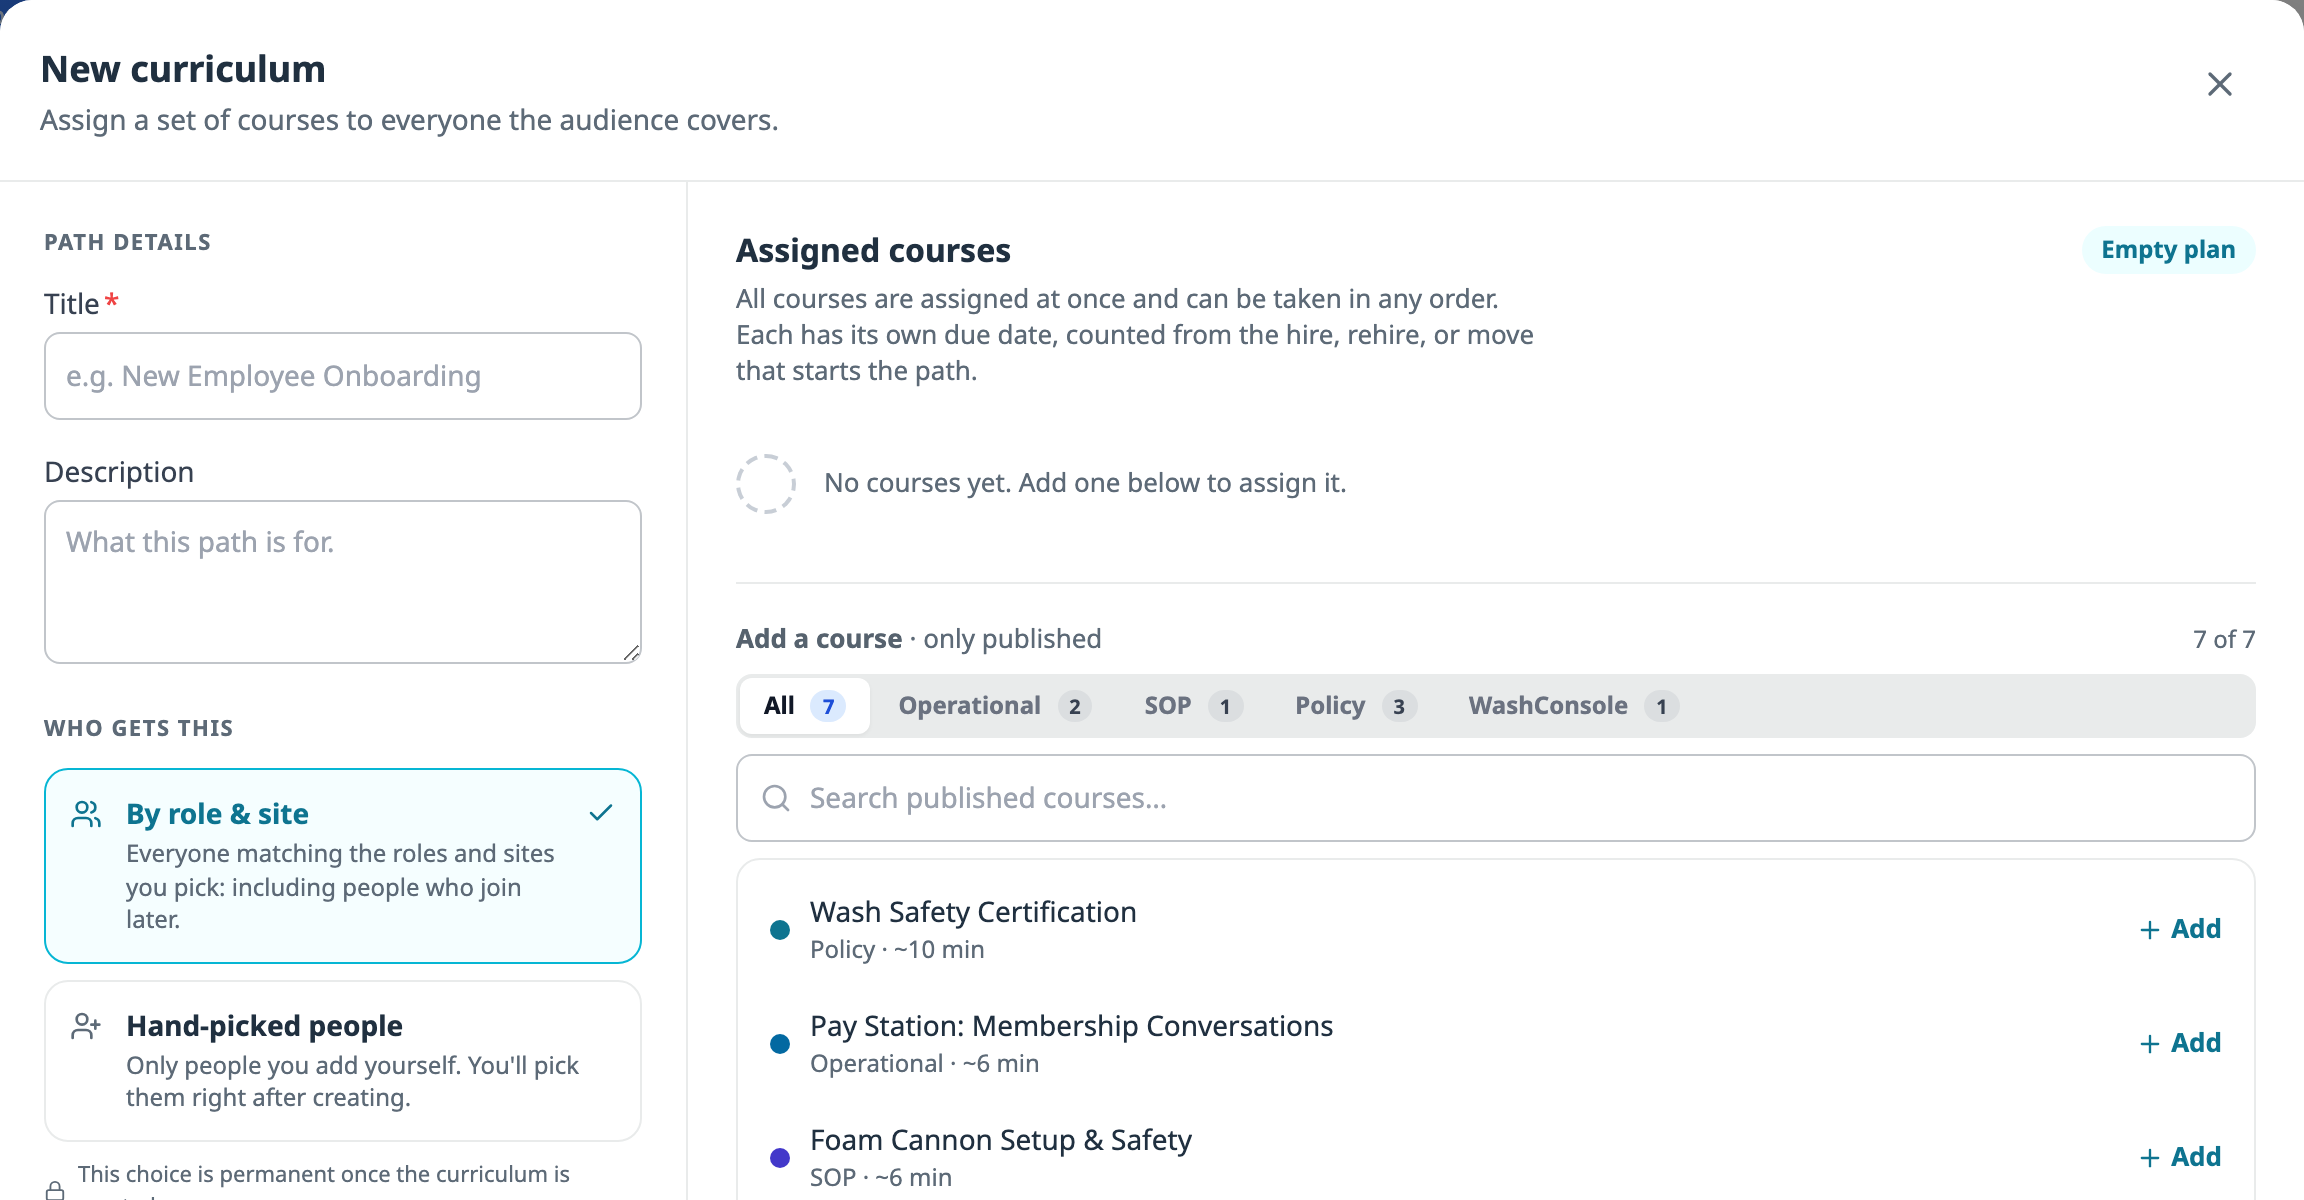
Choose Who gets this when you create the curriculum; the enrollment method cannot be changed later.
Add your company branding to training. In WashConsole Learn's Settings, owners can set a logo and two brand colors for course cards, the course player, certificates and sign-off records. Individual courses can use their own branding or credit a vendor sponsor. Branding setup is available on the web.
Ask learners to identify something in a photo. For a Hotspot question, the author marks the correct area and the learner selects a spot on the image. Practice questions provide immediate feedback, and quiz answers are graded when the attempt is submitted. Hotspot questions work on desktop and mobile web, the kiosk and the iPhone app.
Choose how a curriculum enrolls people. By role & site enrolls people who match the selected roles and sites, including future hires. Hand-picked people enrolls only the people you add. Choose the method when creating the curriculum.
Limit a course to selected roles. People outside those roles cannot open its lesson content. The account owner retains access.
Filter training by site. The course library has a site filter, and the Certificates page follows the selected site on the web and iPhone app.
Read one course section at a time on the web and iPhone app.
ChatConsole
Messages
Reactions and notification settings update on screen when you change them. During a slow send, Messages keeps your draft and selected photos. The message box fits the visible screen, with larger controls for tapping. These changes apply to the web and iPhone app.
See unread counts on the iPhone. The app icon and Chat tab display unread message counts. Notifications settings include a badge switch for that device and a link to the iPhone's notification permission settings.
Start a conversation with people at the selected site. The conversation picker uses that site's team members.
TeamConsole
Kiosk
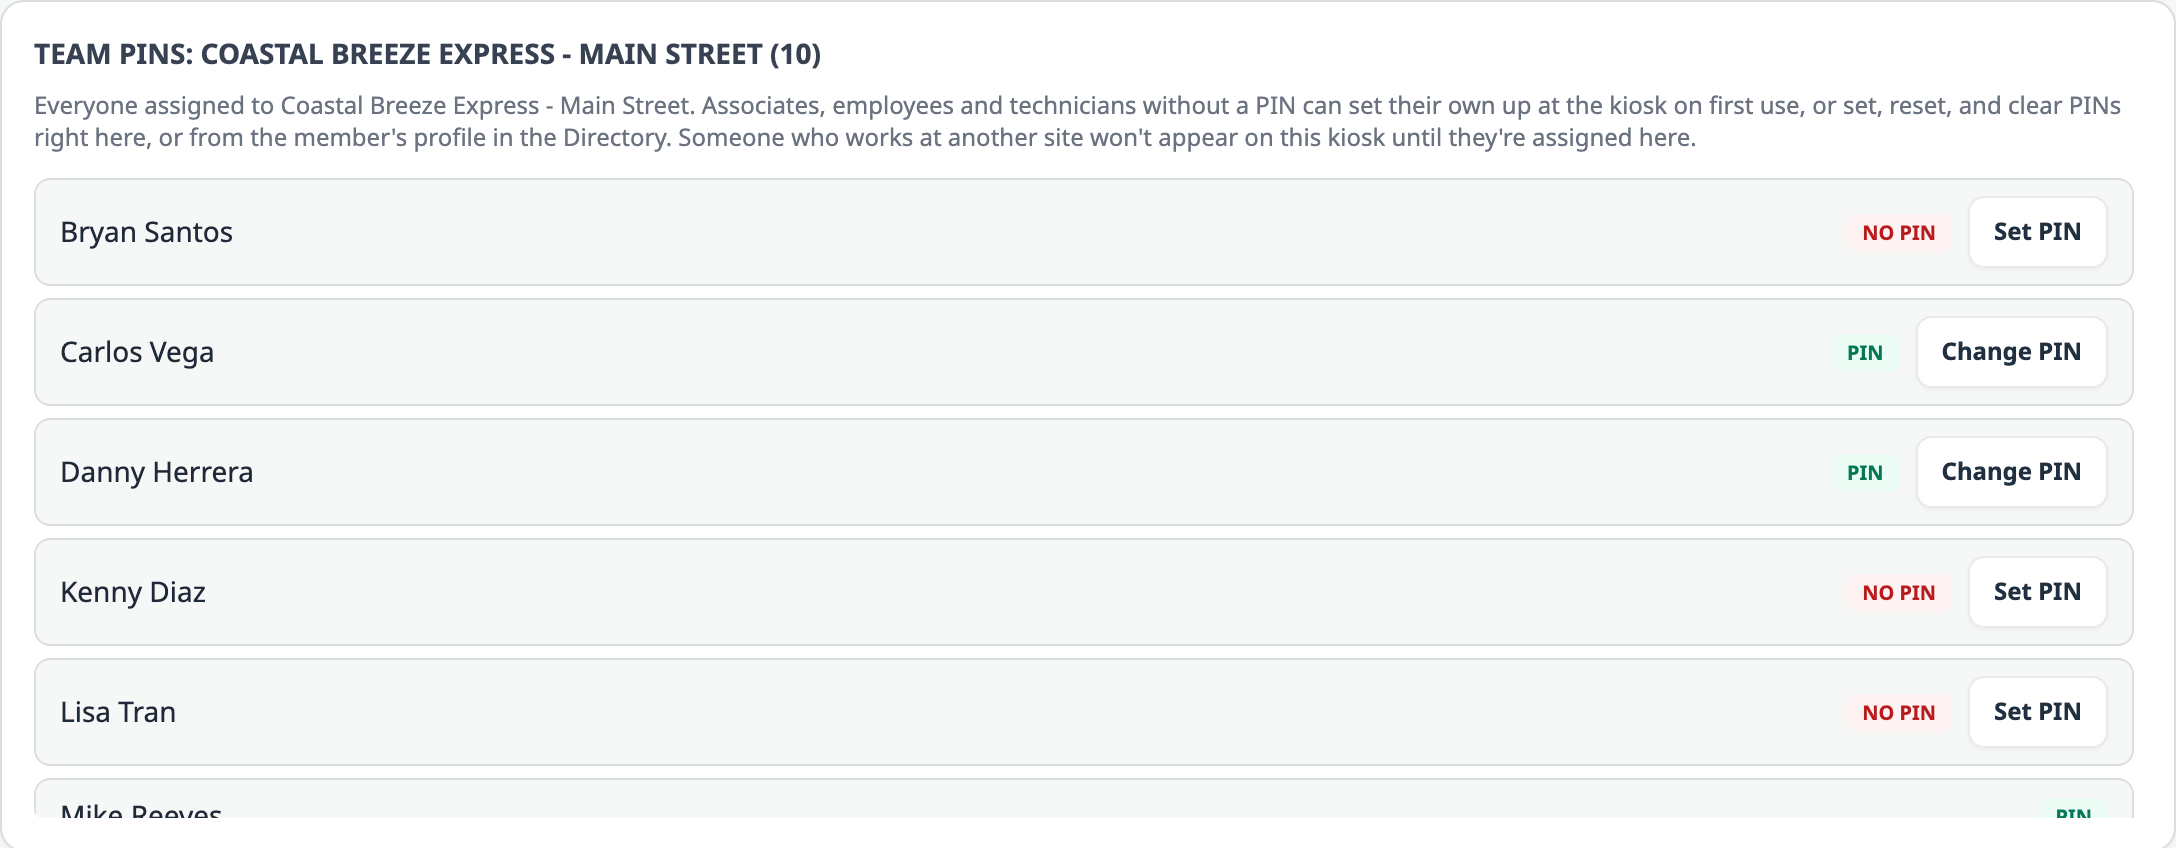
Team PINs on the Kiosk page lists eligible team members assigned to the selected site.
An accepted PIN no longer sends a worker back to the name list. These fixes cover browser-based kiosks and iPads.
The kiosk explains when a worker needs a manager's help. If a PIN is correct but the person belongs to another site or has incomplete setup, the message directs them to a manager. The keypad also shows when a tap registers, and an incorrect PIN message no longer moves the layout.
Manage PINs for the selected site. Team PINs on the Kiosk page lists people assigned to that site who are eligible for kiosk sign-in.
WashConsole is alerted to inactive tablets. Connected kiosks at enabled sites are flagged when they have not checked in for more than 24 hours, so WashConsole can follow up.
Sensors
Sensors
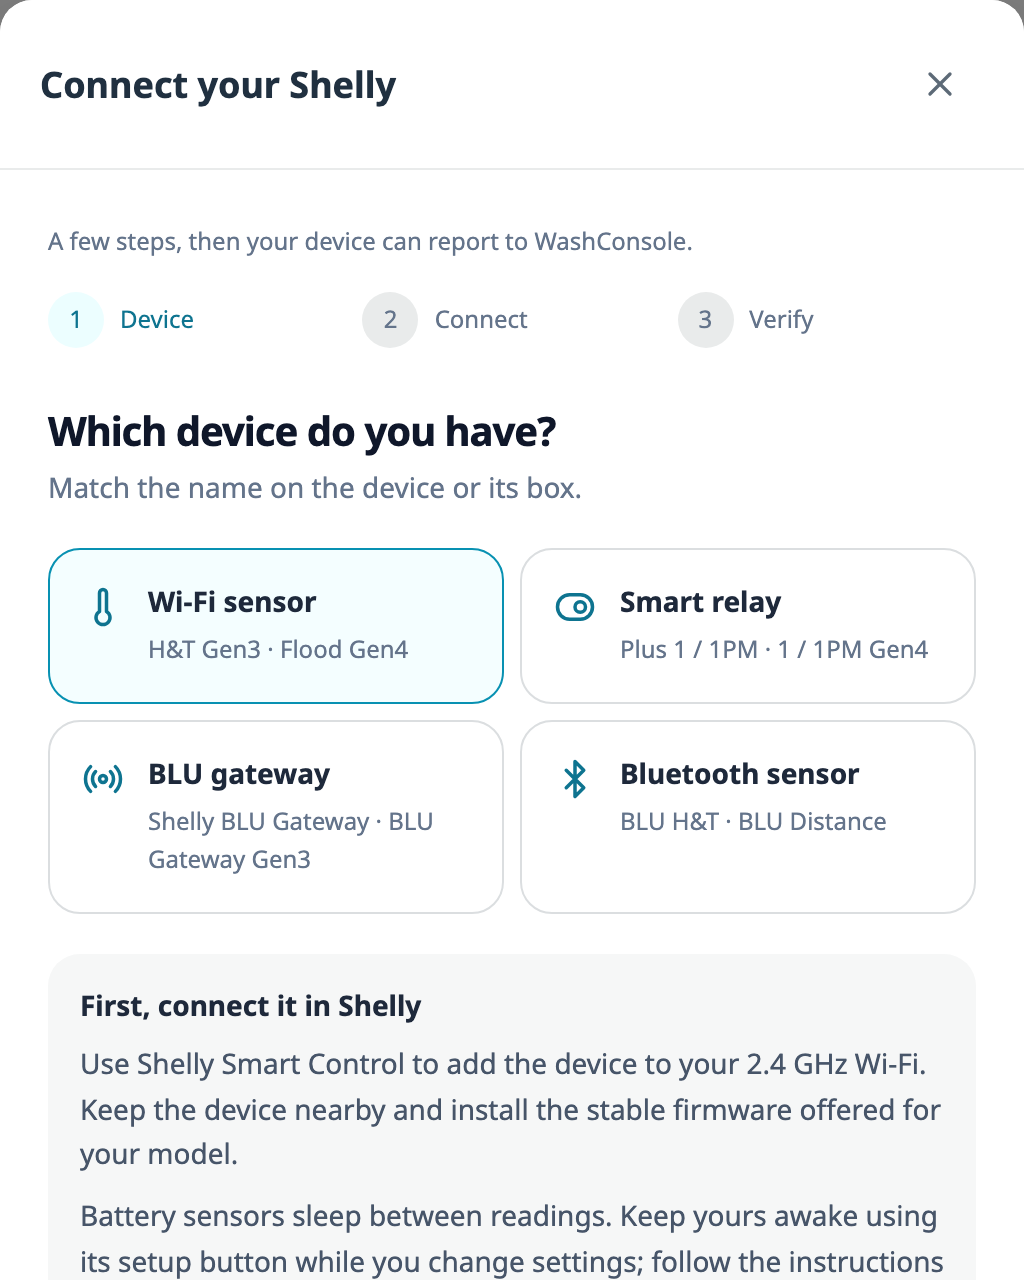
Connect your Shelly starts by asking which device you have.
Connect your Shelly guides device setup. On the web and iPhone app, choose the device type and follow the connection steps. Verify checks that the device is reporting before you assign it. A device cannot pass verification if it is offline, has no recent valid reading or belongs to another account.
iOS 5.0
WashConsole for iPhone
Liquid Glass styling applies to floating controls on iOS 26. The tab bar, toolbars, buttons and brief status messages use glass effects, while content keeps a solid background. The glass effects require iOS 26.
The iPhone app includes more of the features described above. These include unread badges, ALL SITES hours, the chemicals table, Job Title editing and the new Add choices in To-Do. Consoles also show pending-work counts before you open them.
Platform
Across the App
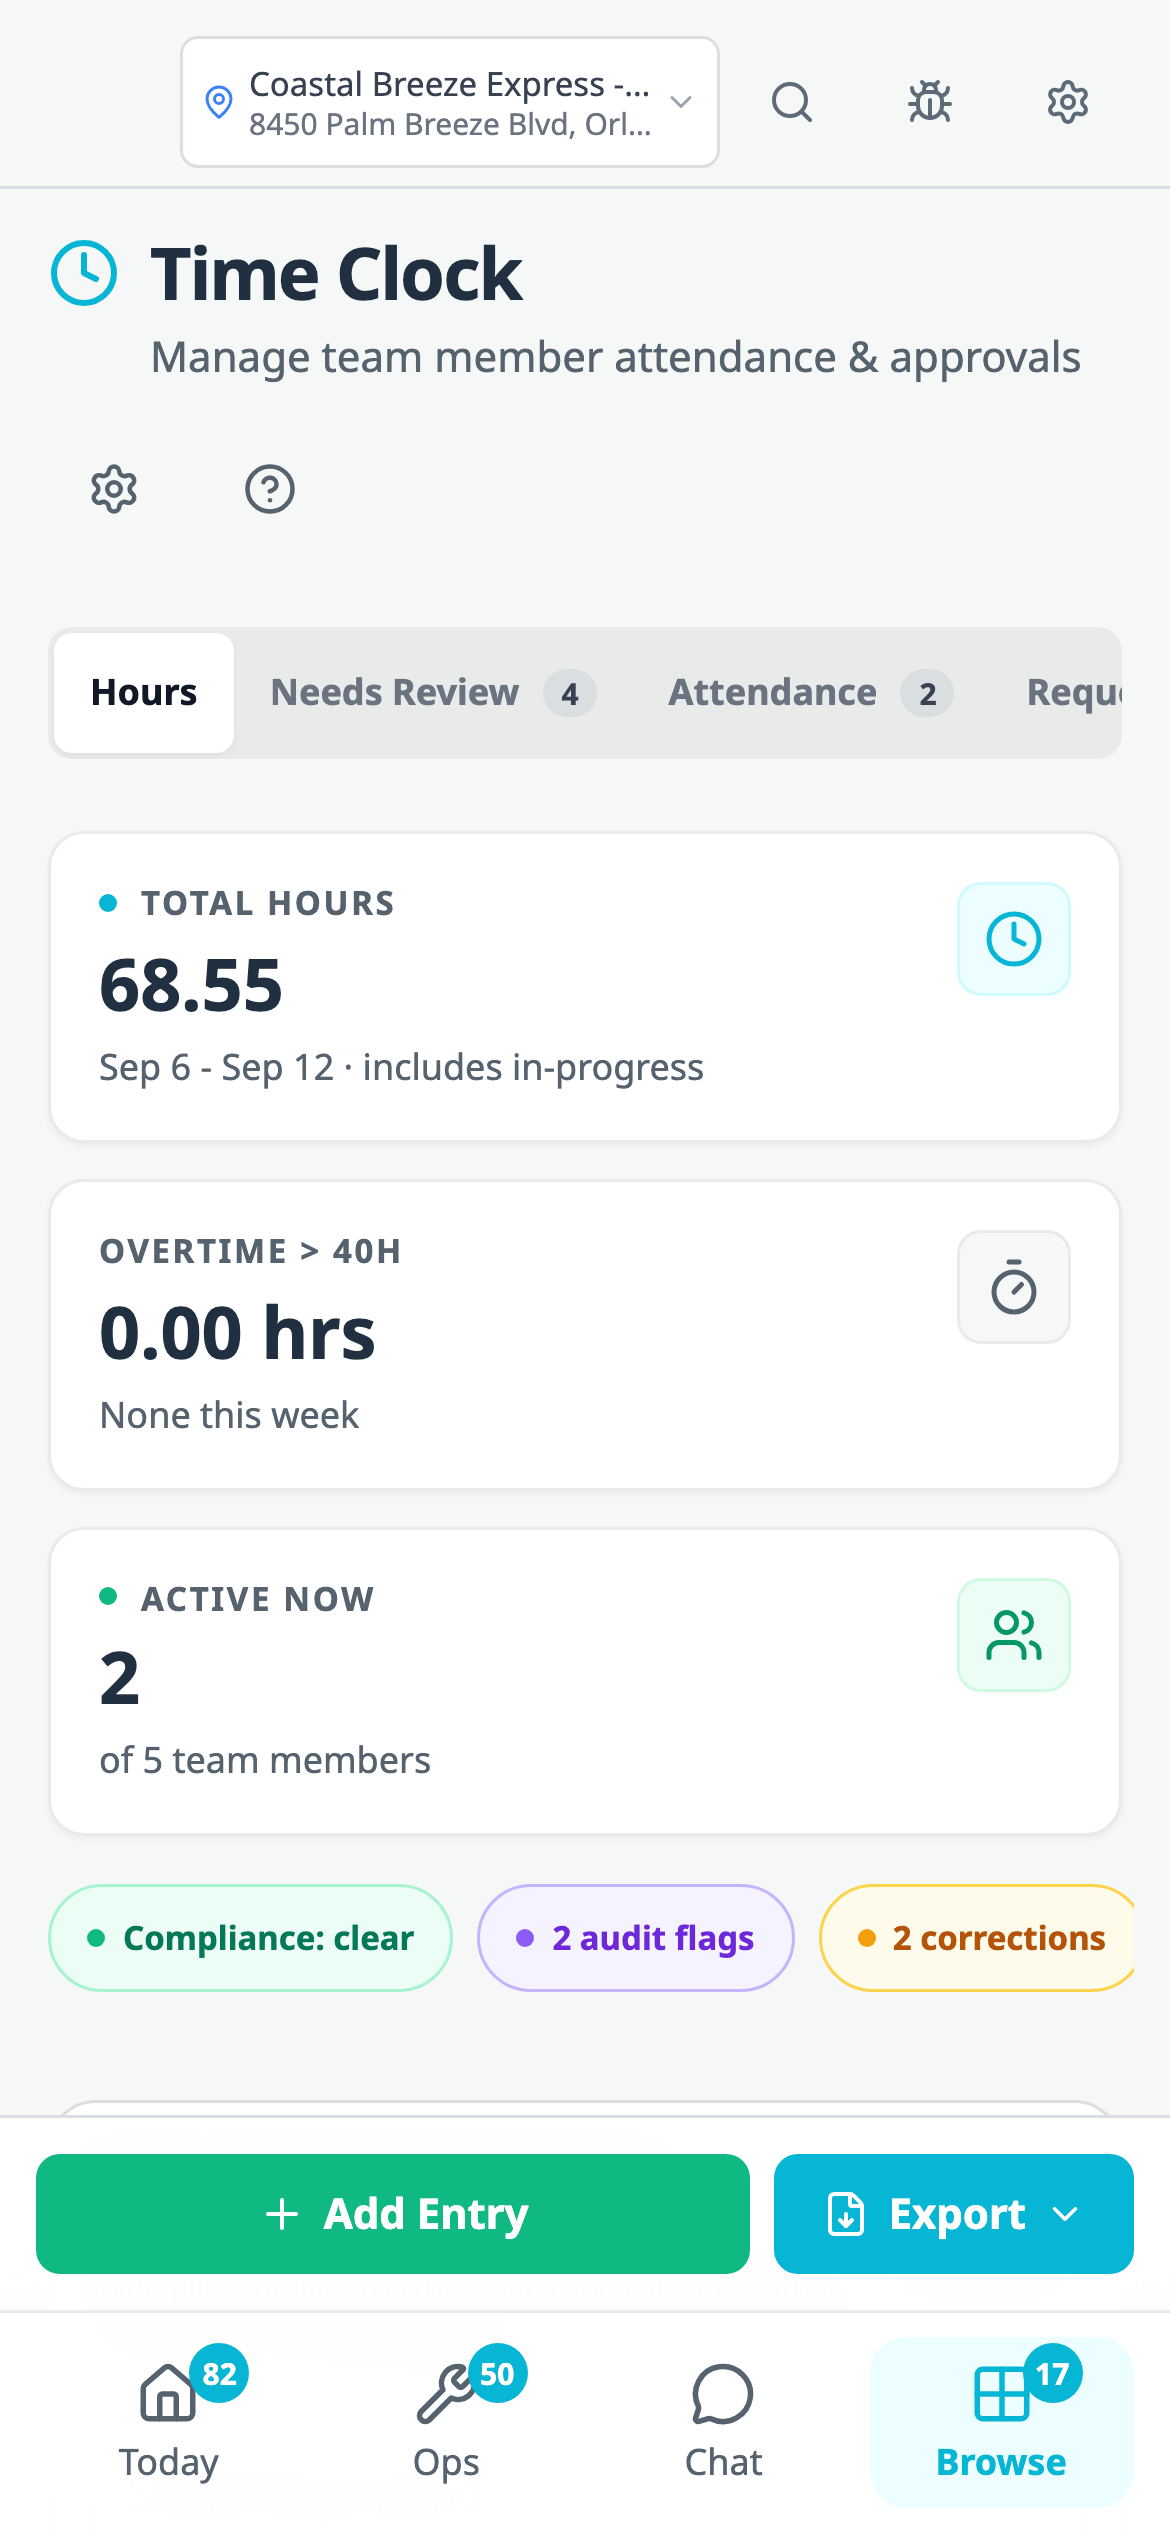
Time Clock in a phone browser uses a compact header and bottom navigation.
Mobile web navigation fits a phone screen. A compact header leaves more room for the page, and the bottom bar provides Today, Ops, Chat and Browse. Forms and dialogs are sized for a phone.
Find account tools on Settings. Owners can open Manage Subscription and Manage Billing & Plan there. The page also provides Integrations, Knowledge Center and Sensor Store cards. The account menu contains Settings, Report a Bug and Sign Out.
Older tabs no longer switch the account after a new sign-in. Signing in on one tab keeps that session when another tab was previously signed out.
WashBot answers general questions again, not only ones covered by the help articles. It still does not give safety advice, security guidance or answers about payroll and compensation.
More app text is available in Spanish. Updates include the Directory relationship picker, team member form, To-Do Undo buttons and training text.
For iPhone features, install the latest available WashConsole app update.
Owners can change kiosk requirements and turn on Managers clock in and out in Time Clock Settings, under Clock-in access.